
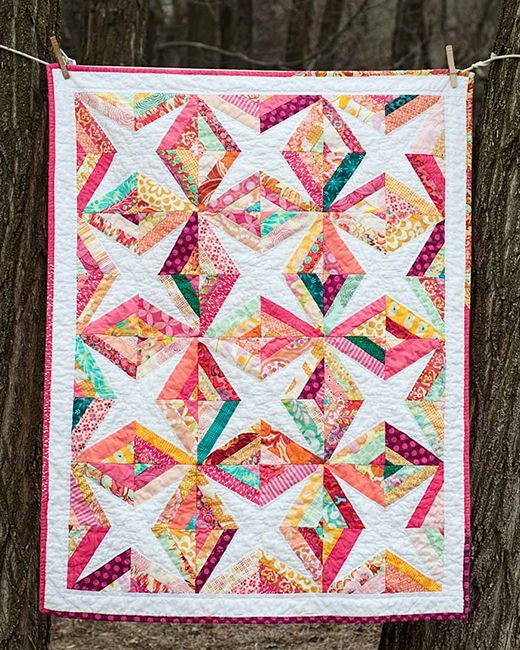
The Giant Dahlia Quilt is a showstopping pattern that has stood the test of time in the world of quilting. This beautiful and intricate design, inspired by the graceful petals of a blooming dahlia flower, continues to captivate quilting enthusiasts of all levels. Whether you’re an experienced quilter or someone just beginning your sewing journey, creating a Giant Dahlia Quilt can be a truly rewarding experience.
One of the most distinguishing features of the Giant Dahlia Quilt is its circular, radiating pattern. With its sweeping curves and bold visual impact, this quilt becomes the centerpiece of any room. While it may look complicated at first glance, many quilters find the process meditative and enjoyable once they break it down into manageable steps. This pattern challenges your precision and creativity, making it a favorite for those who love to play with color and symmetry.
This article will guide you through the fascinating process of making a Giant Dahlia Quilt, from choosing the right fabrics and preparing your templates to piecing and finishing the quilt. You’ll also find tips and ideas to customize your version of this timeless pattern, allowing you to express your personal style with confidence.

1. Understanding the Giant Dahlia Quilt Design
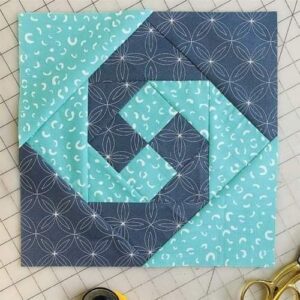
The Giant Dahlia Quilt pattern is recognized by its large, round motif that mimics the layered petals of a dahlia flower. Traditionally, this design is pieced using a series of curved wedges that, when assembled, form a perfect circle or semi-circle. The dramatic geometry of the quilt creates a stunning effect, especially when contrasting fabrics are used for each petal segment.
Creating the design starts with a careful selection of fabrics. Most quilters recommend choosing eight to twelve different fabrics in complementary tones. You can go bold with vibrant colors or keep it classic with soft pastels. The right fabric selection can bring your Giant Dahlia Quilt to life and enhance the illusion of depth and movement in the pattern.
Template preparation is the foundation of this quilt. Because of the complex curves in the design, accuracy in cutting and piecing is crucial. Using plastic or cardboard templates, you’ll trace and cut your fabric pieces with precision. Many quilting enthusiasts find this part enjoyable, as it sets the tone for the entire project.
Piecing the segments involves sewing together individual arcs that gradually expand to form the full flower. This part can be challenging but also satisfying as you watch the quilt take shape. Patience and careful pinning help ensure the curves align beautifully. For beginners, hand basting the seams before sewing may offer extra control.
The center of the dahlia can be a great place for personalization. Some quilters add embroidery, applique, or even fussy-cut motifs to give it a unique flair. This central piece acts as the focal point and ties together the petal arrangement around it.
When laid out on a background fabric, the Giant Dahlia Quilt becomes truly striking. Whether you’re making a full-sized quilt, a wall hanging, or a decorative throw, this design elevates the aesthetic of any space and showcases your quilting skills in the most elegant way.
2. Fabric and Color Choices That Make an Impact
Choosing the right fabrics is essential for creating a visually balanced and harmonious Giant Dahlia Quilt. The selection process should begin with a color palette that reflects your personal taste or the mood you want to set. Traditional dahlia quilts often use gradients of one color or a spectrum of shades that transition smoothly from petal to petal.
You can explore seasonal color themes, such as warm autumn hues or fresh spring pastels, to give your quilt a specific vibe. Bright batiks and solid cottons are also great choices, as they emphasize the clean lines and structure of the petal shapes. Mixing prints with solids adds depth and keeps the eye moving across the quilt.
Fabric texture is another consideration. Stick to quilting-weight cottons for ease of use, but don’t shy away from incorporating a special print or a subtle metallic sheen in the center for added drama. Make sure all fabrics are prewashed to avoid shrinkage or color bleeding later.
Planning the layout before sewing is a smart move. Arrange your fabric pieces in order on a design wall or large surface to ensure the transitions feel natural and appealing. This step allows for last-minute adjustments and helps you visualize the final look.
If you’re feeling adventurous, you can experiment with a monochrome design using different textures or shades of a single color. This approach often results in a more modern, minimalistic interpretation of the traditional Giant Dahlia Quilt.
Whatever route you choose, remember that balance is key. Aim for a mix of light, medium, and dark tones to add contrast and keep the flower from looking flat. A thoughtful combination of fabrics will elevate your Giant Dahlia Quilt from beautiful to breathtaking.
3. Assembling and Piecing the Giant Dahlia
Now comes the exciting part—assembling your Giant Dahlia Quilt. Start by organizing your petal pieces into groups. Labeling them with numbers or letters can help maintain the correct sequence as you sew. Begin piecing the smaller arcs and work outward, aligning the curved edges with pins and easing the fabric as needed.
Curved seams can be tricky, especially for beginners. Use lots of pins and consider sewing slowly or with a walking foot to help manage the fabric. Finger-press each seam as you go and use a steam iron to set the curves without stretching the fabric. Patience is vital at this stage.
After constructing several petal wedges, you’ll begin to see the circular flower form. Keep the overall alignment in check by frequently laying the quilt out on a flat surface. Adjust as needed to maintain symmetry and avoid distortion.
Once the full dahlia is complete, it’s time to add it to the background. This step often involves appliqueing the circular motif onto a large square of background fabric. You can use machine applique, hand stitching, or even fusible techniques depending on your preference and skill level.
Some quilters choose to add a border or frame around the dahlia to highlight its shape or to expand the size of the quilt. Consider adding cornerstones, sashing, or even pieced borders for a more intricate finish.
Finally, prepare the quilt top for layering and quilting. Smooth it out on top of the batting and backing fabric, ensuring everything is aligned and wrinkle-free. Baste the layers together using safety pins or basting spray so you’re ready to begin quilting.
4. Quilting and Finishing Touches
Quilting your Giant Dahlia Quilt adds texture and dimension to the already dynamic design. You can choose to follow the natural lines of the petals with echo quilting or go for a more artistic free-motion quilting approach. Both techniques will enhance the beauty of the quilt without overpowering the pattern.
Stitch-in-the-ditch quilting is a great option for beginners. It involves sewing along the seams where the petals meet, giving the quilt structure while allowing the fabric choices to shine. More advanced quilters may opt for feather motifs or swirling patterns to mimic the movement of real flower petals.
The background area offers a chance to play creatively. You can quilt in a grid, create waves, or use motifs like vines and leaves that complement the floral theme. This contrast between the busy center and the calm background adds visual interest and helps the dahlia pop.
Once quilting is done, trim the edges and prepare the binding. You can use a simple solid color for a clean edge or coordinate it with the fabric used in your petals. Binding can be machine-stitched for durability or hand-finished for a more refined look.
Adding a label to your Giant Dahlia Quilt is a wonderful final step. Include your name, the date, and maybe a short note or quote. It adds a personal touch and creates a keepsake for future generations.
Now, your Giant Dahlia Quilt is ready to be displayed, gifted, or treasured as part of your home. It’s not just a quilt—it’s a celebration of creativity, patience, and timeless design.
FAQ – Giant Dahlia Quilt
What is a Giant Dahlia Quilt?
A Giant Dahlia Quilt is a traditional quilt pattern featuring a large circular floral motif that resembles the petals of a dahlia flower. It’s made from curved fabric segments arranged in a radiating design.
Is the Giant Dahlia Quilt suitable for beginners?
While the curves may seem challenging at first, with careful pinning and patience, beginners can successfully complete a Giant Dahlia Quilt. Starting with a small version is often a good idea.
What fabrics work best for a Giant Dahlia Quilt?
Quilting cotton is ideal. Choose a range of light to dark fabrics in complementary colors to highlight the petal shapes and create depth in the design.
How big is a standard Giant Dahlia Quilt?
The size can vary depending on how many petal arcs you include. It can range from a wall hanging (around 36″) to a full-size bed quilt (over 80″).
Can I machine quilt a Giant Dahlia Quilt?
Yes, many quilters choose to use their domestic sewing machines for quilting. Just take your time and use quilting gloves or a walking foot to help manage the layers.
Is it necessary to use templates for this quilt?
Yes, templates are essential for cutting the curved pieces accurately. Many patterns come with printable templates, or you can create your own from cardboard or template plastic.
Creating a Giant Dahlia Quilt is a fulfilling and artistic journey that allows quilters to explore color, geometry, and technique in one stunning project. From selecting vibrant fabrics to piecing precise curves and finally quilting with care, every step in this process brings joy and creativity. The result is a timeless, elegant quilt that can be treasured for years to come.
If this guide helped you understand the beauty and process of making a Giant Dahlia Quilt, we’d love to hear from you! Share your thoughts, experiences, or suggestions below. Your feedback helps make this creative space even more inspiring for fellow quilters.

