
Lucivania Table Runner – Complete Step-by-Step Guide

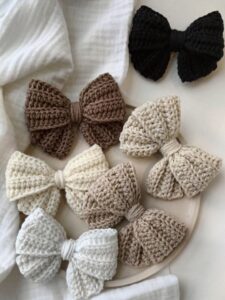
If you’re searching for a creative and charming way to personalize your look, Bow Hairclip Crochet How to Crochet Hair Accessories is a delightful project that combines style with handmade charm. Whether you’re a beginner in the world of crochet or a seasoned artisan, crafting bow hairclips allows you to use small yarn scraps, express your creativity, and even create heartfelt gifts. These crochet accessories are not only fashionable but also functional and eco-friendly.
Learning how to crochet hair accessories opens up a world of design possibilities. You can create pieces that match specific outfits, reflect the seasons, or serve as adorable accents for special occasions. Hair accessories like bow clips are popular because they’re small, quick to make, and offer a satisfying project that you can complete in under an hour. Best of all, they suit people of all ages, from toddlers to adults.
This guide focuses on the step-by-step method for crafting a bow hairclip crochet piece, with a strong emphasis on essential materials, beginner-friendly stitches, styling tips, and customization ideas. By using recommended crochet techniques for hair accessories, you can master the art of handmade beauty that looks both polished and playful.
Before starting your bow hairclip crochet project, it’s important to gather the right tools and materials. The items needed are minimal, which makes this a perfect low-cost and low-commitment craft for anyone interested in learning how to crochet hair accessories.
Start with choosing your yarn. For bow hairclips, cotton or acrylic yarn in a light or medium weight is ideal. Cotton gives a more structured finish while acrylic allows for softer, puffier bows. Select colors that either pop or coordinate with your wardrobe.
Next, you’ll need a crochet hook that corresponds with your yarn weight. Typically, a 3.5 mm to 4.5 mm hook works well for this type of project. Be sure to check your yarn label for hook recommendations if you’re unsure.
You’ll also require hair clips—such as alligator clips, snap clips, or bobby pins—onto which you will attach your crocheted bows. Hot glue or craft glue is commonly used to fix the bow onto the clip once finished.
A yarn needle is useful for weaving in ends and assembling the bow. Sharp scissors will help you trim the yarn cleanly, giving your final piece a professional finish.
Optional accessories include decorative buttons, beads, or lace, which you can sew onto the bow center for added charm. These extras turn your bow hairclip crochet into something truly personalized.
With these supplies in hand, you’re ready to start crocheting. It’s always a good idea to prepare your workspace with good lighting and a flat surface to work on for comfort and precision.
Crafting a basic bow hairclip crochet is simple once you understand the structure. Most bows are made by crocheting a rectangular swatch and then cinching the center to form the bow shape.
Begin by creating a foundation chain with about 15 to 20 stitches, depending on how large you want your bow to be. The number of chains determines the bow’s width.
Work single crochet stitches across each row until you have a rectangle about 5 to 8 rows tall. This creates the body of the bow. You can use other stitches like half-double crochet for a slightly more textured look.
Once your rectangle is finished, fasten off and leave a long tail. Fold or pinch the rectangle in the center and use the yarn tail to wrap tightly around the middle, creating that iconic bow shape.
Tie the yarn securely at the back and use a yarn needle to weave in any remaining ends. This forms a clean and durable finish for your bow hairclip crochet piece.
Using glue or needle and thread, attach your finished bow to a hair clip. Be sure to press down firmly and let the glue dry fully before use.
You now have a beautifully crocheted bow ready to wear or gift. Practice a few times, and you’ll be able to complete a hair accessory in 20 minutes or less!
A major benefit of learning how to crochet hair accessories is the freedom to style them your way. A simple bow can become an elegant embellishment or a fun accent depending on your color and decoration choices.
For a formal look, choose neutral colors like black, white, or cream and add a pearl or rhinestone to the center of the bow. This makes it suitable for weddings or holiday events.
For a playful look, go for bright, bold colors and layer multiple bows together. Using variegated yarn can also give your bows a gradient or multicolor effect without changing yarns.
You can easily adjust the size of your bow by increasing or decreasing the number of foundation chains and rows. Smaller bows are great for babies or subtle accents, while larger bows make bold fashion statements.
Seasonal customization is also fun. Use red and green for Christmas bows, pastels for Easter, or oranges and browns for fall-themed accessories. Add tiny appliqués like flowers, pumpkins, or snowflakes for extra detail.
For younger children, secure the bow on soft elastic headbands instead of clips for a more comfortable wear. This is especially popular for baby photo shoots or birthday outfits.
Your bow hairclip crochet projects can also double as decorations. Attach them to gift wrap, bags, or even use them as brooches by sewing a pin to the back.
Once you’ve mastered how to crochet hair accessories, you might consider gifting or selling your creations. Handmade items always carry a special, personal touch, and bow hairclips are universally appealing.
When gifting, think about the recipient’s style and favorite colors. Personalizing a bow with initials or themed embellishments makes it even more special. Handmade gifts often become keepsakes.
To sell, package your bows nicely—consider using cardstock backing with your name or brand printed on it. Clear, professional photos of your work can help them sell better if you’re offering them online.
Pricing your crochet items can be tricky. Take into account the cost of your materials and time. Since bow hairclip crochet pieces are small and quick, they are great as part of bundles or value sets.
Be sure to follow safety guidelines if you’re selling for babies or toddlers. Make sure everything is securely attached, and use non-toxic materials.
Craft fairs, social media, and handmade marketplaces are great venues for selling your crochet hair accessories. Many crafters have turned small projects like these into thriving businesses.
Finally, always be open to feedback. Whether gifting or selling, listening to suggestions helps you improve your designs and connect more meaningfully with others through your craft.
What is the best yarn for bow hairclip crochet projects?
Cotton and acrylic yarns are best for bow hairclip crochet. Cotton offers a more structured look, while acrylic provides a softer finish. Both are easy to work with and come in various colors.
Do I need to be an expert in crochet to make hair accessories?
Not at all! These are beginner-friendly projects. If you can chain and do basic stitches like single crochet, you can successfully make beautiful bow hairclips.
How do I attach the bow to the hair clip securely?
You can use hot glue, craft glue, or even sew the bow onto the clip using a needle and thread. Make sure the glue is dry and secure before wearing.
Can I wash crochet hair accessories?
Yes, but hand washing is recommended. Use mild soap and cold water. Avoid wringing them out; instead, press gently and let air dry.
Are bow hairclips safe for babies?
Yes, as long as they’re made with soft, safe materials and the embellishments are securely fastened. Avoid small parts that could be a choking hazard.
Can I sell my crochet bow hairclips?
Absolutely! These accessories are popular at craft fairs and online shops. Just ensure quality, safety, and good presentation to appeal to buyers.
Crocheting your own bow hairclip crochet how to crochet hair accessories is a rewarding, creative, and fun experience. With just a few materials and basic stitches, you can craft personalized accessories that express your unique style. From everyday wear to special events, these little bows add a handmade touch that’s both stylish and thoughtful.
We hope this guide has helped you feel confident in getting started with bow hairclip crochet. If you have any suggestions, questions, or would like to share your finished creations, we’d love to hear from you! Your feedback helps us create even more helpful and inspiring tutorials.