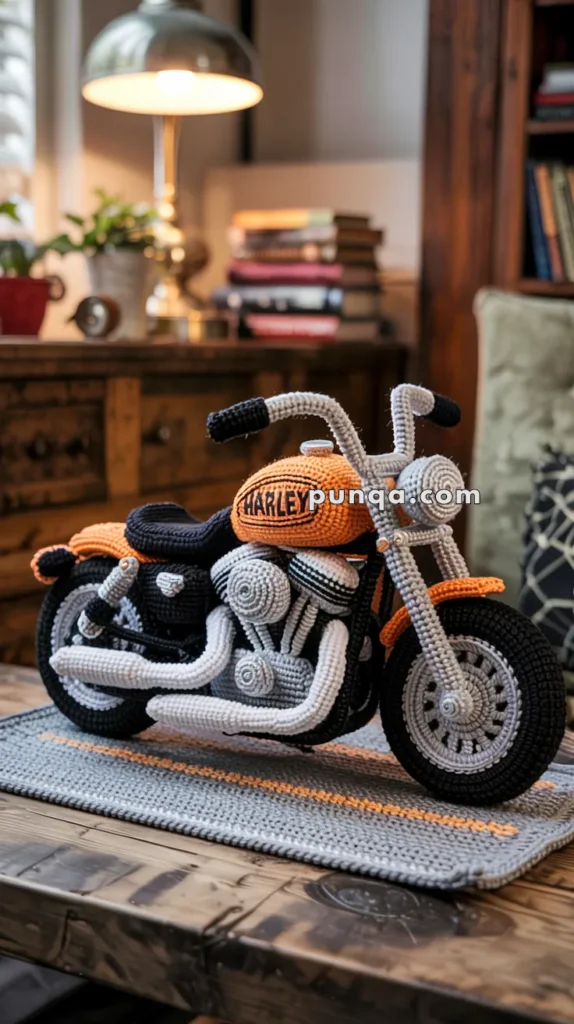
Amigurumi Harley Deividson Motorcycle-free crochet pattern

If you’re looking for a fun and charming project, the AMIGURUMI GIAN THE FROG FREE PATTERN is an ideal way to combine your love for crochet and handmade toys. This delightful frog is a great choice for beginners and experienced crafters alike. Whether you’re creating a gift for a child, decorating a nursery, or adding to your amigurumi collection, this pattern offers a playful and rewarding experience.
The charm of AMIGURUMI GIAN THE FROG FREE PATTERN lies in its simplicity and character. Gian the Frog isn’t just a toy; he’s a handmade companion with personality. With just a few basic stitches, you’ll bring Gian to life, giving him big expressive eyes, a gentle smile, and those adorable froggy limbs that make everyone fall in love.
Using this AMIGURUMI GIAN THE FROG FREE PATTERN also opens the door to creative freedom. You can play with colors, add accessories, or even modify the size depending on your yarn and hook. This pattern is more than instructions; it’s an opportunity to personalize a beloved character with your own handmade touch.

Before diving into the specifics of the AMIGURUMI GIAN THE FROG FREE PATTERN, it’s important to get familiar with some core amigurumi concepts. Amigurumi is a Japanese art form of crocheting small stuffed creatures. It typically uses single crochet stitches, continuous rounds, and tightly packed stuffing to create detailed characters.
Start by choosing the right yarn. For Gian, a soft, worsted-weight cotton or acrylic yarn works beautifully. Choose a vibrant green for his body and white or black for the eyes. Cotton yarn helps maintain shape and gives a clean stitch definition, making Gian’s features pop.
Next, use a smaller crochet hook than normally recommended for your yarn. This creates tight stitches, which prevents stuffing from poking through. For worsted yarn, a 3.0mm to 3.5mm hook is ideal. Remember, tension matters a lot in amigurumi—keep your stitches uniform.
You’ll also need safety eyes, fiberfill stuffing, and a yarn needle. Safety eyes add that professional finish, but you can also embroider the eyes if you prefer a softer or baby-safe version. Fiberfill should be packed firmly but evenly to shape Gian nicely.
The AMIGURUMI GIAN THE FROG FREE PATTERN is usually worked in a spiral, so use a stitch marker to track the beginning of your rounds. This avoids confusion and ensures even shaping. Counting is essential—so don’t skip this small but vital step.
Finally, be patient. Amigurumi is detailed work, but it’s also therapeutic. Don’t rush. Enjoy watching Gian take shape stitch by stitch. If something doesn’t look right, don’t be afraid to unravel and try again. That’s the beauty of crochet—every stitch can be redone.
The body and head are typically crocheted as a single continuous piece. This helps Gian look more cohesive and cuddly. Start with a magic ring and single crochet stitches. The body starts small and expands in width through a series of evenly spaced increases.
Once you’ve built up enough width for the frog’s round belly, you’ll maintain the stitch count for several rows. This forms the “torso” of Gian. Then, you’ll begin decreasing stitches symmetrically to close the body shape and form the base of the head.
As you reach the neck area, add a little less stuffing to keep that part flexible and more natural-looking. Then, begin increasing again for the head, following the AMIGURUMI GIAN THE FROG FREE PATTERN as it guides you through the exact stitch count.
The head is typically a larger sphere, giving Gian that lovable, cartoonish appeal. Continue increasing and stuffing gradually. You’ll want the head to be firm but not overfilled—this helps when attaching the eyes and giving Gian his expression.
Once you’ve reached the widest part of the head, begin decreasing again to close. Use your yarn needle to finish off neatly and invisibly. This neat closure gives a polished appearance to Gian’s adorable head.
Remember to stuff thoroughly before you finish off. Use the back of your crochet hook or a chopstick to press stuffing into all corners. A well-shaped body and head make a huge difference in the final look of Gian the Frog.
The limbs of Gian are crucial to his playful look. Each leg and arm is worked in the round, starting from the toes or fingers upward. These parts are typically smaller and quicker to finish but require precision to ensure symmetry.
For the legs, begin with a magic ring and increase gradually to form Gian’s adorable froggy toes. After a few rows, stop increasing and continue in single crochet for the length. Slight decreases toward the top make it easier to attach to the body.
Stuff the legs lightly so they remain floppy and flexible. This gives Gian his relaxed and huggable vibe. Once completed, sew them evenly on the lower part of the body. Positioning is key—pin them first if needed to ensure a balanced posture.
The arms follow a similar pattern, though they’re shorter and thinner than the legs. Begin with a ring, increase, then crochet in rounds to the desired length. These are usually not stuffed heavily, if at all, to keep them soft and movable.
The eyes are perhaps Gian’s most charming feature. Use white yarn to create round eyeballs and smaller black or brown pieces for pupils. You can also use safety eyes inserted into the white crochet piece. Attach them on top of the head for that classic amigurumi frog look.
Use a small amount of stuffing for the eyes to give them shape. Sew them securely, ensuring both are aligned properly. The positioning of the eyes can dramatically affect Gian’s personality—higher gives a curious look, while closer together creates a sweet, innocent vibe.
Once the main pieces are assembled, it’s time to bring Gian to life with some finishing touches. The first step is to sew all the parts together. Use the tail ends of your yarn and a sturdy yarn needle to attach each piece securely.
Take your time with placement. Use pins or stitch markers to test the positioning before sewing. This step ensures that your AMIGURUMI GIAN THE FROG FREE PATTERN comes out looking well-balanced and professional.
Next, embroider Gian’s smile using black or dark yarn. A simple curved line just below the eyes works beautifully. You can also add small blush circles on the cheeks using light pink yarn or even fabric paint for a cute detail.
Accessories are optional but fun. Add a tiny scarf, a crocheted flower, or a small backpack to personalize your Gian. This makes the project even more special, especially if you’re gifting it to someone.
Think about Gian’s character. Is he adventurous? Make him a tiny explorer hat. Is he gentle and shy? A pastel bowtie might suit him. That’s the beauty of the AMIGURUMI GIAN THE FROG FREE PATTERN—you can tell your own story through your creation.
Finally, give Gian a gentle squish to test his softness and structure. If needed, adjust stuffing or stitches. Once he’s done, admire your work and share it proudly. Handmade creations like Gian are not only crafts—they’re little pieces of joy.
1. Is the AMIGURUMI GIAN THE FROG FREE PATTERN suitable for beginners?
Yes! This pattern is beginner-friendly as it uses basic stitches like single crochet and involves simple shapes. It’s a great project for those new to amigurumi.
2. What kind of yarn should I use for Gian the Frog?
A worsted weight cotton or acrylic yarn works best. Cotton holds shape well and gives a neat finish, making it perfect for detailed work like this.
3. Can I make Gian the Frog larger or smaller?
Absolutely. Simply change your yarn weight and hook size. Thicker yarn and larger hooks will produce a bigger frog, while thinner yarns make a miniature version.
4. Are safety eyes safe for all ages?
Safety eyes are not recommended for children under 3. If making Gian for a baby or toddler, embroider the eyes instead to avoid choking hazards.
5. How long does it take to make Gian the Frog?
Depending on your experience level, Gian can be completed in a few evenings or over a weekend. The project is engaging without being too time-consuming.
6. Can I sell the Gian the Frog I make?
If the pattern creator allows it, selling your finished frogs is usually fine with credit given for the pattern. Always respect pattern licensing terms.
7. How do I keep the stitches tight enough?
Use a smaller hook than usual and keep your tension firm. Practice makes perfect—aim for stitches that are close together to hold stuffing well.
The AMIGURUMI GIAN THE FROG FREE PATTERN is a joyful, beginner-friendly project that offers endless possibilities for creativity and personalization. From learning amigurumi basics to adding your own charming touches, Gian is more than just a crochet toy—he’s a handmade companion with a story.
Whether you’re creating Gian as a gift, for fun, or to build your amigurumi skills, the process is filled with creativity and satisfaction. We hope this guide has helped you understand each step with clarity and confidence.
If you’ve enjoyed this tutorial, please leave your honest feedback and share any suggestions or experiences you had while making Gian the Frog. Your opinion helps improve future patterns and inspires fellow crafters in the community!

