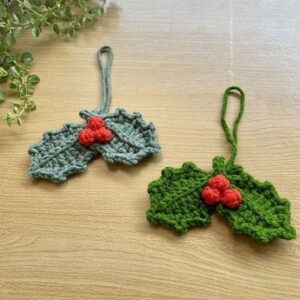
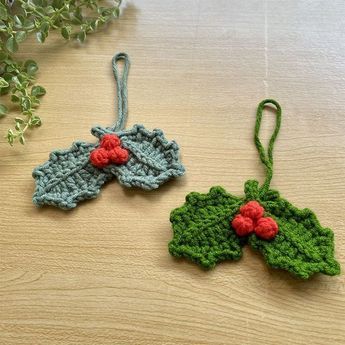
How to Crochet Christmas Holly Leaf is a delightful seasonal project that brings festive charm to any handmade decoration. Whether you’re a beginner or an experienced crocheter, learning how to crochet Christmas holly leaf can add a special touch to your winter holiday crafts. From garlands to table centerpieces, these small yet beautiful leaves are versatile and full of Christmas spirit.
In this tutorial, you will not only learn how to crochet Christmas holly leaf step by step, but also discover helpful tips to ensure your work looks professional and lasts for many seasons. This project uses basic stitches and can be completed quickly, making it perfect for last-minute decorations or thoughtful handmade gifts.
Advertising
Before we get started with the pattern instructions, let’s talk about the importance of choosing the right materials, tools, and colors to make your crocheted Christmas holly leaf truly festive and eye-catching.
Image From Pinterest
1. Choosing Materials for Your Christmas Holly Leaf
To begin learning how to crochet Christmas holly leaf, it’s essential to gather the right materials. The quality and type of yarn, hook size, and even your choice of colors can influence how your finished leaf looks and feels.
First, consider using 100% cotton yarn in festive green shades for the leaves and red for the berries. Cotton yarn offers structure and durability, which is ideal for decorative pieces that need to hold their shape over time.
Second, a 3.5mm to 4mm crochet hook is typically the right size for making holly leaves. This range gives you good control and results in a crisp, neat finish. Make sure your hook size complements your yarn weight.
Advertising
Third, don’t forget the little extras! A yarn needle for weaving in ends, stitch markers if needed, and a pair of sharp scissors will make your crafting smoother and more enjoyable.
Fourth, if you plan to use your crocheted Christmas holly leaf as part of a garland, ornament, or wreath, consider adding felt backing or a bit of fabric stiffener to help the leaves maintain their shape.
Fifth, think about texture. While a basic yarn will get the job done, you might choose a textured or sparkly yarn for a more festive result. However, keep in mind that texture can make it harder to see your stitches.
Finally, always check your gauge if the final size of the leaf matters in your project. Consistency in your tension will ensure all your leaves look uniform, especially if you’re making multiple.
2. Step-by-Step Instructions to Crochet a Holly Leaf
Now that you have your materials ready, let’s dive into how to crochet Christmas holly leaf with a simple pattern that can be adjusted in size or style.
Begin with a slip knot and chain 10. This forms the base of your leaf. Work single crochet (sc), half-double crochet (hdc), and double crochet (dc) stitches along the chain to create a gradual increase in height that mimics a natural leaf shape.
Turn your work and crochet on the other side of the foundation chain using the same sequence in reverse. This creates a symmetrical leaf with a center vein.
To make the classic holly points, you’ll need to add picot stitches or small chain loops at strategic points on the edges of the leaf. These give it the distinctive serrated look.
Repeat the same pattern as many times as needed, and vary the starting chain (e.g., ch 12 or ch 8) to make larger or smaller leaves. This flexibility makes how to crochet Christmas holly leaf a great pattern to customize.
Add a final round of single crochet around the whole leaf for a neat border. This extra round helps to define the edges and ensures durability.
Finish by fastening off the yarn and weaving in all loose ends securely. For extra detail, use red yarn or small beads to create berries and sew them near the base of the leaf.
3. Creative Ways to Use Your Crochet Holly Leaves
Once you’ve mastered how to crochet Christmas holly leaf, the creative possibilities are endless. These festive accents can be used in many unique and charming ways during the holiday season.
First, attach your leaves and berries to a crocheted garland. This makes a wonderful decoration for your mantelpiece, doorway, or staircase. It’s a cozy, handmade alternative to traditional greenery.
Second, use your holly leaves to decorate wrapped gifts. A sprig of crocheted holly tied with ribbon gives any present a special, personalized touch.
Third, create napkin rings or table settings with small holly leaves and red yarn berries. They add a festive, crafty vibe to your Christmas dinner table and delight guests.
Fourth, incorporate your holly leaves into a Christmas wreath. Attach them with hot glue to a foam or wooden ring base along with other crocheted elements like stars, snowflakes, or bows.
Fifth, you can string the leaves together with yarn or twine and hang them as an ornament on your Christmas tree. They’re lightweight and kid-friendly, making them great for family-friendly crafts.
Sixth, consider making brooches or pins from your crochet leaves. Simply sew a safety pin or brooch backing onto the reverse side and wear your holiday spirit proudly on jackets, scarves, or bags.
4. Tips for Perfecting the Crochet Holly Leaf
Even if you’re new to learning how to crochet Christmas holly leaf, you can still create beautifully detailed pieces with a few practical tips to guide you.
First, always block your leaves after finishing them. Blocking helps them lie flat and enhances their shape. Use a damp cloth and gently press with a warm iron, or pin the leaves down and mist lightly with water.
Second, when using multiple colors like green and red, make sure to weave in your ends carefully so that they’re not visible from the front. Clean finishing makes your work look polished and professional.
Third, experiment with different yarn types. While cotton is best for structure, using metallic or sparkly yarns can give a glamorous twist to your project.
Fourth, practice your picot or point stitches on scrap yarn before incorporating them into the final leaf. These decorative edges can be tricky at first, but they’re essential for a realistic look.
Fifth, keep your stitches even and your tension consistent. Uneven stitches will affect the overall symmetry of the leaf, especially if you’re making multiples for a larger project.
Sixth, don’t be afraid to embellish. Tiny beads, sequins, or even embroidery thread can add dimension and detail to your crochet holly leaves, making them stand out even more.
– Frequently Asked Questions
Q1: Can beginners learn how to crochet Christmas holly leaf? Yes! The basic leaf pattern uses simple stitches like chain, single crochet, and double crochet. Even beginners can follow along with a bit of practice.
Q2: What is the best yarn to use for crocheting holly leaves? Cotton yarn is ideal because it holds shape well. However, acrylic or sparkly yarns can also be used for decorative variations.
Q3: How do I make the pointed edges on a holly leaf? The pointed edges are usually created using picot stitches or small chain loops. These are added to mimic the serrated look of real holly leaves.
Q4: Can I make the leaves in different sizes? Absolutely! You can change the size of the leaf by altering the starting chain length or using thicker/thinner yarn.
Q5: How do I attach berries to the holly leaf? You can crochet small red circles or use red beads, then sew or glue them near the base of the leaf to resemble traditional holly berries.
Q6: Are these leaves washable? Yes, if made with washable yarn like cotton or acrylic. Be sure to hand wash gently and lay flat to dry to maintain the shape.
Q7: Can I use these leaves in children’s crafts or toys? Definitely! Just avoid small detachable beads if the item will be used by young children. Otherwise, they’re a great addition to kid-friendly decorations.
Q8: How many leaves do I need for a small garland? This depends on the garland’s length, but typically 10–15 leaves with berries spaced evenly work well for a small 1-meter (3-foot) garland.
Now that you’ve learned how to crochet Christmas holly leaf, you’re ready to spread festive joy with your handmade creations. This easy and charming pattern is perfect for both beginners and advanced crocheters looking to add a special touch to their holiday decorations.
We covered everything from choosing materials and working the pattern to creative ways to use the finished leaves and tips to perfect your work. Whether you add them to a gift, a wreath, or a table setting, these crocheted holly leaves will bring warmth and cheer to your celebrations.
If you enjoyed this tutorial and have tried making your own holly leaves, please leave a sincere comment below with your thoughts and any suggestions. Your feedback helps improve our future patterns and inspires fellow crochet lovers. Happy holidays and happy crocheting!


