Zig Zag Stitch Crochet Blanket Patterns – A Comprehensive Tutorial
Advertising
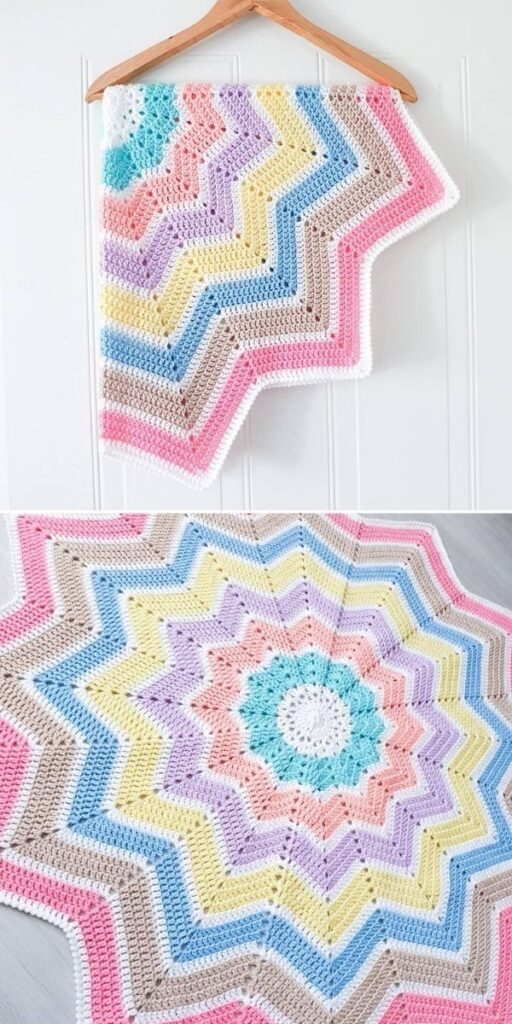
Zig Zag Stitch Crochet Blanket Patterns – A Comprehensive Tutorial is one of the most captivating ways to add movement and charm to your crochet projects. Right from the very first stitch, this pattern captures the eye with its rhythmic peaks and valleys, offering a visually dynamic texture that looks intricate but is surprisingly achievable, even for beginners. Whether you’re a seasoned crocheter or someone just starting out, the zig zag stitch brings endless creative possibilities to your blanket-making experience.
This article aims to walk you through everything you need to know about Zig Zag Stitch Crochet Blanket Patterns – A Comprehensive Tutorial. From understanding the structure of the stitch to exploring variations and tips for a polished finish, you’ll discover how to make your blanket both beautiful and functional. Using a humanized and easy-to-follow approach, we’ll break down the steps and offer insight to help you succeed.Using zig zag stitch
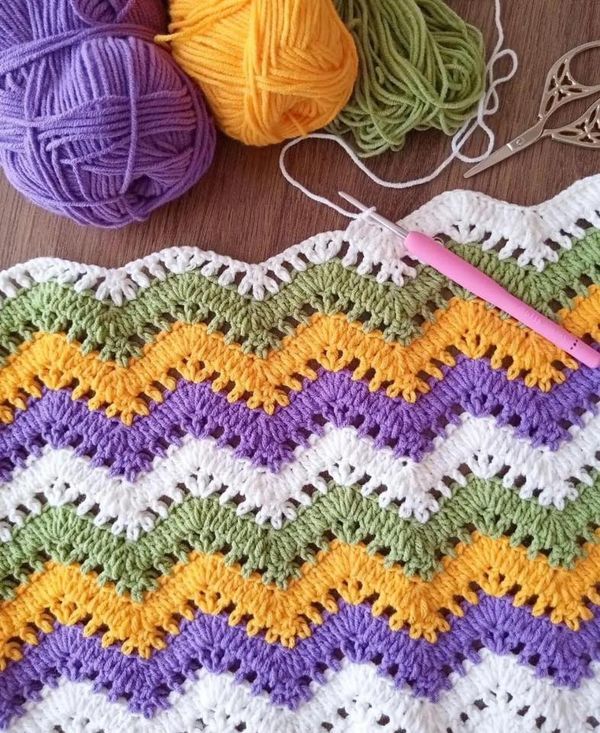
The zig zag stitch in crochet, also known as the chevron or ripple stitch, is a technique that involves strategically increasing and decreasing stitches in a row to create a “V” or wave-like shape. This rhythmic rise and fall gives your blanket that iconic zig zag pattern.
What makes this stitch pattern so special is its combination of simplicity and visual impact. You’re primarily working with double crochets and chain stitches, but the key lies in consistent counting. Once you establish your foundation row correctly, the rest flows naturally with a bit of repetition and rhythm.
A standard zig zag stitch crochet blanket starts with a chain in multiples of a specific number, usually 12 + 3. This allows the pattern to maintain its flow across the entire blanket. Depending on the design, you can adjust the width of the “waves” by using more or fewer stitches in each section.
Color changes also add flair to this pattern. You can choose to switch colors at the end of each row or after several rows to create dramatic stripes. Yarn choice also affects the final look—cotton offers structure, while acrylic adds softness and ease of care.
Advertising
Many crocheters enjoy the meditative quality of this stitch. The repetition is soothing, yet it keeps your attention with subtle shifts and shaping. If you enjoy patterns that feel rewarding and intuitive, zig zag stitch crochet blanket patterns are an ideal match.
Finally, once you master the basic structure, you can easily experiment with variations such as lacy zig zags, chunky yarns for a bold look, or even mix it with other stitch styles. The possibilities are endless with this versatile design.
2. Choosing the Right Yarn and Hook
When starting any project involving zig zag stitch crochet blanket patterns, the choice of yarn and hook will greatly impact your final result. It’s important to choose materials that complement the structure and aesthetic of the zig zag stitch.
Worsted weight yarn is a popular choice for beginners. It’s thick enough to show the stitch definition clearly while still being easy to handle. If you’re looking for something more luxurious, consider a soft merino or a cotton blend. These fibers add comfort and elegance to your finished piece.
The size of your crochet hook should match your yarn weight. Usually, a 5mm (H-8) or 5.5mm (I-9) hook works well for medium-weight yarns. Always check the yarn label recommendations and make a small swatch before starting the full blanket to ensure the gauge is consistent.
Color choice plays a big role in the look of your zig zag stitch crochet blanket. You can go for a gradient effect with ombré yarns, bold stripes with contrasting hues, or a monochromatic style for subtle sophistication. Using self-striping yarn can also add interest without changing yarns manually.
Consider the blanket’s purpose—will it be a baby gift, a cozy throw, or a bedspread? For baby blankets, choose hypoallergenic and washable yarns. For adult throws, you might opt for a chunkier yarn for warmth and weight.
Texture is another factor. Some yarns have a slight halo (fuzziness), which can soften the edges of the zig zag. Others are smooth and crisp, giving your pattern clean, sharp lines. Pick a texture that aligns with your vision for the finished project.
Finally, make sure to have enough yarn. Zig zag patterns can use more yarn due to their up-and-down construction. It’s always safer to buy extra than to risk running out mid-project.
3. Step-by-Step: Creating Your Zig Zag Crochet Blanket
Now that you’ve gathered your materials, it’s time to start your zig zag stitch crochet blanket. This step-by-step guide will walk you through the basic construction, helping you build confidence as you go.
Step 1: Start with your foundation chain. Choose a multiple of 12 plus 3 extra chains for the turning chain. For example, you might start with 123 chains (120 + 3) depending on the desired width.
Step 2: In the first row, work double crochets across the chain, using increases (3 dc in one stitch) and decreases (dc3tog) to create the peaks and valleys. This row sets the tone for the entire blanket.
Step 3: At the end of the row, chain 3 and turn your work. This turning chain acts as your first double crochet. Repeat the established pattern of increases and decreases. Be mindful of stitch placement—it’s easy to shift the zig zag unintentionally.
Step 4: Continue crocheting row by row, keeping your stitch counts consistent. It helps to count each section out loud, especially during the first few rows. The zig zag shape becomes more apparent after a few rows.
Step 5: Change colors as desired. You can carry yarn up the side, or fasten off and join a new color. Weave in your ends neatly using a yarn needle for a professional finish.
Step 6: Optional—add a border! A single crochet border helps frame the blanket and gives it structure. You can choose a contrasting color or match your dominant yarn. This final touch adds polish to your finished piece.
4. Creative Variations and Finishing Tips
Once you’ve mastered the basic zig zag stitch crochet blanket patterns, why not explore creative ways to make your blanket stand out even more? This section offers ideas and expert tips to customize and enhance your project.
Try different yarn weights for a unique texture. Bulky yarn creates a plush, cozy look, while finer yarn gives your zig zag a more delicate, lacy appearance. This choice can transform your blanket from a winter essential to a summer accessory.
Add texture by using post stitches or puff stitches in your zig zag rows. This creates dimension and tactile interest. If you’re making a sensory blanket or a showpiece, textured stitches are a great way to elevate your design.
Play with asymmetrical color blocking. Instead of repeating stripes evenly, create a bold look with larger sections of one color and smaller pops of another. This technique adds modern flair and makes your blanket feel one-of-a-kind.
Incorporate edging techniques like scallops, picots, or ruffles. These details give your blanket personality and a polished look. Choose an edging that complements your blanket’s theme—soft for baby gifts, or bold for home décor.
Use stitch markers to help maintain your pattern. Especially in larger blankets, markers can help you keep track of where your increases and decreases occur. This small step reduces mistakes and saves time.
Finally, don’t rush the finishing. Block your blanket if needed to straighten edges and define the zig zag shape. Wash and dry according to yarn instructions, and fold or roll your blanket carefully for gifting or storing.
FAQ – Zig Zag Stitch Crochet Blanket Patterns
Q: Is the zig zag stitch suitable for beginners? Yes, absolutely! While it requires counting and a basic understanding of increases and decreases, it’s an excellent pattern for beginners ready to take the next step. The repetition makes it easy to memorize.
Q: What’s the difference between zig zag, ripple, and chevron stitches? They are essentially the same concept with minor variations in terminology and stitch combinations. All involve peaks and valleys created by increases and decreases.
Q: Can I make a baby blanket with the zig zag stitch? Yes! Zig zag stitch blankets are popular for baby gifts. Just use soft, washable yarns and consider slightly narrower stripes for a gentler look.
Q: How do I stop my edges from looking uneven? Consistency is key. Always work your increases and decreases in the same spots and count stitches regularly. Adding a border at the end also helps neaten the edges.
Q: How many chains do I need to start a zig zag blanket? You need a multiple of 12 plus 3 chains for turning. Measure your desired width and adjust accordingly to fit your project’s size.
Q: Can I use a zig zag stitch for other projects? Yes! You can use it for scarves, pillows, table runners, and more. The stitch is very versatile and adds visual interest to many types of crochet items.
We hope you’ve enjoyed this in-depth guide on Zig Zag Stitch Crochet Blanket Patterns – A Comprehensive Tutorial. From learning the fundamentals of the zig zag stitch to mastering creative color and texture variations, you now have all the tools to create a beautiful, personalized blanket. The zig zag pattern offers a perfect balance between ease and elegance, making it a favorite among crocheters of all levels.
Now it’s your turn! Have you tried the zig zag stitch before? What color combinations do you love using? Share your honest thoughts and suggestions in the comments—we’d love to hear how your project turned out and what you’d like to learn next!

