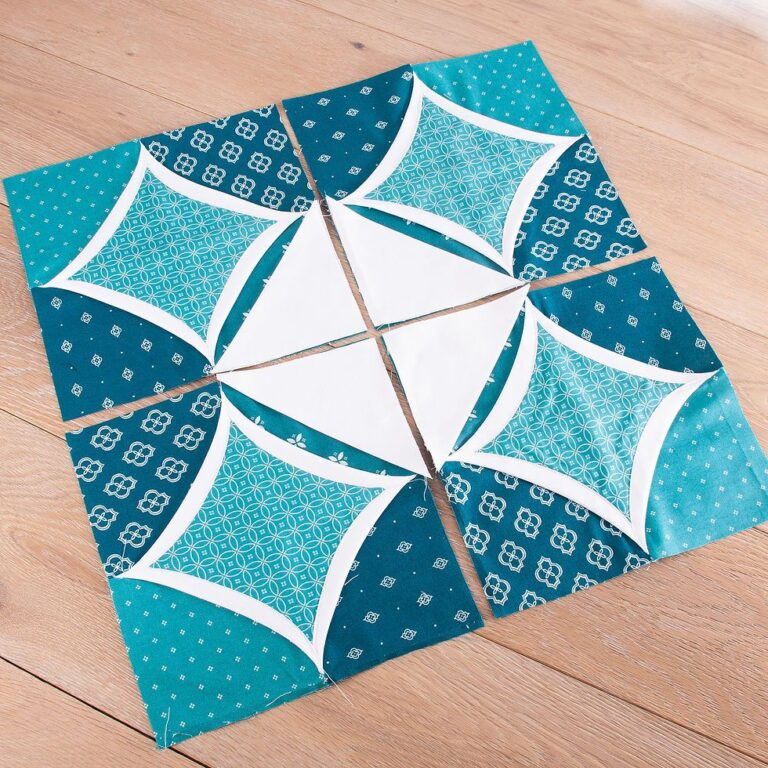
Cathedral Block - Quilt Pattern
The Sleepy Cat Coaster – Quilt Pattern is an adorable and functional quilting project perfect for adding a cozy and playful touch to your home décor. Whether you are a cat lover, a quilter, or simply someone who enjoys crafting small but charming handmade items, this project brings together creativity, practicality, and a touch of whimsy. Designed to protect your table surfaces while bringing a smile to your face, the coaster is shaped like a curled-up cat taking a nap—making it not just useful, but a delightful conversation piece as well.
Creating a Sleepy Cat Coaster – Quilt Pattern allows you to experiment with fabrics, colors, and quilting techniques without committing to a large-scale project. It’s the perfect way to use fabric scraps, try out a new quilting motif, or practice applique techniques. The compact size makes it a great beginner-friendly project, yet it still offers opportunities for more advanced quilters to add intricate details or personalization. Plus, the finished piece is a wonderful gift for fellow cat enthusiasts or as a thoughtful handmade addition to a housewarming set.
One of the best things about the Sleepy Cat Coaster – Quilt Pattern is how customizable it is. You can create a realistic-looking cat by choosing fabrics in natural shades, or go whimsical with bright colors and bold prints. The quilting stitches can be simple straight lines for a modern feel or free-motion quilting to add texture and mimic fur patterns. Whatever your style, this small project is sure to bring joy both during the making process and every time you set your mug down on it.
Selecting the right fabrics is the first step in bringing your Sleepy Cat Coaster – Quilt Pattern to life. Quilting cotton is a popular choice due to its ease of handling and wide range of designs. Look for fabrics that reflect the personality of your “cat”—from soft beige and gray tones for a realistic touch to vibrant patterns for a playful look.
In addition to the outer fabrics, you’ll need batting to give the coaster its soft, cushioned feel. Batting also helps absorb moisture from cups or mugs, making the coaster practical as well as pretty. Thin batting works best for this project, ensuring the coaster remains flat and stable on the table.
The backing fabric should be durable and non-slip if possible. You can achieve this by using textured fabrics or adding a layer of non-slip material. This helps keep the coaster in place, especially if it will be used for hot beverages.
Thread color is another detail worth considering. Matching thread blends seamlessly into the fabric, while contrasting thread can add decorative outlines that highlight the cat’s features.
If you plan to add applique details like eyes, whiskers, or a tail, gather small fabric scraps or felt pieces in appropriate colors. These extra touches can make your Sleepy Cat Coaster – Quilt Pattern even more charming.
Finally, ensure you have your basic quilting tools ready—rotary cutter, self-healing cutting mat, quilting ruler, pins or clips, and an iron. Having the right tools will make the process smoother and the results more professional.
Once your fabrics and materials are ready, it’s time to start cutting the pieces for your Sleepy Cat Coaster – Quilt Pattern. Using a template or pattern outline, trace the shape of the cat onto the fabric for both the top and the backing pieces. Be sure to cut batting in the same shape.
Accuracy is key when cutting, as even small misalignments can affect the finished look. Use a sharp rotary cutter for clean edges, and double-check your measurements before cutting the batting and backing.
If you’re adding applique features such as ears or a curled tail, cut these separately and position them on the quilt top before assembling. Pin or baste them in place so they don’t shift during sewing.
Layer your fabric pieces in the following order: backing fabric (right side down), batting, and quilt top (right side up). This “quilt sandwich” will form the base of your coaster.
Once the layers are aligned, secure them using safety pins or quilting clips. This will prevent shifting during stitching and help keep your cat shape intact.
Before quilting, it’s a good idea to lightly mark any quilting lines or feature outlines with a removable fabric marker. This step ensures neat, intentional stitching, especially if you plan to highlight the curves and details of the cat’s body.
Quilting your Sleepy Cat Coaster – Quilt Pattern is where the design truly starts to come alive. The stitches not only hold the layers together but also add personality and dimension to the piece.
Straight-line quilting is the simplest method, following the curves of the cat’s body or creating a geometric background. For a more artistic touch, free-motion quilting can be used to mimic fur texture or create whimsical swirls.
Applique techniques can be applied for facial features. Small circles of fabric or felt can be sewn on for eyes, while embroidery floss can be used for whiskers and a small nose. These details bring the sleepy expression to life and give the coaster character.
You can also add a lightly padded ear section or a curled tail with an extra layer of batting to give a 3D effect. This adds a tactile element that makes the coaster even more appealing.
If you want to make your Sleepy Cat Coaster – Quilt Pattern more durable, consider stitching around the edges with a tight zigzag or satin stitch. This not only finishes the edges neatly but also prevents fraying over time.
Finally, press the coaster gently with a warm iron to set the stitches and smooth any wrinkles. Your quilting lines will look crisper, and the overall shape will be well-defined.
The finishing stage of your Sleepy Cat Coaster – Quilt Pattern is where it transforms from a work-in-progress into a polished piece ready for use. Binding the edges is an important step for both durability and appearance.
Cut binding strips from your chosen fabric, fold them in half lengthwise, and sew them around the coaster’s edge. This provides a neat border that frames the cat design and adds an extra pop of color or contrast.
If you prefer a seamless look, you can use a turned edge finish, folding the raw edges inward and topstitching them in place. This works especially well for irregular shapes.
Personalization options are endless. Add the name of your pet embroidered along the edge, choose fabrics that match your kitchen décor, or create a themed set for different seasons or holidays.
A set of Sleepy Cat Coaster – Quilt Pattern creations makes a wonderful handmade gift. Wrap them in ribbon or place them in a small gift box for an extra-special presentation.
Lastly, check your coaster for any loose threads or uneven stitches, and give it one final press. Your finished coaster is now ready to protect your surfaces and brighten your day with its adorable design.
1. Is the Sleepy Cat Coaster suitable for beginner quilters?
Yes, this project is small and manageable, making it ideal for beginners to practice quilting skills and applique techniques.
2. What type of batting should I use?
A thin, low-loft batting works best, providing enough padding without making the coaster bulky.
3. Can I wash the Sleepy Cat Coaster?
Yes, machine wash on a gentle cycle and air dry to keep the coaster looking fresh.
4. How can I prevent the coaster from slipping on smooth surfaces?
Use a textured backing fabric or add a layer of non-slip material to the bottom.
5. Can I make the coaster in different shapes?
Absolutely! While the cat shape is the main theme, you can adapt the pattern to other animals or playful designs.
6. How long does it take to complete one coaster?
Typically, it can be completed in one to two hours, depending on the level of detail and embellishment.
Making a Sleepy Cat Coaster – Quilt Pattern is a fun, creative, and practical quilting project that’s perfect for using fabric scraps and experimenting with design.
From selecting fabrics and cutting the cat shape to adding quilting details and personal touches, every step allows you to showcase your personality and sewing skills. Whether you keep it for yourself or gift it to a fellow cat lover, this coaster is sure to be cherished. I’d love to hear your honest opinion and suggestions—share your thoughts so we can continue inspiring each other in our creative journeys.


