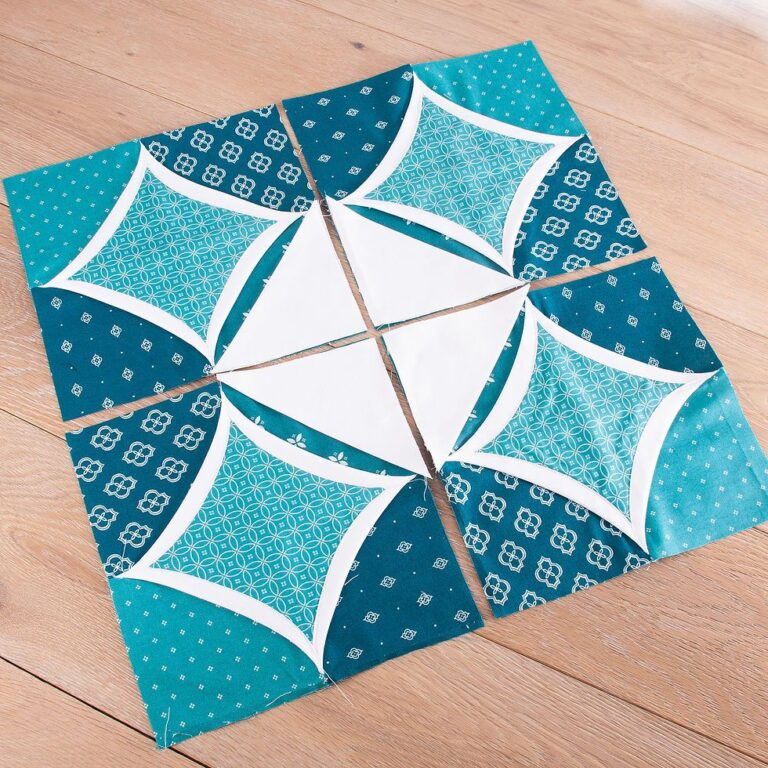
Cathedral Block - Quilt Pattern
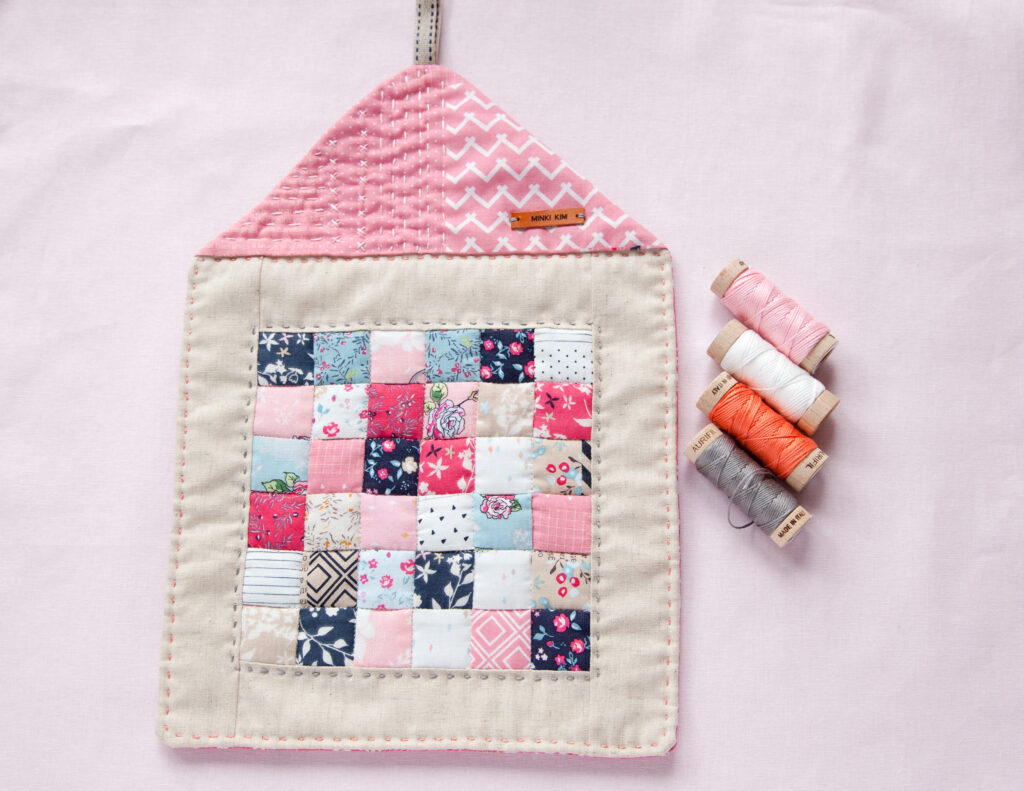
If you are searching for a creative and practical quilting project, the Quilted Mini House Trivets – Quilt Pattern is a wonderful option to explore. This pattern combines functionality with charm, giving you the opportunity to create a unique piece that can brighten up any kitchen or dining table. Whether you are a beginner or an experienced quilter, this project offers a fun way to practice essential quilting techniques while producing something both decorative and useful.
The charm of the Quilted Mini House Trivets – Quilt Pattern lies in its versatility. It is not just a simple trivet—it becomes a small quilted house that can serve as a cozy accent for your home décor. These mini houses are perfect for protecting your surfaces from hot dishes, while also adding a handmade touch that guests will admire. Because of their compact size, they are also a wonderful choice for quick projects or gifts for loved ones.
In this article, we will walk through the details of this pattern, how to approach it step by step, and the creative ways you can adapt it to your own style. With clear explanations and helpful tips, you will feel confident in starting your very own Quilted Mini House Trivets – Quilt Pattern today.
The first step in working with the Quilted Mini House Trivets – Quilt Pattern is gathering your materials. Since the project is small, it is an excellent way to use up fabric scraps. Cotton fabrics work best because they are durable, washable, and easy to sew.
You will also need batting to provide thickness and insulation. Since trivets are meant to protect your surfaces from heat, choosing a heat-resistant batting is highly recommended. This makes your finished project both functional and safe.
Another important material is the thread. Use high-quality cotton or polyester thread that matches or contrasts with your fabrics, depending on the effect you want. A neutral thread often works well for piecing, while decorative stitching may benefit from a bolder choice.
Before cutting into your fabrics, it’s helpful to sketch or visualize how you want your mini house to look. Think about the roof, walls, windows, and doors. These small design details make each Quilted Mini House Trivets – Quilt Pattern truly one of a kind.
Templates are extremely useful at this stage. Having a roof and house body template ensures that all pieces come together neatly. Precision in cutting will save you time during assembly and help create sharp, clean lines.
Finally, prepare your workspace. Keep your tools—rotary cutter, cutting mat, ruler, and sewing machine—ready. A well-organized sewing area makes the quilting process more enjoyable and less stressful.
Once you have everything ready, you can begin constructing the Quilted Mini House Trivets – Quilt Pattern. Start by cutting your fabric pieces according to the templates. You will need a roof section, a base for the house, and optional smaller pieces for windows and doors.
Layer your fabrics with the batting sandwiched in between. This is where quilting techniques come into play. Secure the layers with pins or clips to avoid shifting while sewing.
Next, stitch along the outlines of the house shape. This will keep your layers together and add durability. Quilting lines can be straight, diagonal, or even decorative, depending on your preference. Experiment with stitches to give your mini house its own personality.
Add appliqué details such as windows or doors. These small touches are what bring your Quilted Mini House Trivets – Quilt Pattern to life. A bit of embroidery or hand-stitching can enhance the handmade feel even more.
Once the front of your trivet is complete, finish the edges with bias tape or binding. This gives the trivet a polished look while securing all layers. Carefully curve around the roof edges for a neat finish.
After binding, press your project with an iron to smooth out seams and give it a crisp appearance. At this stage, your trivet is ready to use or gift.
One of the joys of making the Quilted Mini House Trivets – Quilt Pattern is the endless room for creativity. You can experiment with colors, fabrics, and textures to make each house unique.
For a farmhouse style, choose muted tones such as beige, soft blue, or rustic red. Add gingham or floral fabrics for a vintage effect. This will give your trivets a cozy, country feel.
If you prefer a modern look, go for bold geometric prints or monochrome palettes. Black, white, and gray combinations can turn a simple mini house into a chic home accessory.
Holiday-themed trivets are also a great idea. Create a Christmas village with red and green fabrics, or design spooky Halloween houses with orange and black. These seasonal versions make excellent handmade gifts.
You could also personalize trivets by embroidering family initials or names on the roof. This makes the Quilted Mini House Trivets – Quilt Pattern not only decorative but also meaningful for the recipient.
For children’s rooms, playful fabrics featuring animals, stars, or cartoon patterns can be used. These little houses could double as décor as well as functional kitchen accessories.
Creating the Quilted Mini House Trivets – Quilt Pattern comes with several advantages. First, it allows quilters to practice essential skills such as piecing, quilting, and binding on a small, manageable project.
Second, these trivets are functional. They protect your tables and countertops from hot pans and dishes, while also adding a touch of handmade charm.
Third, they make excellent gifts. Because of their size, they are quick to sew, and the house design appeals to many people. Personalized versions make them even more special.
Another benefit is sustainability. By using fabric scraps, you reduce waste and make use of materials that might otherwise be thrown away. It’s a wonderful way to recycle creatively.
Additionally, making these trivets can be a relaxing and enjoyable activity. Quilting often has a therapeutic effect, providing calmness and satisfaction as you create something with your hands.
Finally, finishing a Quilted Mini House Trivets – Quilt Pattern gives a sense of accomplishment. It’s a small but rewarding project that brings joy both in the making and in everyday use.
What size should a Quilted Mini House Trivet be?
Most trivets are around 7–9 inches wide, but you can adjust the size depending on your needs.
Can I wash Quilted Mini House Trivets?
Yes, since they are made from cotton fabrics, they can be washed. Always use gentle cycles and air dry for longer durability.
What type of batting is best for these trivets?
A heat-resistant batting is recommended, especially if you plan to use them under hot pans and dishes.
Do I need advanced quilting skills to make them?
Not at all. The Quilted Mini House Trivets – Quilt Pattern is beginner-friendly, and it’s a great project to practice piecing and quilting.
Can these trivets be used as decoration only?
Yes. Many people hang them as wall décor, use them as mug rugs, or place them on shelves to add charm to their space.
How can I personalize my trivet?
Add embroidered initials, choose themed fabrics, or create seasonal versions to suit different occasions.
The Quilted Mini House Trivets – Quilt Pattern is a delightful project that combines creativity, practicality, and charm. It is a wonderful way to use fabric scraps, practice quilting skills, and create something meaningful for yourself or as a gift. From choosing fabrics to adding personal details, each step of the process is enjoyable and rewarding.
I hope this article has inspired you to try making your own Quilted Mini House Trivets – Quilt Pattern. Now I would love to hear from you! Share your honest opinion and let me know your suggestions in the comments—your feedback helps keep the quilting community alive and creative.


