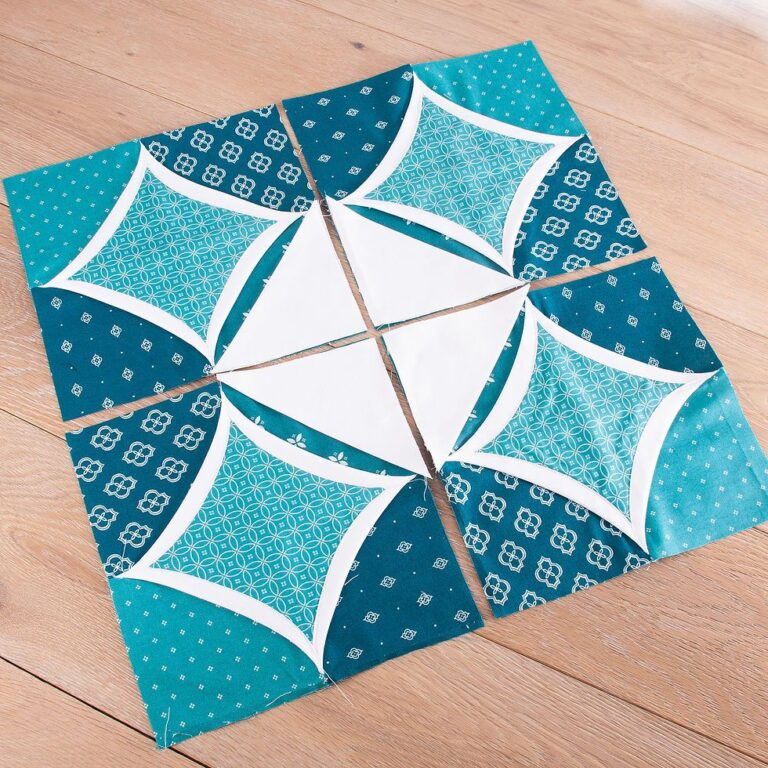
Cathedral Block - Quilt Pattern
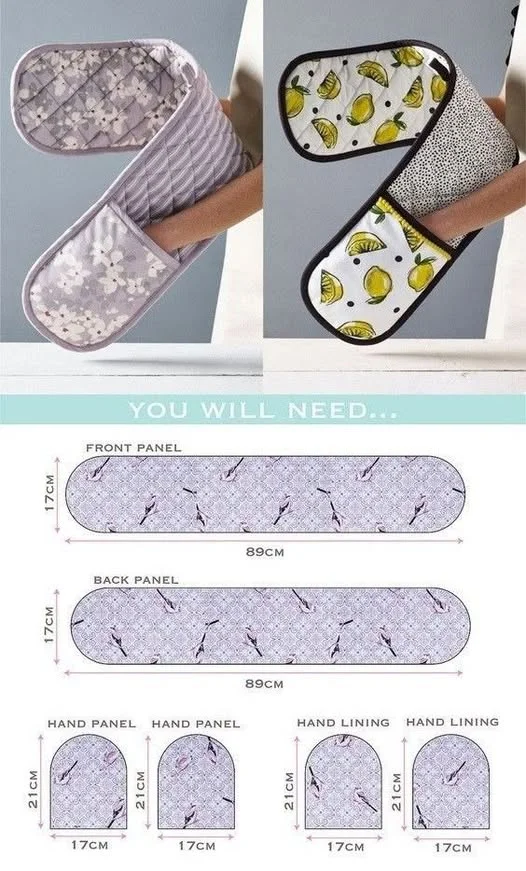
The Double Quilted Potholder Tutorial – Quilt Pattern is a wonderful project for anyone who loves quilting and wants to create something practical and beautiful at the same time. Potholders are essential in every kitchen, and when you make them yourself, you add a personal touch that transforms a simple accessory into a work of art. This tutorial will guide you through the steps of creating a double-layered quilted potholder that not only looks charming but also offers durability and protection for handling hot dishes.
Working with quilting projects like potholders is ideal for beginners and experienced quilters alike. It’s a manageable project that doesn’t take too much time, yet it allows you to practice essential skills such as piecing, quilting, and binding. With a Double Quilted Potholder Tutorial – Quilt Pattern, you also get the opportunity to experiment with fabrics, colors, and textures in a way that can inspire future quilt projects.
In this article, you will learn how to create your own quilted potholder step by step. We will cover everything from fabric selection to finishing details, ensuring that your final piece is functional, heat-resistant, and stylish. Let’s dive into this fun and practical quilting project together.
When starting the Double Quilted Potholder Tutorial – Quilt Pattern, one of the most important steps is selecting the right fabrics. Cotton fabric is always the best choice because it withstands heat and washes well. Avoid synthetic fabrics, as they can melt or become damaged when exposed to high temperatures.
It is also essential to pick fabrics that complement each other visually. A potholder offers a small canvas where you can play with bold colors, traditional quilt block designs, or even seasonal prints. This makes the process fun and allows you to personalize your project according to your style or occasion.
For the batting, choose a heat-resistant option such as insulated batting designed specifically for potholders. Layering your potholder with two pieces of batting helps create the “double quilted” effect, making your piece thicker and more protective.
Other materials you will need include quilting thread, a sewing machine, scissors, pins, and bias tape for binding. Having all the tools ready before you begin ensures a smooth and enjoyable quilting process.
If you are a beginner, consider preparing precut fabric squares or strips to make assembly easier. This way, you can focus on the quilting technique without worrying too much about perfect cutting.
Remember, the quality of the materials you use will directly affect the durability of your finished potholder. Investing in good batting and sturdy cotton fabrics means your potholder will last longer and serve its purpose effectively.
Once your materials are ready, you can begin assembling the Double Quilted Potholder Tutorial – Quilt Pattern. Start by cutting two fabric squares for the front and back, usually around 8 inches by 8 inches. Cut two batting squares of the same size to create the padded interior.
Place the fabric pieces with the right sides facing out and layer the batting between them. This sandwich method is the foundation of most quilted items and ensures that your potholder will be both protective and attractive. Pin the layers together to prevent shifting during stitching.
The next step is quilting the layers. You can choose a simple grid pattern, straight-line quilting, or a decorative stitch depending on your skill level and style preference. Quilting not only secures the layers but also enhances the design of your potholder.
Once the quilting is complete, it’s time to square off the edges. Use a ruler and rotary cutter to trim any uneven fabric or batting. This step ensures that your potholder has clean edges, making the binding process much easier.
After trimming, prepare your binding. You can use premade bias tape or make your own from coordinating fabric. Binding adds strength to the edges and gives your potholder a professional, finished look.
Finally, stitch the binding carefully around the edges of your potholder. Miter the corners for a neat appearance and secure the ends properly. Once the binding is finished, you have completed the basic assembly of your potholder.
The beauty of the Double Quilted Potholder Tutorial – Quilt Pattern is that you can customize it to suit your needs and style. Adding a fabric loop in one corner, for example, allows you to hang the potholder on a hook in your kitchen for easy access.
You can also experiment with patchwork designs on the front panel. Using small fabric scraps, you can create traditional quilt blocks such as the log cabin, nine-patch, or star block. This adds visual interest and makes your potholder unique.
Another idea is to add an extra layer of quilting. By stitching more lines across the surface, you increase durability and ensure that the batting stays securely in place even after multiple washes. This additional quilting also enhances the heat resistance of your potholder.
If you want to make a set, consider creating matching potholders with different designs but coordinating fabrics. This way, your kitchen accessories will have a cohesive look that is both practical and decorative.
Personalization is another option. You can embroider initials, seasonal motifs, or decorative stitches along the binding to give your potholder a special touch. These small details make the project even more rewarding and can turn a simple potholder into a meaningful gift.
Remember, the goal is not only functionality but also creativity. A handmade quilted potholder is a reflection of your style and skills, so don’t hesitate to experiment and make it your own.
The Double Quilted Potholder Tutorial – Quilt Pattern is perfect for quilters of all levels. For beginners, it is a small-scale project that teaches essential techniques such as layering, quilting, and binding without being overwhelming.
If you are new to quilting, start with simple straight-line quilting patterns. These are easy to execute and provide clean, classic results. As you gain confidence, you can try diagonal lines or free-motion quilting for a more creative design.
For advanced quilters, potholders are a fantastic way to test out new patterns and techniques before committing to larger quilt projects. They allow you to experiment with color combinations, intricate stitches, and detailed patchwork on a small, manageable scale.
Always take your time with cutting and measuring, as accuracy is key to a neat finished product. A rotary cutter and self-healing cutting mat are valuable tools that make the process easier and more precise.
Ironing is also an essential part of quilting. Press your fabric and seams carefully before assembling the layers. A well-pressed quilt block leads to smoother stitching and a more professional look in your final potholder.
Finally, remember to enjoy the process. Quilting is both creative and relaxing, and small projects like potholders allow you to finish something quickly while still practicing valuable skills.
1. What size should a quilted potholder be?
Most potholders measure between 7 and 9 inches square. This size provides enough coverage for handling hot cookware while still being comfortable to use.
2. Can I use regular batting instead of insulated batting?
You can, but it is safer to use heat-resistant batting designed for potholders. Regular batting alone may not provide enough protection from heat.
3. How do I wash a quilted potholder?
Machine wash on a gentle cycle with mild detergent and air dry or tumble dry on low. Avoid using fabric softeners, as they can reduce heat resistance.
4. Do I need a sewing machine to make a potholder?
While a sewing machine makes the process faster, you can also hand-stitch a quilted potholder. It may take more time, but the result can be just as durable.
5. Can I use scraps to make a potholder?
Yes! Potholders are perfect scrap-busting projects. Small fabric pieces can be pieced together to create beautiful patchwork designs.
6. How can I make my potholder thicker?
To increase thickness, add an extra layer of batting or use a double layer of insulated batting. This provides better heat resistance and a sturdier feel.
The Double Quilted Potholder Tutorial – Quilt Pattern is an enjoyable and rewarding project that combines functionality with creativity. By following the steps outlined in this article, you can create a potholder that not only protects your hands but also adds charm to your kitchen. Whether you are a beginner learning the basics or an experienced quilter testing out new designs, this project offers something for everyone.
Now it’s your turn to try making your own quilted potholder. I’d love to hear your honest opinion about this tutorial and any suggestions you may have for improving future projects. Share your thoughts and let’s keep the joy of quilting alive together!


