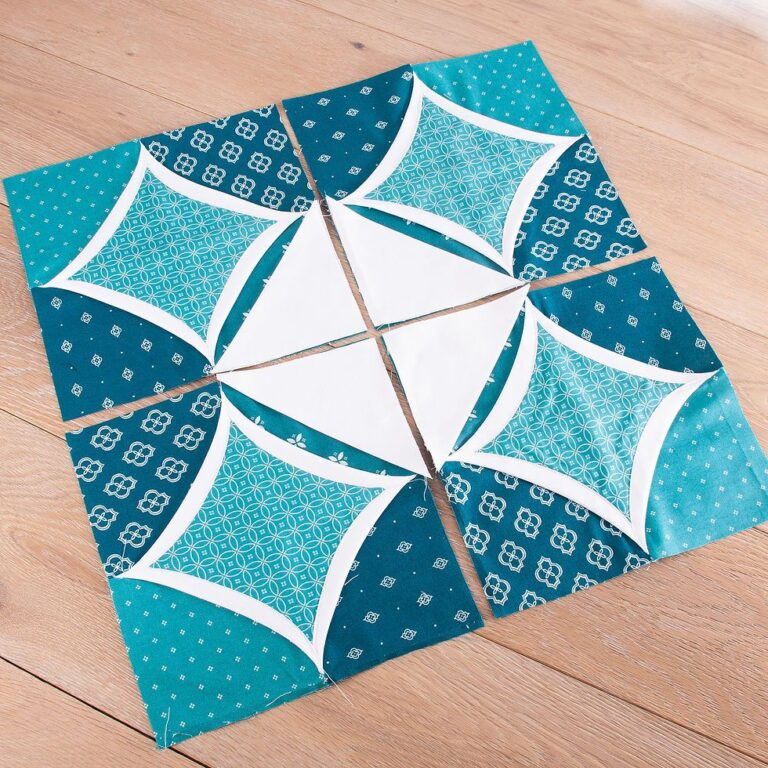
Cathedral Block - Quilt Pattern
Learning How To Make Patchwork Flower Coasters – Quilt Pattern is a wonderful way to combine creativity, functionality, and the beauty of quilting into small but meaningful projects. These coasters not only protect your furniture but also bring a personal touch to your home, making them ideal for everyday use or thoughtful handmade gifts. By exploring quilting techniques on a smaller scale, you can practice precision and play with fabric combinations without the pressure of creating a full quilt.
The appeal of Patchwork Flower Coasters lies in their charm and versatility. You can experiment with bold colors, soft pastels, or floral prints to reflect the seasons or your personal style. Because they are small, they are perfect for using up fabric scraps from larger quilting projects, allowing nothing to go to waste. With every coaster you make, you sharpen your quilting skills while creating something practical and delightful.
This tutorial on How To Make Patchwork Flower Coasters – Quilt Pattern will guide you through every step of the process. From choosing fabrics and cutting pieces to assembling and finishing, you will learn essential quilting techniques that can be applied to other sewing projects. Whether you are a beginner quilter or an experienced maker, this project is fun, accessible, and rewarding.

When starting a project like How To Make Patchwork Flower Coasters – Quilt Pattern, fabric selection plays a crucial role. Opt for 100% cotton fabrics, as they are easier to work with and hold their shape well. Cotton also handles heat better, which is useful if you plan to place warm mugs on the coasters.
Scraps from past quilting projects are perfect for this craft. You can mix solids, prints, and florals to create unique patchwork designs. The key is to balance color and pattern so that the finished coaster has harmony while still showcasing the patchwork style.
Batting is another essential element. Thin cotton batting is ideal for coasters because it provides enough structure without being too bulky. If you prefer extra thickness, you can layer two pieces of batting together.
Other materials you will need include thread that matches or contrasts with your fabrics, a rotary cutter or scissors, and quilting rulers for precise cuts. These tools ensure neatness, which is especially important in small projects like coasters.
In addition, you may want to prepare an iron and ironing board. Pressing fabrics at each stage of the process helps achieve crisp seams and a professional finish. A small quilting iron is especially handy when working with compact patchwork pieces.
By gathering the right fabrics and materials from the start, your Patchwork Flower Coasters will look polished, durable, and ready to impress both guests and family.
The heart of How To Make Patchwork Flower Coasters – Quilt Pattern is the cutting and arranging of the small fabric pieces. Precision matters greatly here, since even slight measurement errors can affect how the pieces align.
Begin by cutting squares or petal-shaped pieces, depending on the flower design you want. Many quilters prefer simple squares arranged in a flower-like pattern, while others enjoy more complex petal shapes. Either choice works beautifully for a coaster-sized project.
When arranging, lay out your cut pieces on a flat surface before sewing. This lets you visualize the final look and make adjustments to colors or patterns. It’s a chance to ensure balance and symmetry in your design.
If you are new to patchwork, consider starting with a four-patch or nine-patch flower arrangement. These simple patterns provide a floral impression without requiring advanced skills, making them perfect for beginners.
For those with more experience, you can create layered petals or curved shapes. This adds complexity and makes your coasters stand out as mini works of art. Remember, experimenting with different styles is part of the fun.
Once your arrangement is set, take a picture with your phone before sewing. This reference helps you remember the layout in case the pieces get moved around while working.
The next stage of How To Make Patchwork Flower Coasters – Quilt Pattern is sewing your fabric pieces together. Start with small sections, joining two pieces at a time. Always use a quarter-inch seam allowance, the quilting standard, to maintain consistency across the design.
Press seams open or to the side after each join. This step not only keeps the coaster flat but also reduces bulk when layering fabrics together later. A well-pressed seam makes a noticeable difference in the finished product.
Once your flower patchwork top is complete, place it right sides together with a backing fabric of the same size. Add your batting layer beneath the patchwork top. This “quilt sandwich” creates the structure of the coaster.
Pin or clip the layers together to prevent shifting. Begin sewing around the edges, leaving a small opening to turn the coaster right side out. After turning, press again to smooth the edges.
Topstitching is optional but highly recommended. A neat row of stitching around the edge secures the layers, reinforces durability, and gives the coaster a finished look. You can also quilt small details, like stitching along the flower petals, to enhance the design.
Taking time with careful stitching ensures your Patchwork Flower Coasters are both sturdy and beautiful. This step transforms your cut fabrics into a functional piece of handmade art.
The final step in How To Make Patchwork Flower Coasters – Quilt Pattern is adding personal touches that make your project truly unique. Finishing techniques can elevate a simple coaster into a treasured handmade keepsake.
One popular option is adding decorative quilting stitches. You might stitch in the ditch along the patchwork seams or create free-motion designs like swirls, leaves, or even more flowers. These stitches add texture and character.
Binding is another way to finish edges. While many coaster makers prefer a turned edge for simplicity, binding gives a professional and traditional quilting look. Choose a contrasting fabric to make the edges pop.
You can also experiment with applique. Adding a small fabric flower or leaf on top of the patchwork design creates layers of depth and dimension. This is an excellent way to use tiny fabric scraps creatively.
For themed coasters, tailor your fabrics to holidays or seasons. Bright florals for spring, warm tones for autumn, or festive prints for winter make your coasters perfect for year-round use. They also make thoughtful gifts when tailored to special occasions.
Don’t forget presentation if you plan to gift your Patchwork Flower Coasters. Tie a set together with a ribbon or place them in a handmade fabric pouch. These small details add charm and make your quilting project even more memorable.
The finishing stage is your chance to let creativity shine. Each coaster can be slightly different, reflecting your personality and style as a quilter.
1. Do I need advanced quilting skills to make Patchwork Flower Coasters?
Not at all! This project is suitable for beginners. Simple patchwork techniques are easy to follow, making it a great introduction to quilting.
2. What size should Patchwork Flower Coasters be?
Most coasters measure between 4 and 5 inches square, but you can adjust the size based on your preference. Larger coasters can accommodate mugs or small teapots.
3. Can I wash Patchwork Flower Coasters in the washing machine?
Yes, if you use cotton fabrics and batting. Wash them on a gentle cycle and air dry for best results. Quilted coasters become softer and cozier with use.
4. Do I need batting inside the coasters?
Batting is recommended to give structure, absorb moisture, and protect surfaces. Thin batting works best to avoid bulkiness.
5. How many coasters should I make in a set?
A set of four or six is most common, but you can make as many as you like. Sets are ideal for gifting and create a cohesive collection.
6. Can I hand sew instead of using a sewing machine?
Yes, hand sewing is possible, though it takes longer. A sewing machine provides cleaner and stronger seams, but hand sewing works if you prefer a slower, more mindful process.
In this article, you learned How To Make Patchwork Flower Coasters – Quilt Pattern step by step, from fabric selection and cutting to sewing, assembling, and finishing. These coasters are a delightful way to practice quilting on a small scale while creating functional and decorative items for your home.
Now it’s your turn to bring out your fabrics, try this project, and let your creativity flourish. I’d love to hear your honest opinions and suggestions—share your thoughts and experiences so we can continue inspiring each other in the wonderful world of quilting.


