Crochet Angel for Christmas – Pattern
The Leaves Quilt Block Tutorial – Quilt Pattern is a delightful and timeless design that captures the beauty of nature through the art of quilting. This block is a favorite among quilters because of its versatility, charm, and the way it adds seasonal warmth to any quilt project. Whether you’re crafting for fall, spring, or simply want to add a natural motif to your quilting, the Leaves Quilt Block Tutorial – Quilt Pattern provides the perfect opportunity to create something elegant and meaningful.
Learning how to piece together a leaves quilt block is not only enjoyable but also a great skill-building exercise for quilters at all levels. Beginners can benefit from its clear structure, while advanced quilters can play with fabric variations, colors, and layouts. The result is a block that looks intricate yet can be simplified to suit different preferences. By focusing on Leaves Quilt Block Tutorial – Quilt Pattern, you can develop both technical skills and artistic expression.
In this article, you will discover step-by-step insights, tips, and inspiration for creating your own leaves quilt block. From choosing the right fabrics to piecing techniques, pressing methods, and layout variations, we’ll explore everything you need to know. The Leaves Quilt Block Tutorial – Quilt Pattern is a versatile design that fits beautifully into quilts for all seasons, table runners, wall hangings, and even small decorative projects.

The Leaves Quilt Block Tutorial – Quilt Pattern begins with the concept of representing natural leaf shapes through simple geometric units. Most designs use squares, half-square triangles, or rectangles arranged to mimic the symmetry of leaves. This makes it easier to adapt the block to any quilt size while maintaining a visually striking effect.
One of the best things about this pattern is its adaptability. Quilters can choose earthy tones for a fall-inspired quilt or soft greens for a spring-themed creation. This flexibility makes the Leaves Quilt Block Tutorial – Quilt Pattern suitable for year-round quilting projects. It’s a block that can transform depending on your fabric choices.
Traditionally, leaves quilt blocks measure around 6 to 12 inches, but you can resize them according to your project. Larger blocks are great for statement quilts, while smaller blocks can be used in runners, placemats, or mini quilts. Resizing ensures that the Leaves Quilt Block Tutorial – Quilt Pattern fits seamlessly into any design.
The leaves design also pairs beautifully with other blocks. For example, combining leaf motifs with floral or star quilt blocks creates a thematic quilt with plenty of character. This blending demonstrates the versatility of the Leaves Quilt Block Tutorial – Quilt Pattern in building larger, more complex quilts.
Another advantage of this block is its beginner-friendly structure. Although it looks detailed, it’s mainly composed of straight seams and simple units, making it less intimidating for new quilters. With patience and practice, anyone can achieve a polished look with the Leaves Quilt Block Tutorial – Quilt Pattern.
Finally, this quilt block holds symbolic value. Leaves often represent growth, renewal, and the cycles of nature. Incorporating them into a quilt design not only adds beauty but also brings meaning to your handmade creation. This is one reason why many quilters love returning to the Leaves Quilt Block Tutorial – Quilt Pattern.
Choosing the right fabrics is essential for bringing the Leaves Quilt Block Tutorial – Quilt Pattern to life. Fabrics in shades of green, brown, gold, or red instantly create a fall aesthetic, while lighter greens and floral prints suggest spring and summer vibes. Your fabric palette sets the tone of the quilt and enhances the block’s design.
Batiks are a popular choice for this type of pattern because of their organic, nature-like appearance. A batik fabric with variegated shades can make your leaves look more realistic, giving depth to the Leaves Quilt Block Tutorial – Quilt Pattern. Solid fabrics also work well if you prefer a clean, modern aesthetic.
Scrappy quilts are another wonderful approach. Using leftover fabric in different shades creates a lively, textured quilt full of character. The Leaves Quilt Block Tutorial – Quilt Pattern is perfect for scrap projects because the leaf design thrives on variation, making every block unique.
Background fabric plays an equally important role. A neutral background such as white, cream, or light gray allows the leaves to stand out. On the other hand, darker backgrounds can create a dramatic effect, emphasizing the bold shapes in the Leaves Quilt Block Tutorial – Quilt Pattern.
Color placement is key. By carefully arranging darks and lights, you can add dimension to your block. Some quilters like to use gradient fabrics that move from light to dark, mimicking the look of real leaves. This technique makes the Leaves Quilt Block Tutorial – Quilt Pattern visually captivating.
Finally, seasonal fabrics can personalize your quilt even further. Fabrics with tiny acorns, vines, or floral prints can be paired with your leaves to tell a story. With thoughtful selection, the Leaves Quilt Block Tutorial – Quilt Pattern becomes more than a design—it becomes an expression of creativity.
The Leaves Quilt Block Tutorial – Quilt Pattern typically starts with cutting squares and triangles that will be assembled into leaf shapes. Accuracy during cutting is crucial to ensure clean lines and balanced blocks. A rotary cutter, self-healing mat, and clear ruler are your best tools for success.
Half-square triangles (HSTs) are often used in this block. Creating them efficiently saves time and ensures consistency. Many quilters prefer the two-at-a-time or four-at-a-time HST method when working with the Leaves Quilt Block Tutorial – Quilt Pattern, as it speeds up the process without sacrificing precision.
Chain piecing is another useful technique. By sewing multiple units in a continuous line, you reduce thread waste and maintain a steady workflow. This method is perfect when assembling multiple leaves blocks, making the Leaves Quilt Block Tutorial – Quilt Pattern project more efficient.
Pressing seams is just as important as sewing. Pressing them toward the darker fabric prevents shadows and creates a smoother finish. For beginners, finger pressing before ironing can help maintain accuracy in the Leaves Quilt Block Tutorial – Quilt Pattern.
Once your units are pieced, layout is the next step. Arrange your triangles and squares before stitching them together to ensure the leaf shape forms correctly. Taking time at this stage prevents mistakes and ensures a beautiful finish for your Leaves Quilt Block Tutorial – Quilt Pattern.
Finally, trim and square your block to the desired size. Squaring ensures each block fits seamlessly into the quilt top, keeping your final project neat and professional. With these steps, your Leaves Quilt Block Tutorial – Quilt Pattern will come together beautifully.
The Leaves Quilt Block Tutorial – Quilt Pattern offers endless possibilities for creative layouts. One classic approach is repeating the leaf blocks in rows to create the look of a field of leaves. This arrangement is simple yet striking, ideal for quilts that highlight seasonal themes.
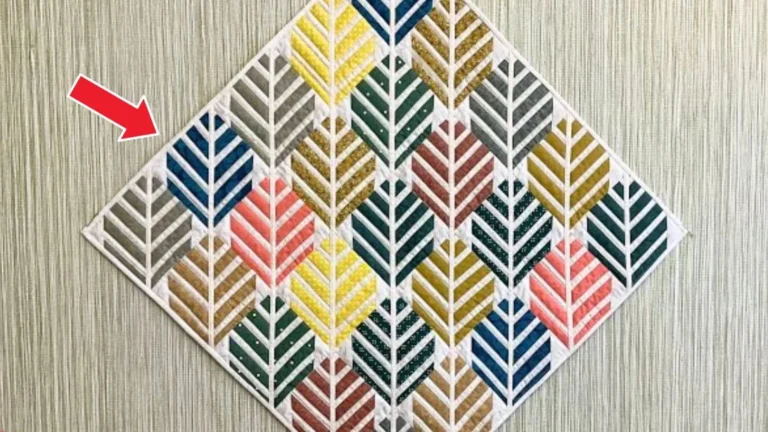
Diagonal layouts can also be eye-catching. By setting the leaves on-point, you create dynamic movement across the quilt. This technique adds energy to the Leaves Quilt Block Tutorial – Quilt Pattern and works beautifully for larger projects like bed quilts.
Another option is alternating the leaf blocks with plain squares or complementary designs. This gives breathing space in your quilt while still highlighting the leaf motifs. Many quilters love pairing the Leaves Quilt Block Tutorial – Quilt Pattern with log cabin or star blocks for added variety.
Mini quilts and wall hangings are fantastic small-scale projects for this design. A few leaf blocks combined make a perfect seasonal decoration. This is a great way to experiment with color and layout on a smaller canvas while enjoying the Leaves Quilt Block Tutorial – Quilt Pattern.
Table runners and placemats are also popular applications. A row of leaf blocks down the center of a table runner makes a warm autumn decoration. Smaller leaves quilt blocks can become coasters or potholders, showcasing the versatility of the Leaves Quilt Block Tutorial – Quilt Pattern.
Lastly, quilters often enjoy creating applique versions of leaf blocks. While the tutorial usually focuses on piecing, applique offers another dimension of creativity. Combining pieced and applique leaves makes the Leaves Quilt Block Tutorial – Quilt Pattern truly unique.
1. What size should I make my leaves quilt block?
Most leaf blocks range between 6 and 12 inches, but you can adjust the size to suit your project.
2. Is the Leaves Quilt Block good for beginners?
Yes, it’s very beginner-friendly. The block uses basic shapes like squares and triangles, making it easy to learn.
3. Can I make this block scrappy?
Absolutely! The Leaves Quilt Block Tutorial – Quilt Pattern looks wonderful with scrappy fabrics, adding texture and interest.
4. Do I need special tools for this block?
A rotary cutter, ruler, and cutting mat are highly recommended for precision, but no advanced tools are required.
5. What fabrics work best for the leaves?
Batiks, solids, or seasonal prints in greens, browns, and golds work beautifully for realistic leaves.
6. Can I combine leaf blocks with other patterns?
Yes, the Leaves Quilt Block Tutorial – Quilt Pattern pairs well with stars, flowers, and log cabin designs for variety.
The Leaves Quilt Block Tutorial – Quilt Pattern is a timeless design that allows quilters to connect with the beauty of nature while practicing essential piecing skills. From choosing fabrics and sewing techniques to exploring layouts and creative uses, this block offers limitless potential for expression. Its beginner-friendly construction and versatility make it a favorite among quilters of all levels.
I hope this article inspired you to try the Leaves Quilt Block Tutorial – Quilt Pattern in your next project. Have you ever made this design before? Share your honest thoughts, experiences, and suggestions—I’d love to hear your feedback and see how you bring your own creativity to this beautiful quilt block!

