
Charming Quilt Homes - Pattern
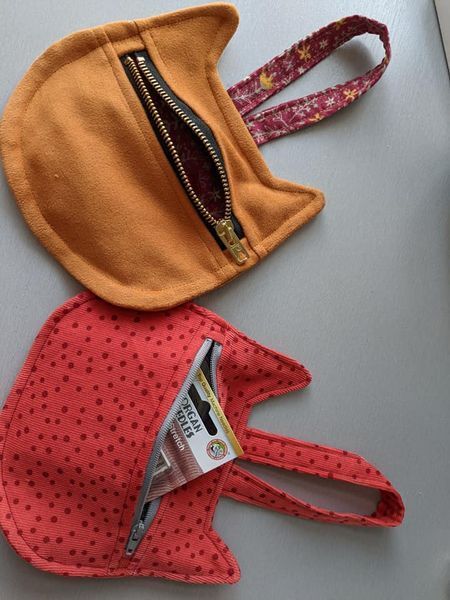
If you are looking for a creative and practical project, the Free Kitty Bag Sewing – Quilt Pattern is the perfect choice. This project allows you to combine functionality with charm, creating a bag that not only carries your essentials but also reflects your love for quilting and handmade crafts. From the playful kitty design to the thoughtful quilt details, this project is ideal for beginners and experienced sewists alike.
Working on a Free Kitty Bag Sewing Pattern – Quilt Pattern provides the opportunity to experiment with fabric choices, textures, and quilting techniques while creating something truly personal. You can adjust colors, add embellishments, or keep it simple for everyday use. This makes the project versatile and suitable for gifting, personal use, or even selling in craft fairs.
In this article, we will explore step-by-step ideas, tips, and inspiration to make your kitty bag project enjoyable and rewarding. Whether you are sewing for fun or looking for a meaningful handmade gift, the Free Kitty Bag Sewing – Quilt Pattern will guide you toward a delightful creation.
When starting your Free Kitty Bag Sewing Pattern – Quilt Pattern, the fabric you choose sets the tone for your entire project. Opt for durable cotton fabrics that are easy to quilt and long-lasting for everyday use. You can mix prints for a fun look or choose solids for a minimalist style.
One of the joys of this project is experimenting with color. Bright fabrics can make your kitty bag playful and eye-catching, while soft neutrals create a sophisticated and elegant feel. By carefully selecting your palette, you can bring your kitty design to life in a unique way.
Patterns such as polka dots, florals, and stripes blend well with quilting techniques and can enhance the visual appeal of your bag. Mixing bold prints with subtle fabrics ensures that your kitty stands out beautifully.
For durability, consider adding interfacing or stabilizer inside the bag layers. This gives structure to your quilted kitty bag and ensures it holds its shape while carrying items.
Think about the lining fabric too. A contrasting or complementing lining adds a surprise element every time you open your kitty bag, making it even more special.
Finally, always prewash your fabrics before cutting and sewing. This prevents shrinkage later and keeps your finished Free Kitty Bag Sewing – Quilt Pattern looking professional and neat.
The sewing process of the Free Kitty Bag Sewing – Quilt Pattern is where the real fun begins. This is where your creativity turns into a tangible product. Start with precise cutting to ensure all pieces align correctly when assembling your quilted bag.
Use a walking foot for your sewing machine if possible. This helps manage layers of fabric and batting, especially when quilting through thicker sections. It will keep your stitches straight and even, which is essential for a polished finish.
Quilting stitches can be simple or decorative. Straight-line quilting provides a clean, modern look, while free-motion quilting adds whimsy and detail to your kitty bag. Both methods highlight the quilt pattern beautifully.
When assembling, focus on reinforcing seams. Bags are used frequently, so durability is key. Double-stitch or backstitch areas that will handle more stress, such as handles or base corners.
Adding a zipper or snap closure can make your kitty bag more practical. Choose hardware that complements your fabric choices, blending style with function.
Don’t forget the final press. Ironing your seams and overall bag ensures it looks crisp and professional, giving your Free Kitty Bag Sewing – Quilt Pattern a perfect finishing touch.
One of the most enjoyable aspects of the Free Kitty Bag Sewing – Quilt Pattern is personalization. The kitty design itself is a blank canvas for creativity, allowing you to make each bag one-of-a-kind.
Appliqué techniques can be used to add kitty faces, paws, or other details. Using embroidery, you can stitch whiskers, eyes, or even playful expressions that give your bag personality.
Buttons, bows, or fabric flowers can add charming details. These small touches elevate the kitty theme and make your bag truly unique to your style.
Consider adding extra pockets inside or outside the bag. They are practical for organizing and also allow for more decorative quilting panels to shine.
For those who love hand stitching, sashiko-style embroidery or decorative topstitching can bring a handmade, artistic feel to the kitty bag.
If gifting, you can customize the Free Kitty Bag Sewing – Quilt Pattern with initials or favorite colors of the recipient. This makes the bag not just a practical item but also a thoughtful and personal present.
Once your kitty bag is complete, it becomes a practical yet stylish accessory. The Free Kitty Bag Sewing Pattern – Quilt Pattern is versatile enough for many occasions and uses.
It makes a perfect everyday tote for carrying books, groceries, or small essentials. The quilted structure gives it strength while still being lightweight.
For children, this kitty bag can become a playful companion. They can carry toys, snacks, or art supplies, and the fun kitty design makes it appealing to little ones.
Crafters and quilters can also use the kitty bag to store sewing notions or small projects on the go. It’s both functional and a proud showcase of your sewing skills.
Travelers will find the kitty bag handy as a secondary travel tote. It folds easily into luggage but can be pulled out for day trips, carrying souvenirs, or essentials while sightseeing.
Finally, the kitty bag makes a fantastic handmade gift. With its thoughtful quilting details, it shows effort and care, making it a cherished item for anyone who receives it.
1. Is the Free Kitty Bag Sewing – Quilt Pattern suitable for beginners?
Yes, this pattern is beginner-friendly. Basic sewing and quilting skills are enough to get started, and the project offers a great opportunity to practice both.
2. What size should I expect my finished kitty bag to be?
The size can vary depending on how you scale the pattern, but most versions are medium-sized totes, large enough to carry essentials without being too bulky.
3. Do I need special tools to make the kitty bag?
Basic sewing supplies such as scissors, rotary cutter, ruler, pins, and a sewing machine are sufficient. A walking foot and quilting gloves can make the process easier but are optional.
4. Can I use scraps for this project?
Absolutely. The Free Kitty Bag Sewing – Quilt Pattern is perfect for using up fabric scraps, especially when creating the quilted sections. It’s an eco-friendly and cost-effective option.
5. How can I make my kitty bag more durable?
Adding interfacing, reinforcing seams, and using strong handles will extend the bag’s lifespan. Choosing high-quality fabrics also helps maintain its shape and strength.
6. Can I sell kitty bags I make using this pattern?
Yes, handmade items using this pattern can be sold, as long as they are crafted by you. Many sewists enjoy selling them at markets, craft fairs, or online shops.
The Free Kitty Bag Sewing – Quilt Pattern is a delightful project that combines quilting artistry with practical sewing. From choosing fabrics to adding personalized touches, this pattern allows you to explore your creativity while crafting something useful and charming. With its versatility and charm, it is perfect for beginners, seasoned quilters, and anyone looking to create a meaningful handmade bag.
Now that you have learned about this pattern, we’d love to hear from you! Share your thoughts, experiences, and suggestions about the Free Kitty Bag Sewing – Quilt Pattern. Your feedback not only inspires new projects but also helps others discover the joy of handmade sewing. Would you like me to expand this article with step-by-step cutting and assembly instructions to make it even more complete?


