
Charming Quilt Homes - Pattern
The Sawtooth Star Quilt Block – Quilt Pattern is one of the most beloved traditional designs in quilting. Its clean lines, timeless symmetry, and radiant star shape have captured the hearts of quilters for generations. Whether you are a beginner eager to learn the basics or an experienced quilter looking to refine your skills, this pattern offers a beautiful balance of simplicity and elegance. In this article, we’ll explore everything you need to know about this iconic block, from its history and construction techniques to creative variations and assembly tips.
The beauty of the Sawtooth Star Quilt Block lies in its versatility. It can be adapted to any color palette, from soft pastels to bold contrasts, making it perfect for seasonal quilts, baby blankets, wall hangings, and even large bed quilts. The Quilt Pattern itself uses basic shapes—squares and flying geese units—making it approachable while still offering endless design possibilities. The star can be the focal point of a quilt or part of a repeating pattern, and with thoughtful fabric choices, it can create stunning visual movement.
What makes this pattern stand out is its deep connection to quilting heritage. The Sawtooth Star Quilt Block – Quilt Pattern dates back to the 1800s, a time when quilting was not just a hobby but an art form and necessity. Each block told a story through fabric and color. Today, this pattern continues to inspire quilters who appreciate its historical charm and modern adaptability. Let’s explore how to make your own Sawtooth Star and bring this classic design to life.
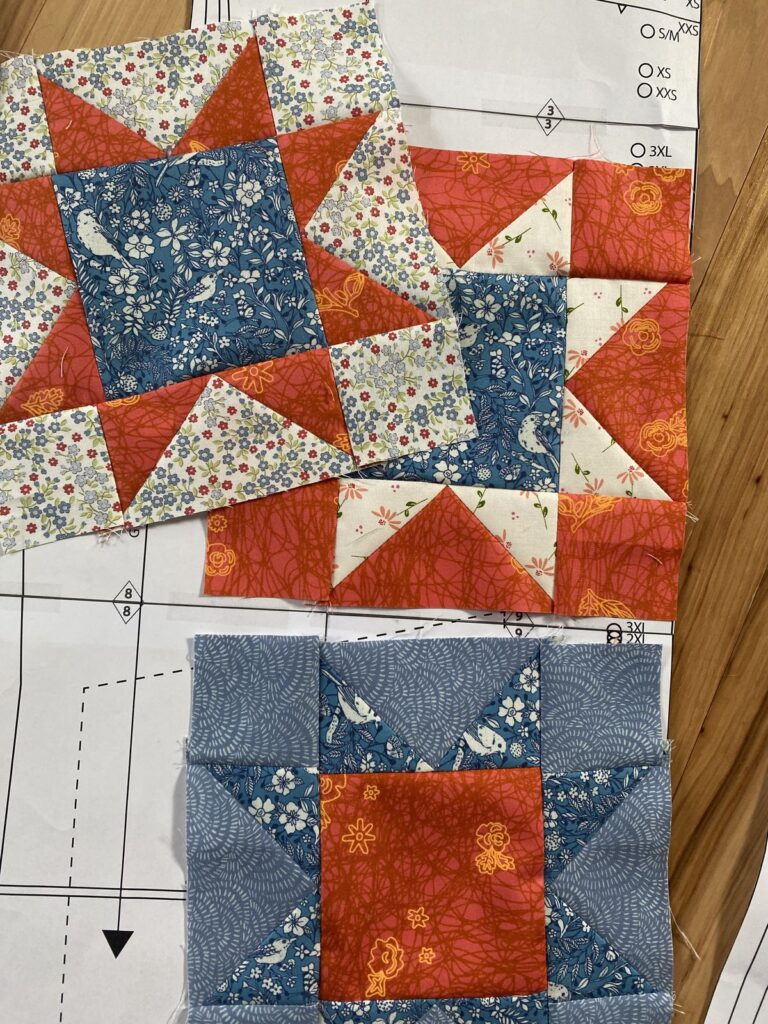
The Sawtooth Star Quilt Block gets its name from the pointed “teeth” that surround the center square, resembling the edge of a saw blade. These points are created using flying geese units, which form the signature star shape. The block typically consists of nine sections arranged in a simple 3×3 grid: one large center square, four corner squares, and four flying geese units.
The traditional Quilt Pattern can be made in a variety of sizes. Common measurements include 6-inch, 8-inch, and 12-inch blocks, depending on the project. Smaller blocks are ideal for wall hangings or table runners, while larger blocks work beautifully for quilts and bedspreads. Adjusting the scale allows for creative flexibility without altering the overall design.
Fabric choice plays a major role in the appearance of your Sawtooth Star Quilt Block. Many quilters choose a light background with a dark star for contrast, but reversing these colors can create a dramatic and modern effect. Using patterned fabrics can add texture and personality, while solid fabrics highlight the crisp geometry of the star.
When planning your Quilt Pattern, pay attention to fabric values—light, medium, and dark tones—to create visual depth. The contrast between the star points and background is key to making the design stand out. Always test your color combinations before cutting fabric to ensure the star shines as the focal point.
Accuracy in cutting and piecing is essential for success. The flying geese units should align perfectly so the star points meet at the corners of the center square. Using a consistent ¼-inch seam allowance will help keep your block square and balanced. Precision is what gives the Sawtooth Star Quilt Block its sharp, professional look.
Finally, press your seams carefully. Pressing toward darker fabrics or using the “nesting seams” technique can help your points match perfectly. A well-pressed block not only looks better but also makes the assembly process smoother later on.
To begin creating your Sawtooth Star Quilt Block – Quilt Pattern, start by selecting your fabrics. Choose one for the background, one for the star points, and one for the center square. For a traditional look, pick complementary or contrasting colors that highlight the star.
Next, cut your fabric pieces. You’ll need one large square for the center, four smaller squares for the corners, and eight rectangles and squares for the flying geese units. Using a rotary cutter and quilting ruler ensures clean, precise cuts that make assembly easier.
The flying geese units are the heart of the Sawtooth Star Quilt Block. To make them, place a small square on one end of a rectangle, right sides together, and sew diagonally from corner to corner. Trim the excess fabric, press open, and repeat on the other side. This creates one “goose.” You’ll need four of these for each block.
Once the flying geese are ready, lay out all your pieces in a 3×3 grid to form the Quilt Pattern. The center square sits in the middle, the flying geese surround it to form the star points, and the small squares fill the corners. This arrangement helps you visualize the final look before stitching.
Sew the block together in horizontal rows. Join the top row first (flying goose + corner + flying goose), then the middle row (goose + center square + goose), and finally the bottom row. Press each seam as you go to maintain accuracy. When all three rows are complete, sew them together to form the full Sawtooth Star Quilt Block.
To finish, press the entire block flat and square it up if needed. The edges should align perfectly. Once you’ve made one, you’ll find that the Sawtooth Star Quilt Block – Quilt Pattern is both satisfying and addictive—you’ll want to make an entire quilt full of stars!
The Sawtooth Star Quilt Block is a classic design, but that doesn’t mean it can’t be modernized. With a little creativity, you can make countless variations that reflect your personal style. Try playing with scale, color, and placement to give this timeless pattern a fresh twist.
One popular variation involves adding a secondary design in the center square. You can use a fussy-cut piece of fabric featuring a floral motif, an animal print, or a geometric pattern that draws the eye. This technique adds personality and makes your Quilt Pattern unique.
Another fun approach is to use scrappy fabrics for the star points. Mixing different prints and textures gives a vibrant, patchwork feel that celebrates the spirit of traditional quilting. This variation works especially well with leftover fabric scraps, making it an eco-friendly option.
Modern quilters sometimes experiment with negative space, placing the Sawtooth Star Quilt Block off-center in a large background fabric. This minimalist style emphasizes the star and gives a clean, contemporary look to the quilt.
You can also try alternating the direction of your stars to create dynamic movement across the quilt top. When arranged in rows, the stars seem to dance across the fabric, creating rhythm and energy. This technique works beautifully in both small and large quilts.
Finally, experiment with different color gradients—such as ombre or rainbow tones—to make your Sawtooth Star Quilt Block – Quilt Pattern truly stand out. Using gradual color transitions can transform a traditional design into a modern masterpiece.
Once you’ve assembled several Sawtooth Star Quilt Blocks, it’s time to piece them together into a larger quilt. Lay out your blocks on a design wall or flat surface to decide on the best arrangement. Consider alternating colors or adding sashing (strips between the blocks) for a polished look.
Adding borders can enhance the overall design of your Quilt Pattern. A simple narrow border can frame the stars beautifully, while a wider border can create a dramatic effect. Choose fabrics that complement your star colors to maintain harmony.
When quilting, decide on a stitching pattern that complements the star motif. Straight-line quilting emphasizes the geometric structure, while free-motion quilting can add softness and flow. Both approaches work well with the Sawtooth Star Quilt Block, depending on your desired aesthetic.
Binding is the final step that completes your project. Choose a binding fabric that either contrasts for a bold frame or blends for a subtle finish. Carefully sew it around the edges to secure the quilt layers together.
Don’t forget to label your quilt with your name and date—it’s a meaningful touch that honors your work. Quilts made with the Sawtooth Star Quilt Block – Quilt Pattern often become cherished keepsakes, passed down through generations.
Finally, take time to admire your finished piece. Each block represents patience, creativity, and craftsmanship. Whether you make one block or an entire quilt, you’ve created something timeless and uniquely yours.
1. What size should I cut my fabric for a Sawtooth Star Quilt Block?
For a 12-inch finished block, cut one 6½” center square, four 3½” corner squares, and use 3½” x 6½” rectangles for the flying geese units. Adjust these measurements proportionally for different block sizes.
2. Can I make a Sawtooth Star Quilt Block without flying geese units?
Yes, some quilters prefer to use half-square triangles instead of flying geese. This method can simplify construction but may add more seams.
3. What fabrics work best for this quilt pattern?
Cotton quilting fabrics are ideal because they hold shape well and are easy to press. Choose high-contrast colors to make the star stand out.
4. How do I prevent my star points from getting cut off?
Ensure consistent ¼-inch seam allowances and avoid trimming too much fabric when piecing. Accurate cutting and careful pressing also help maintain sharp points.
5. Can I make a whole quilt using only Sawtooth Star Blocks?
Absolutely! Many quilters create entire quilts using this pattern. Try alternating color schemes or adding sashing between blocks for variety.
6. What is the best quilting design for a Sawtooth Star Quilt?
Straight-line quilting works beautifully, especially when following the lines of the star. However, free-motion designs can also add softness and character.
The Sawtooth Star Quilt Block – Quilt Pattern is more than just a traditional design—it’s a celebration of quilting history, creativity, and craftsmanship. From its elegant symmetry to its endless variations, this block offers both beauty and versatility. Whether you’re a beginner learning to sew your first quilt or an experienced quilter refining your technique, the Sawtooth Star will always be a rewarding choice.
Now that you’ve learned the steps, tips, and creative ideas for making your own Sawtooth Star Quilt Block, it’s time to put needle to fabric and bring your masterpiece to life. I’d love to hear your thoughts! Please share your honest opinion and suggestions about this Quilt Pattern—your feedback helps inspire future projects and fellow quilters around the world.


