
Charming Quilt Homes - Pattern
How to Make Fabric Alphabet Letters – Quilt Pattern is a creative and educational sewing project that brings together quilting skills and personalized design. These fabric letters are not only fun to make, but they also serve multiple purposes: they can be used as learning tools for children, as charming decorations, or even as thoughtful handmade gifts. By using colorful fabrics, basic quilting techniques, and a touch of creativity, you can create a unique set of quilted alphabet letters that will be treasured for years to come.
One of the best aspects of making fabric alphabet letters is the endless customization. You can choose fabrics that reflect your style, seasonal colors, or even repurpose fabric scraps from other quilting projects. This makes the craft eco-friendly and budget-friendly, while also giving you an opportunity to practice new quilting patterns on a small scale. Whether you are a beginner or an experienced quilter, this project is an excellent way to explore new techniques without the pressure of working on a large quilt.
In this article, we will walk through everything you need to know about how to make fabric alphabet letters – quilt pattern, from selecting the right materials to finishing your letters with precision. You’ll learn step-by-step tips, creative variations, and practical uses for your finished pieces. By the end, you’ll feel confident starting your own set of quilted alphabet letters and maybe even inspired to expand into other handmade fabric projects.
When beginning a project like how to make fabric alphabet letters – quilt pattern, the first and most important step is selecting the right materials. The fabrics you choose will determine the look, durability, and overall feel of your alphabet letters. Bright cotton fabrics are ideal because they are easy to work with, durable, and available in countless colors and prints.
It’s a good idea to use fabric scraps from previous quilting projects. This gives your letters a patchwork charm while also being environmentally conscious. You might even consider choosing a specific color palette to keep the alphabet cohesive and visually appealing.
In addition to fabrics, you’ll need some quilting batting or stabilizer to give the letters structure. Batting helps the letters hold their shape and gives them a soft, quilted feel, while stabilizer ensures they don’t become floppy.
Essential supplies include fabric scissors, pins, a rotary cutter, a quilting ruler, and a sewing machine. A simple straight stitch is usually sufficient, though you can add decorative stitches if you want more flair. Don’t forget to prepare an iron for pressing your pieces, which will make sewing easier and neater.
Thread selection is also important. Matching thread will blend into the fabric, while contrasting thread can create bold outlines around each letter. Both options work well depending on the look you want.
Finally, think about safety if the letters are for children. Using fabrics free of loose embellishments and avoiding small buttons or beads ensures your quilted letters remain safe for little hands.
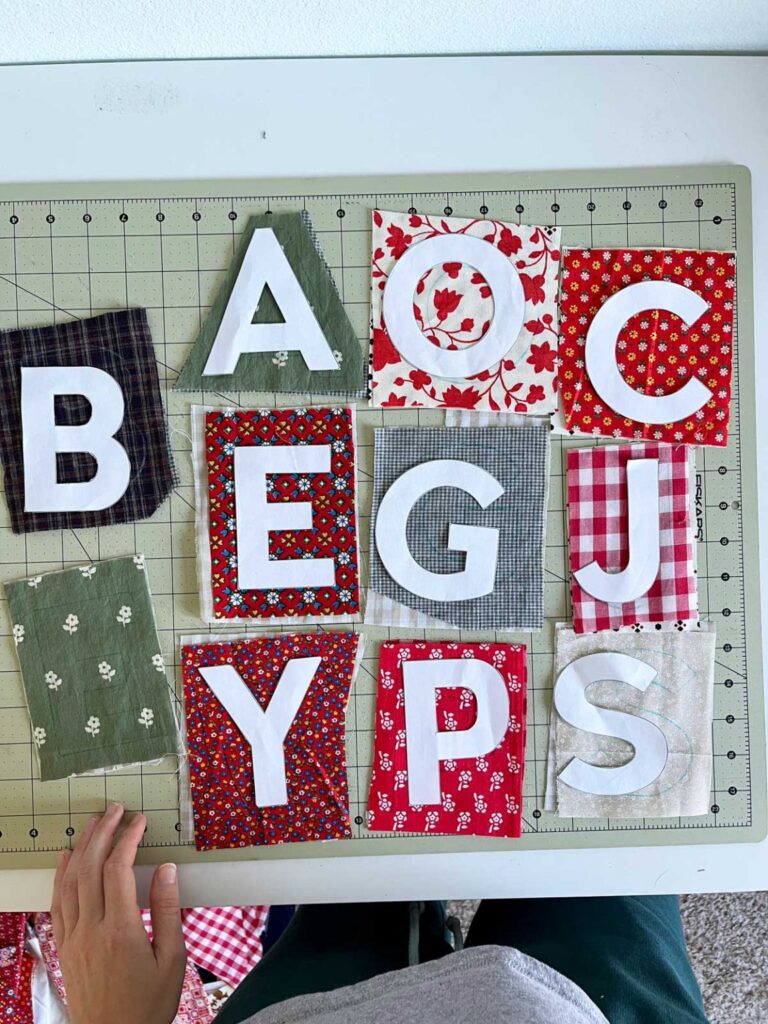
Once your fabrics and supplies are ready, the next step in how to make fabric alphabet letters – quilt pattern is preparing your templates. These templates are essential because they ensure all your letters come out consistent in size and shape.
You can draw your own letters on cardboard or heavy paper, or print templates in the font style you prefer. Bold, simple block letters usually work best, as they are easier to cut and sew than delicate or ornate fonts.
After creating the templates, trace each letter onto the back of your fabric. Remember that you will need two fabric pieces per letter: one for the front and one for the back. Using a fabric marker or chalk ensures the markings are visible but removable later.
Next, cut out batting or stabilizer in the same shape as your letters. This layer will be sandwiched between the front and back fabric pieces to provide structure. Accuracy during cutting is key, so take your time with this step.
For a more professional finish, consider adding seam allowances when cutting your fabric. This extra space around the edges makes it easier to sew and turn the letters inside out without losing their shape.
After cutting, press your fabric pieces with an iron to remove wrinkles and prepare them for sewing. A smooth fabric surface is much easier to work with and leads to cleaner results.
With your letters cut and prepared, you’re ready to move on to stitching them into quilted shapes.
The heart of how to make fabric alphabet letters – quilt pattern is in the sewing and quilting process. Start by layering your fabric pieces: place the front fabric face down, then add the batting or stabilizer, and finally place the back fabric face up. Pin the layers together to prevent shifting during sewing.
Using your sewing machine, stitch around the outline of each letter, leaving a small opening for turning. Keep your stitches neat and close to the edge, as this will define the shape of your letter. If you want extra durability, go over the seams twice.
Once stitched, carefully trim the excess fabric around the seams. Clip curves and corners so the fabric lays flat when turned right-side out. This detail is especially important for letters with rounded or angled shapes.
Turn the letters inside out through the opening. Use a blunt tool, like the end of a knitting needle or a chopstick, to gently push out the corners and curves. Then press the letter flat with an iron to set the shape.
Close the opening by hand stitching or machine stitching close to the edge. This final seam keeps the batting secure inside and completes the construction of your letter.
For a quilted look, you can stitch decorative lines or patterns across the surface of the letters. This adds both strength and beauty, making each letter unique. Straight-line quilting, zigzag stitches, or even free-motion quilting can all work beautifully on these small projects.
Now that you’ve mastered how to make fabric alphabet letters – quilt pattern, it’s time to explore the many creative ways to use them. These handmade letters are versatile and can serve different purposes depending on your needs.
One of the most popular uses is educational. Children can use the letters to learn the alphabet, practice spelling, and develop fine motor skills. Soft quilted letters are safe, tactile, and engaging for young learners.
Fabric letters also make charming room decorations. You can spell out a child’s name above their bed, create holiday-themed words for seasonal décor, or hang them as bunting at parties and events.
They make thoughtful, personalized gifts as well. A set of initials or a baby’s full name crafted from quilted letters is a wonderful present for new parents, blending creativity with practicality.
Another creative use is in sensory play. Because the letters are soft and textured, they can be incorporated into quiet play mats or activity boards. Adding textures like corduroy, velvet, or denim fabrics enhances the sensory experience.
Finally, consider combining your quilted letters with other sewing projects. You could attach them to tote bags, quilts, or pillows to personalize household items. They are also perfect additions to themed quilts, where each letter can be part of a larger story or design.
The possibilities are endless, and that’s what makes fabric alphabet letters such a delightful sewing project.
1. What fabrics are best for quilted alphabet letters?
Cotton fabrics are ideal because they are easy to work with and durable. Scraps from other quilting projects also work wonderfully.
2. Do I need special tools to make fabric letters?
No, basic quilting tools like scissors, a rotary cutter, pins, a sewing machine, and an iron are enough.
3. Can I make fabric alphabet letters without a sewing machine?
Yes, you can sew them by hand, though it will take longer. Hand stitching can also add a charming handmade look.
4. How do I make the letters sturdy enough for play?
Using batting or stabilizer between the fabric layers helps the letters hold their shape and makes them more durable.
5. Can I wash quilted alphabet letters?
Yes, if you use washable fabrics and secure stitching, the letters can be machine washed on a gentle cycle.
6. What size should I make fabric alphabet letters?
This depends on their use. For play and learning, larger letters (4–6 inches tall) are ideal. For decorations, smaller sizes may work better.
7. How can I decorate fabric letters further?
You can add appliqué, embroidery, or decorative stitches. Just be cautious about small embellishments if the letters are for children.
8. Are quilted alphabet letters beginner-friendly?
Absolutely. They are a simple project with small pieces, making them great for beginners to practice quilting techniques.
Learning how to make fabric alphabet letters – quilt pattern opens up a world of creativity and practical crafting. From choosing fabrics and cutting templates to sewing and exploring unique uses, this project combines fun with functionality. These letters can educate, decorate, and delight, all while showcasing your quilting skills.
I’d love to hear your thoughts! Have you tried making quilted alphabet letters before? Share your opinion and suggestions in the comments—I look forward to your feedback.


