Sandhills Star Quilt Block - Quilt Pattern
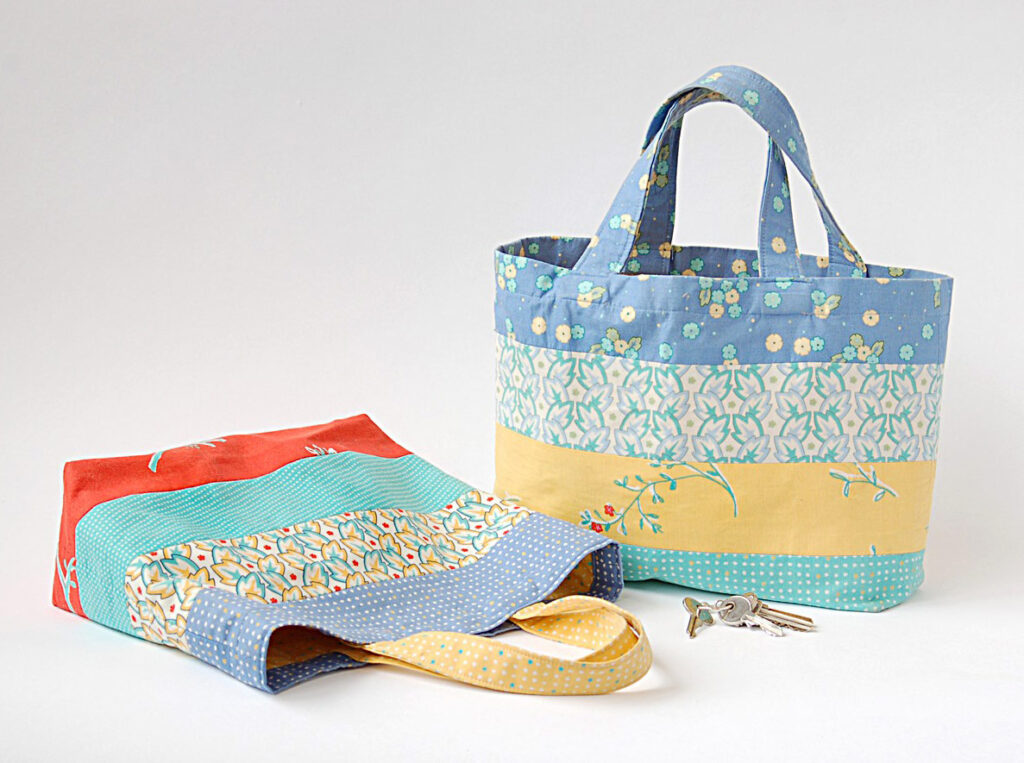
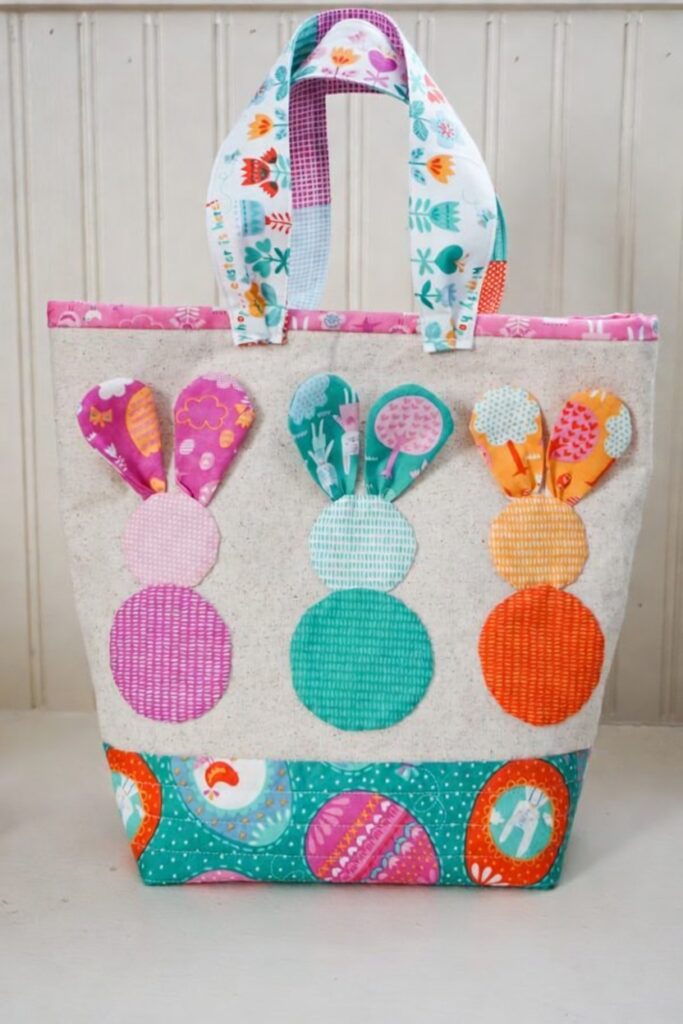
Starting a creative sewing journey with a Mother and daughter tote bag tutorial – Quilt Pattern is not only about making a beautiful accessory, but also about sharing memories, skills, and love through fabric. Whether you are an experienced quilter or just starting out, this project offers a blend of functionality and charm. Tote bags are timeless, and when you add a quilted touch, they become even more unique, cozy, and personal.
The beauty of a quilted tote lies in its versatility. You can use fabrics that match your personality, add a special touch for your daughter, and even experiment with fun patterns that make each bag one-of-a-kind. By following a clear quilt pattern, this project becomes both enjoyable and achievable for beginners and advanced crafters alike. The joy of quilting something that is not only practical but also symbolic of a relationship makes this project deeply rewarding.
This Mother and daughter tote bag tutorial – Quilt Pattern provides a structured yet creative process to sew bags that can be carried to school, work, or weekend outings. Handmade bags always stand out, and quilting techniques add durability and artistry that cannot be found in store-bought items. Now, let’s walk step by step through this guide and bring your vision to life.
When starting this Mother and daughter tote bag tutorial – Quilt Pattern, the first step is selecting fabrics that reflect personality and function. Cotton is often the best choice, as it is easy to sew and works well with quilting techniques. Adding contrasting colors for the mother and daughter versions makes the project fun and visually appealing.
Before cutting, wash and iron the fabric to avoid shrinkage later. Preparing fabric correctly ensures the finished tote holds its shape. Consider adding batting for softness and structure, which is essential in quilted projects. Batting not only enhances durability but also gives a professional look.
You will also need basic quilting supplies: rotary cutter, ruler, cutting mat, sewing machine, and matching threads. Having these ready saves time and keeps the process smooth. It is always helpful to prepare everything before beginning, especially if sewing alongside your daughter.
Another tip is to choose fabrics with playful prints for the child’s tote, while keeping the adult version slightly more neutral or sophisticated. This creates harmony while maintaining individuality. Using complementary tones ties the two bags together beautifully.
Cutting fabric into squares or strips according to the quilt pattern will guide the rest of the project. Precision is key here, as it ensures your seams align properly. Measure twice and cut once to avoid mistakes that can affect the final shape.
Lastly, involve your daughter in fabric selection. Allowing her to pick patterns she loves gives her ownership and excitement about the tote she will proudly carry.
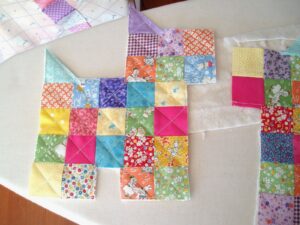
The next step in the Mother and daughter tote bag tutorial – Quilt Pattern is piecing together the quilt blocks that will form the body of the bag. Begin by arranging your fabric pieces in a layout you like. Play with different combinations until the design feels balanced and pleasing.
Start sewing the pieces row by row, pressing the seams flat after each line. This keeps the quilt top neat and prevents bulky areas. A flat quilt top results in a cleaner look when assembling the tote.
Once the rows are complete, join them to create the front and back panels of the tote. At this stage, you will already see the personality of the bags coming through. It is inspiring to notice how simple pieces transform into a quilted design.
For durability, use a ¼-inch seam allowance. This is standard in quilting and ensures strength while keeping the design aligned. Consistency in seam allowances is crucial for accuracy.
If sewing with your daughter, this step becomes a wonderful teaching opportunity. She can help arrange pieces, choose which block goes where, and even stitch under guidance. It transforms the process into a bonding experience.
Finally, layer the quilt top with batting and backing fabric, securing them together with pins. This quilt sandwich forms the structure of your tote. You can choose simple straight-line quilting or free-motion designs depending on skill level.
Now comes the exciting part of the Mother and daughter tote bag tutorial – Quilt Pattern: turning the quilted panels into a functional tote. Begin by trimming excess batting and backing to match the quilt top. Ensure all edges are even before moving forward.
Sew the front and back panels together along the sides and bottom, leaving the top open. Reinforce these seams for strength, as tote bags often carry weight. Backstitching at the beginning and end helps prevent unraveling.
To create depth, box the corners of the bag. This is done by folding each corner, matching seams, and stitching across a measured distance. Boxing gives the tote structure and makes it more spacious inside.
Next, prepare the lining. Cut two pieces of fabric equal to the quilted panels. Sew them together in the same way, leaving an opening at the bottom for turning. The lining provides a neat interior finish and adds strength.
Handles are essential. Cut fabric strips or use pre-made straps, making sure they are sturdy. Attach them to the quilted panels before sewing the lining and exterior together. Handles can be customized in length depending on whether the tote is for a child or an adult.
Finally, place the lining inside the quilted bag, right sides together, and sew around the top edge. Turn the bag right side out through the lining opening, then stitch the opening closed. Give the tote a final press, and it’s ready to use.
The last stage of the Mother and daughter tote bag tutorial – Quilt Pattern is all about personalization. Add decorative touches such as appliqué, embroidery, or buttons to make the totes special. Each addition tells a story and makes the bags truly unique.
For the daughter’s tote, consider fun embellishments like patches or fabric paints. Children love having a bag that feels playful and reflects their style. For the mother’s tote, minimalist details such as quilting motifs or monogramming add elegance.
Practicality is also important. Add inside pockets to store smaller items like keys or phones. A magnetic snap or zipper closure can keep belongings secure. These small touches enhance usability while keeping the bags stylish.
Once finished, these totes can be used in daily life—whether for school, shopping, work, or outings together. Carrying matching or complementary bags creates a lovely bond and visual connection between mother and daughter.
This project also makes for a thoughtful gift. Handmade totes represent care, time, and love, making them treasured presents for birthdays, holidays, or simply as a surprise.
Most importantly, the process of creating together leaves lasting memories. The finished tote is not just a bag but a symbol of shared creativity and love.
What size should the tote bags be?
The size depends on preference. A medium tote is ideal for everyday use, while a smaller one works well for children. Adjust the quilt pattern dimensions accordingly.
Can beginners follow this tutorial easily?
Yes, this Mother and daughter tote bag tutorial – Quilt Pattern is beginner-friendly. The steps are straightforward, and quilting techniques are explained in a simple way.
Do I need a quilting machine to make this bag?
A standard sewing machine is enough. Straight-line quilting can be done without specialized equipment, making this project accessible to everyone.
What kind of batting works best?
Lightweight cotton batting is recommended for this project. It adds structure without making the bag too bulky.
How can I personalize the tote bags further?
You can add embroidery, appliqué, fabric paint, or even use fabrics that hold personal meaning. Creativity is encouraged to make each tote unique.
Are these bags washable?
Yes, if you use pre-washed cotton fabrics and batting, the bags are machine washable. Gentle cycles and air drying are recommended to maintain shape.
Creating a Mother and daughter tote bag tutorial – Quilt Pattern is more than just a sewing project—it is an experience filled with creativity, bonding, and functionality. From fabric selection to personalization, each step allows you to express love and individuality while producing a practical accessory.
I hope this guide has inspired you to start quilting your own matching totes. If you try this project, please share your honest opinion and suggestions. Your feedback helps improve tutorials and keeps the creative community growing with fresh ideas.


