
Charming Quilt Homes - Pattern
The Carpenter’s Star – Quilt Pattern is one of the most captivating and versatile designs in the world of quilting. Loved for its geometric beauty and timeless charm, this pattern brings together tradition, precision, and creativity in a way that few other blocks can. Whether you are a beginner eager to learn or an experienced quilter looking for a new challenge, the Carpenter’s Star never fails to inspire and delight.
This design is unique because it combines the precision of sharp angles with the warmth of handcrafting. The Carpenter’s Star – Quilt Pattern allows quilters to play with colors, contrast, and fabric textures to create a bold visual effect. Many quilters enjoy how the star appears almost three-dimensional, making the finished quilt look both intricate and impressive while remaining achievable through careful piecing.
Another reason this pattern has become a favorite is its ability to tell stories. Quilters often select fabric combinations that reflect memories, seasons, or personal styles. With its striking layout, the Carpenter’s Star – Quilt Pattern becomes more than just a quilt block—it turns into an heirloom piece, something that families treasure for years. Let’s explore the steps, variations, and inspiration behind this timeless quilting pattern.
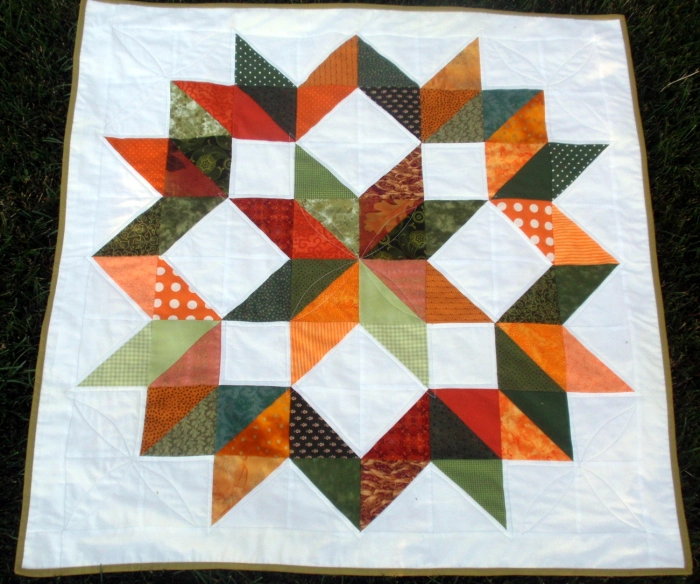
The Carpenter’s Star – Quilt Pattern is rooted in traditional quilting, yet it has stood the test of time due to its elegance and versatility. It is constructed from diamond-shaped units, which come together to form a radiant star in the center of the quilt.
This pattern is popular among quilters because it allows for countless color variations. By playing with light and dark fabrics, the star can appear bold, subtle, or even glowing, depending on your vision. The geometric symmetry creates a strong focal point, making it ideal for both large quilts and smaller decorative projects.
Historically, this quilt design was used as a way to showcase precision in craftsmanship. Each seam needed to be aligned perfectly, which required patience and careful cutting. Over time, quilters have developed modern techniques and tools that make piecing the Carpenter’s Star much easier while still honoring its traditional roots.
Another advantage is that the Carpenter’s Star – Quilt Pattern can be scaled to any size. You can use it as the centerpiece of a bedspread, a cozy throw, or even a wall hanging. Its adaptability makes it a go-to design for many quilting projects.
The star’s structure is also ideal for highlighting fabric collections. If you have a bundle of coordinating fabrics, this pattern allows you to showcase each piece beautifully within a unified design. It is both artistic and practical, combining efficiency with style.
Above all, learning to create this pattern gives quilters a sense of accomplishment. It looks advanced, but once broken down into smaller steps, the process becomes manageable and enjoyable. That balance of challenge and satisfaction is what makes it such a beloved design.
Starting your own Carpenter’s Star – Quilt Pattern begins with preparation. First, gather your fabrics, ensuring you have a mix of contrasting colors to make the star shine. Cotton fabrics are usually the best choice, as they press well and hold their shape during sewing.
Cutting is one of the most crucial steps. You will need diamond shapes, which can be cut using a rotary cutter and a quilting ruler. Accuracy here is essential; small errors in cutting can affect how well the pieces fit together later on.
Next, you’ll assemble the star by joining the diamond units into larger sections. Many quilters prefer to work in quadrants, which makes the piecing process more organized and manageable. This approach also reduces mistakes and keeps seams aligned.
As you sew, press the seams carefully to one side or open, depending on your preference. Pressing is not just about neatness—it helps your pieces fit better and reduces bulk in the finished quilt. A well-pressed star will have crisp lines that emphasize its beauty.
Once the main star is assembled, you can add borders, background fabric, or additional blocks around it. This flexibility allows you to personalize the quilt to match your vision, whether you prefer a minimalist look or a more detailed composition.
Finally, quilting the finished top adds another layer of artistry. Straight-line quilting enhances the star’s geometry, while free-motion quilting can introduce curves and textures that soften the sharp lines. Binding the quilt completes the process, leaving you with a masterpiece to treasure.
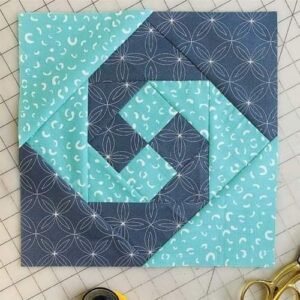
One of the most exciting aspects of the Carpenter’s Star – Quilt Pattern is experimenting with color. The star’s geometry makes it highly responsive to contrasts, which means your fabric choices can completely transform the look of the quilt.
A classic approach is to use a light background with a dark star, creating a dramatic focal point. This traditional look never goes out of style and is perfect for showcasing strong, solid fabrics.
On the other hand, modern quilters often prefer bold, bright colors. Imagine a Carpenter’s Star made from vibrant batiks, or rainbow shades arranged in a gradient. The result is eye-catching and playful, while still respecting the star’s timeless design.
Neutral tones also work beautifully. Grays, creams, and soft pastels give the quilt a calming, understated elegance. This approach is ideal if you want the quilt to blend seamlessly into home décor while still offering a touch of artistry.
Seasonal color palettes are another option. Reds and greens can turn the Carpenter’s Star into a festive holiday quilt, while blues and whites evoke a winter theme. In autumn, warm shades of orange, gold, and brown bring out a cozy, rustic feeling.
Ultimately, the beauty of the Carpenter’s Star – Quilt Pattern lies in its adaptability. No two quilts look exactly alike, and your personal color story makes your quilt truly unique.
Even though the Carpenter’s Star – Quilt Pattern looks complex, it becomes much easier with a few helpful tips. The first is to use tools that ensure accuracy, such as a 60-degree quilting ruler for cutting diamonds. Precision at the start leads to success later.
Second, consider chain piecing your units. This method saves time and keeps your sewing consistent. By stitching multiple units in one continuous line, you minimize thread waste and maintain a steady rhythm.
Third, always double-check the layout before sewing large sections together. The Carpenter’s Star relies on symmetry, so one misplaced piece can change the entire design. Laying out the quilt on a design wall or large surface helps prevent mistakes.
Fourth, don’t underestimate the power of pressing. Pressing each seam as you go makes assembly smoother and ensures the quilt top lies flat. It also enhances the crisp, sharp look of the star’s points.
Fifth, embrace patience. This pattern is not a race—it’s a journey. Taking your time ensures accuracy and reduces frustration, especially if you’re new to quilting diamonds.
Lastly, remember to enjoy the process. The Carpenter’s Star – Quilt Pattern is more than just a project—it’s an opportunity to express creativity, practice precision, and craft something meaningful with your own hands.
What skill level is needed to make the Carpenter’s Star – Quilt Pattern?
This pattern is often recommended for intermediate quilters, but confident beginners who are willing to practice accuracy can also succeed.
Do I need special tools to cut the diamonds for this pattern?
A rotary cutter and a 60-degree quilting ruler are highly recommended, as they make the cutting process easier and more accurate.
Can I make the Carpenter’s Star in different sizes?
Yes, the pattern is highly adaptable. You can enlarge or reduce the size depending on whether you want a bed quilt, a wall hanging, or a smaller project.
Which fabrics work best for this quilt design?
Cotton fabrics are ideal because they are easy to press and sew. Solids, tone-on-tones, or small prints showcase the star’s geometry beautifully.
How should I quilt the finished Carpenter’s Star?
Both straight-line and free-motion quilting work well. The choice depends on whether you want to emphasize the geometric design or add softer, decorative textures.
Why is it called the Carpenter’s Star?
The name comes from its resemblance to intricate wooden inlay designs, often crafted by skilled carpenters. It symbolizes precision and craftsmanship.
The Carpenter’s Star – Quilt Pattern is a design that combines history, artistry, and creativity into one beautiful quilt. From its bold geometric form to its endless color possibilities, this pattern offers quilters both a challenge and a reward. It’s a project that allows personal expression while connecting to quilting traditions passed down through generations.
If you’ve been inspired to try this pattern, gather your fabrics, sharpen your rotary cutter, and enjoy the process. Quilting is not only about the finished product but also about the joy of creating something meaningful. I would love to hear your honest opinions and suggestions—what inspires you about the Carpenter’s Star, and how would you bring your own style to this timeless quilt?


