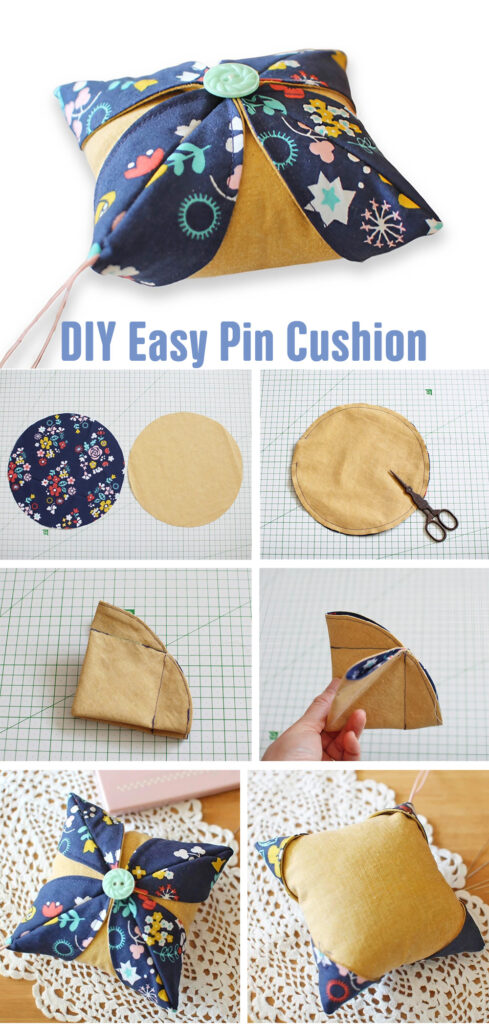
Finger Pin Cushion - Quilt Pattern

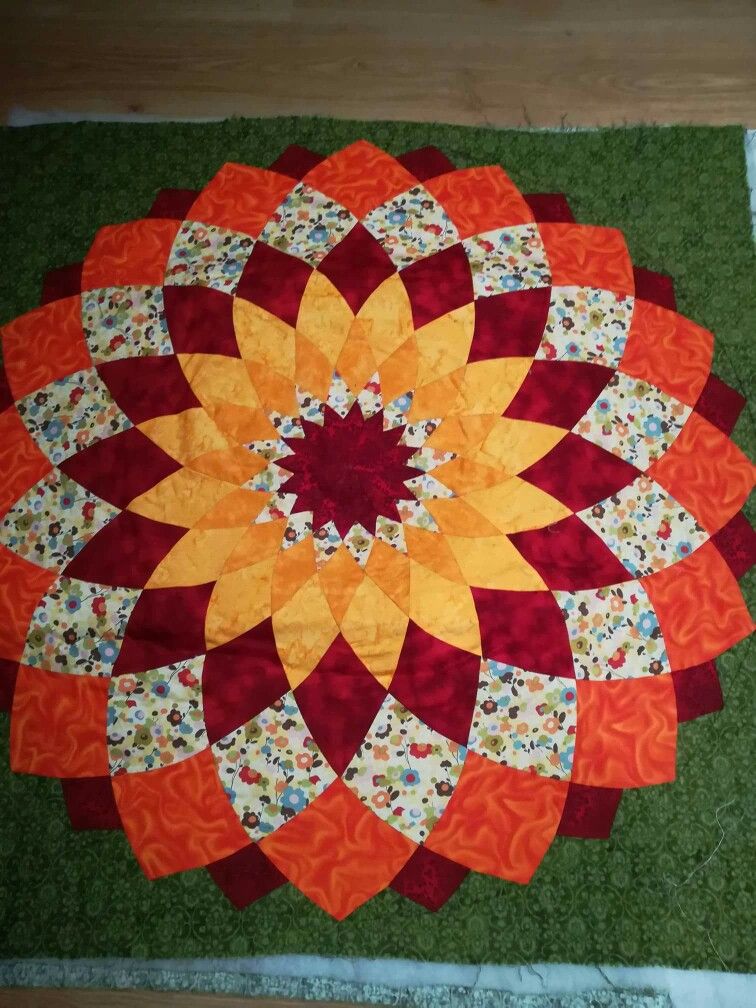
The Large Dahlia – Quilt Pattern is one of the most breathtaking and timeless quilt designs ever created. Known for its circular, flower-like appearance, the Dahlia quilt radiates beauty and complexity while maintaining a balanced harmony that captures every quilter’s heart. Whether you’re a beginner eager to learn or an experienced quilter looking for your next challenge, this pattern offers both a rewarding process and a stunning final result. The combination of curved piecing, color placement, and precision sewing makes the Large Dahlia – Quilt Pattern a true masterpiece in the quilting world.
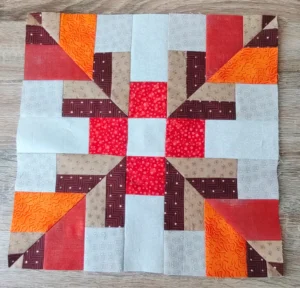
The beauty of the Large Dahlia lies in its illusion of movement. Its petals seem to expand outward, symbolizing growth and creativity. Each piece contributes to the overall circular bloom, creating a mesmerizing focal point. When done with vibrant or gradient fabrics, the Dahlia takes on a lifelike quality—almost like a real flower in full bloom. This pattern invites quilters to play with light, shadow, and texture, allowing for endless creative expression.
Learning how to make a Large Dahlia – Quilt Pattern is not only a creative pursuit but also a mindful one. It encourages patience, attention to detail, and a deep connection with color and form. This pattern has been cherished for generations and continues to inspire today’s quilting community. In this tutorial, we’ll explore its origins, the materials needed, how to piece it together, and creative ideas to make your Dahlia truly unique.
The Large Dahlia – Quilt Pattern traces its roots back to traditional American quilting, where circular motifs represented unity and wholeness. Unlike simpler geometric blocks, the Dahlia stands out for its intricate design made from precisely cut segments that form concentric rings. Its name, inspired by the dahlia flower, perfectly captures its blossoming symmetry.
Throughout the 20th century, this pattern became a favorite among quilters who wanted to showcase their technical skill. The curved seams and complex assembly made it both a challenge and a badge of honor. Today, it’s celebrated not only for its difficulty but also for its timeless beauty. Many quilters use it as a centerpiece for wall hangings, bedspreads, and decorative quilts.
Color selection plays a vital role in the success of a Large Dahlia – Quilt Pattern. Traditional designs often feature a radiant gradient—starting with a darker shade at the center and gradually lightening toward the edges. This creates the illusion of depth and dimension, much like petals catching sunlight. However, modern quilters are experimenting with bold, contrasting colors, giving this historical pattern a fresh twist.
The symmetry of the Dahlia makes it ideal for displaying quilting precision. Every segment needs to align perfectly to maintain the flower’s round form. This attention to alignment helps quilters develop new levels of skill and confidence. Once completed, the Dahlia becomes not just a quilt, but a piece of art worthy of admiration.
In quilting exhibitions, the Large Dahlia – Quilt Pattern often draws attention for its captivating composition. Its balanced circular layout naturally leads the viewer’s eye to the center, creating a sense of calm and order. No matter the fabric or color palette used, it always manages to stand out as a timeless representation of craftsmanship.
Ultimately, the Dahlia symbolizes more than beauty—it represents perseverance and creativity. Every curved seam, every carefully chosen fabric piece, tells the story of patience and dedication. That’s why, even after decades, the Large Dahlia – Quilt Pattern remains a beloved favorite among quilters worldwide.
Before you begin, gather the right materials to make your Large Dahlia – Quilt Pattern project successful. Precision is key in this design, so high-quality fabric and proper tools will make all the difference. You’ll need quilting cotton, a rotary cutter, a curved ruler, and a reliable sewing machine capable of handling delicate seams.
Choose fabrics that blend harmoniously. Many quilters prefer using a range of tones within a single color family to create a radiant, gradient effect. For example, several shades of pink or blue can beautifully mimic the petals of a blooming flower. Alternatively, you can go bold with contrasting colors like navy and gold for a striking visual impact.
Templates are essential for cutting the curved pieces accurately. You can make your own from template plastic or use pre-made acrylic templates available in quilting shops. Always double-check your measurements before cutting—precision ensures that each petal aligns perfectly when sewn together.
It’s wise to starch your fabrics lightly before cutting. This helps prevent stretching, especially on curved pieces. Keeping your fabric stable will make piecing smoother and more accurate. Another tip is to label each section as you cut; the Dahlia has multiple rings and petals, so organization is crucial.
When sewing, use a smaller stitch length to create stronger seams that hold well through curved sections. Pressing your seams carefully—either open or to one side—will keep your quilt top flat and professional-looking. Small details like these can elevate your final quilt from good to extraordinary.
Finally, prepare your workspace. A clean, well-lit area helps you stay focused and avoid mistakes. The Large Dahlia – Quilt Pattern requires patience and precision, so setting up your tools and materials properly will make the process more enjoyable and rewarding.
Creating the Large Dahlia – Quilt Pattern begins with assembling the center circle. Start by piecing together the smallest ring of petals. These central sections establish the alignment for the entire design, so accuracy is key. Sew each curved piece slowly, easing the fabric gently to fit without stretching.
Next, move outward to the second ring of petals. Each layer builds upon the previous one, forming a radiant bloom. Matching the seams carefully will ensure your circular design remains even. You may find it helpful to press each completed ring before attaching the next to maintain smooth transitions.
Once the petals are complete, it’s time to add the background fabric. This step frames the Dahlia, enhancing its shape and making it stand out. Choose a neutral or complementary background color to balance your chosen palette. Attaching the background pieces can also help correct any minor shape distortions from piecing.
After assembling the full top, you’ll baste your quilt sandwich—consisting of the top, batting, and backing. Use pins, spray baste, or thread basting depending on your preference. Basting ensures all layers remain flat and secure while quilting.
For quilting, many prefer following the natural petal lines of the Dahlia. This accentuates the floral shape and adds depth to the design. Alternatively, free-motion quilting or echo quilting can provide texture and personality. Experiment with thread colors that complement or contrast your fabric choices for added visual interest.
Finally, finish your quilt with a neat binding. A solid color works well to frame the design without distracting from the central pattern. Once complete, your Large Dahlia – Quilt Pattern will radiate with beauty, showcasing both your technical skill and artistic vision.
One of the most exciting aspects of the Large Dahlia – Quilt Pattern is its versatility. By changing colors, fabrics, or layout, you can create an entirely different look while preserving the classic shape. For a modern twist, use bold prints or even metallic fabrics to add shimmer and contemporary flair.
Consider experimenting with scale. A smaller version of the Dahlia makes a stunning pillow cover or wall hanging, while a larger one can serve as a breathtaking bedspread centerpiece. You can also combine multiple Dahlia blocks for a more intricate quilt composition.
Color gradients are another creative opportunity. Try blending from dark to light tones or alternating warm and cool colors to create dynamic contrast. Ombre fabrics work beautifully for this, simplifying color transitions and creating a naturally flowing effect.
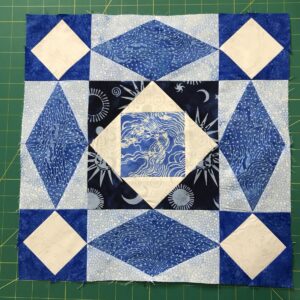
Don’t be afraid to explore unconventional backgrounds. A dark backdrop, such as charcoal or deep navy, can make bright petals glow dramatically. On the other hand, a soft pastel background evokes a dreamy, romantic feel. The background choice can completely transform your Large Dahlia – Quilt Pattern.
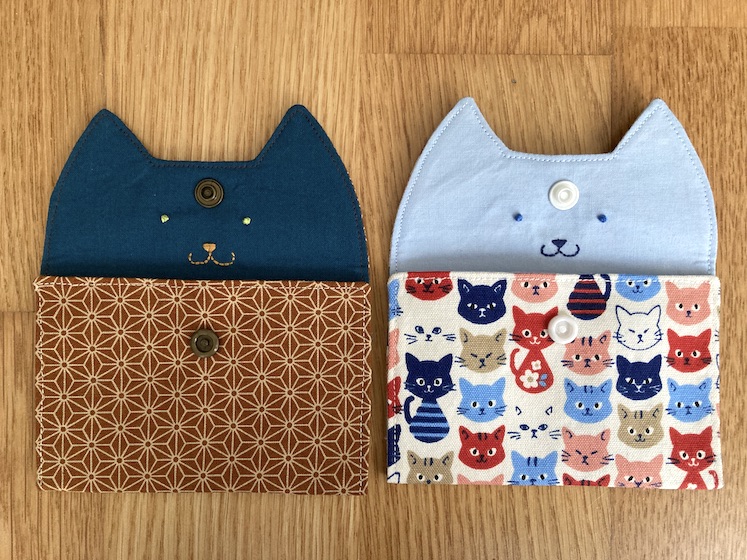
You can also embellish your Dahlia with hand embroidery or beading to emphasize the petal edges. These subtle details add personality and depth, turning your quilt into a true showpiece. Many quilters enjoy adding personal touches like initials, dates, or meaningful symbols within the quilt design.
When displaying your finished quilt, choose a location where light can enhance its visual depth. Hanging it on a wall or draping it across a bed allows its full circular beauty to shine. Each stitch tells a story of patience, skill, and creativity, making your Large Dahlia – Quilt Pattern a cherished work of art.
1. Is the Large Dahlia – Quilt Pattern suitable for beginners?
While the pattern is more advanced due to curved piecing, patient beginners can succeed with careful preparation and practice. Starting with smaller Dahlia projects can help build confidence.
2. What type of fabric works best for this quilt?
High-quality quilting cotton is ideal. Choose fabrics with consistent weave and minimal stretch for precise cutting and sewing.
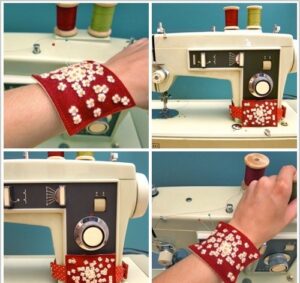
3. Can I make a Large Dahlia using a sewing machine?
Yes! Most quilters use sewing machines for this pattern, though hand-piecing is also possible if you prefer a traditional approach.
4. How do I choose the right colors for my Dahlia quilt?
Consider gradients or complementary shades. Using fabrics that shift gradually in tone creates the classic glowing effect of a Dahlia bloom.
5. How long does it take to complete a Large Dahlia quilt?
Depending on size and experience, it can take several days to weeks. The process involves precision cutting, piecing, and detailed quilting.
6. Can the Large Dahlia pattern be resized?
Absolutely. You can enlarge or reduce template sizes to create anything from mini wall hangings to full bed quilts.
The Large Dahlia – Quilt Pattern is more than a sewing project—it’s a creative journey. From choosing harmonious fabrics to mastering curved seams, each step offers a rewarding experience. Its floral symmetry, radiant design, and endless color possibilities make it a timeless addition to any quilter’s portfolio.
If you’ve never tried this pattern before, now is the perfect time to begin. Let your creativity bloom with every petal you stitch. We hope this guide has inspired you to explore the elegance of the Large Dahlia – Quilt Pattern and bring your own version to life.
We’d love to hear your thoughts! Share your honest opinions, experiences, and suggestions in the comments—your feedback helps inspire more quilting enthusiasts around the world.
