
Boat and Sailboat- Crochet Pattern
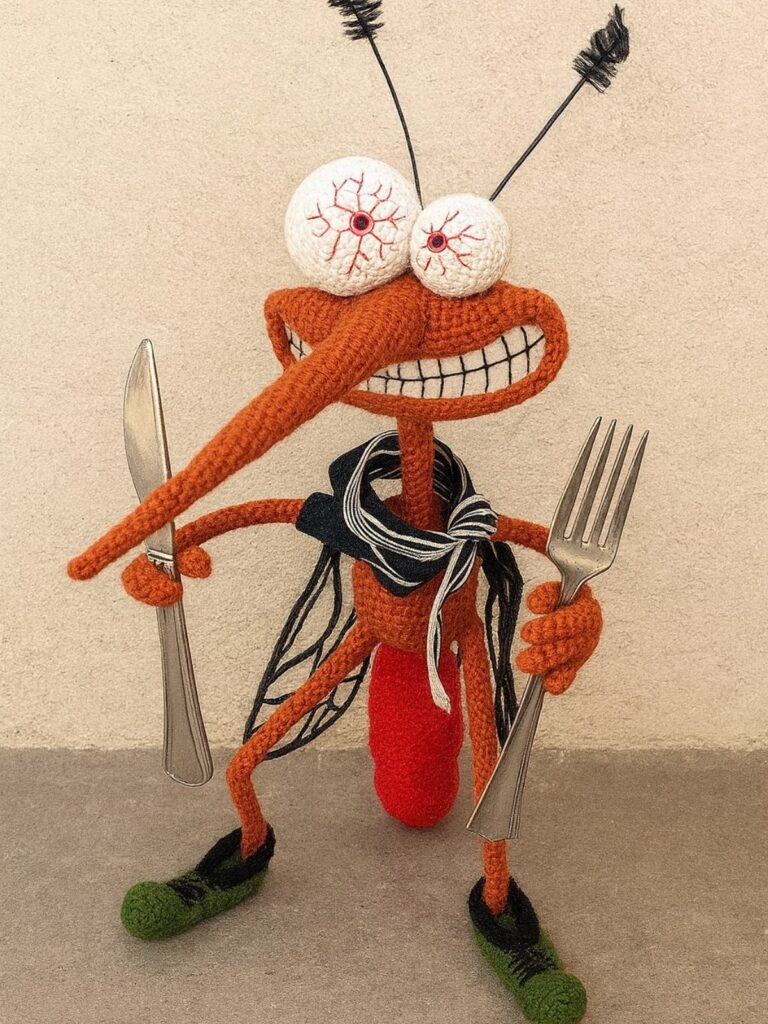
The Amigurumi Mosquito Ornament – Crochet Pattern is a fun, quirky, and creative project that combines humor and craftsmanship. While mosquitoes might not be everyone’s favorite insects, turning them into adorable crocheted ornaments adds a touch of playfulness to your decor. Whether you’re an experienced crocheter or just starting out, this pattern allows you to create a small and detailed piece that’s perfect for gifts, seasonal decorations, or simply for showcasing your love for unique amigurumi designs.
This delightful Amigurumi Mosquito Ornament – Crochet Pattern can be a wonderful project to explore shaping, detailing, and small-scale stitching techniques. Using only a few materials and basic stitches, you’ll be surprised at how easy it is to bring this tiny mosquito to life. You can play with colors, yarn textures, and even add little wings or eyes to give your mosquito a touch of character. It’s a great project for those who enjoy quick crochet creations with big personality.
The best part about creating your own Amigurumi Mosquito Ornament – Crochet Pattern is that it combines fun and function. You can use it as a keychain, car charm, bag accessory, or a funny addition to your craft fair booth. It’s also a fantastic way to use leftover yarn from previous projects. The result is a charming piece that’s sure to make people smile while showcasing your crocheting skills.
Before you begin crocheting your Amigurumi Mosquito Ornament – Crochet Pattern, it’s essential to gather the right materials. Choosing the correct yarn, hook size, and accessories will help your mosquito take shape beautifully. You don’t need much — just a few basic crochet tools that you probably already have in your crafting kit.
First, select cotton or acrylic yarn in shades of gray, black, or brown for the body, and lighter yarn for the wings. Cotton yarn tends to hold its shape better and gives your ornament a clean finish. Acrylic yarn, on the other hand, adds a bit more flexibility, making it perfect for beginners who like a softer texture.
Next, you’ll need a 2.0 mm to 3.0 mm crochet hook, depending on your yarn’s thickness. A smaller hook helps keep the stitches tight so that the fiber filling doesn’t show through. You’ll also need a yarn needle for sewing parts together, scissors, and polyester fiberfill for stuffing.
Don’t forget the fun details! Tiny safety eyes or black embroidery thread can bring your mosquito’s face to life. You can even use a bit of wire to shape the legs and wings if you want your ornament to look more realistic.
Having a stitch marker can be very helpful since amigurumi patterns are usually worked in continuous rounds. This ensures you don’t lose track of where each round starts. It might seem like a small thing, but it saves a lot of time and prevents mistakes later.
Finally, prepare a small keychain ring or ribbon loop if you plan to hang your mosquito ornament. These finishing touches will give your crochet creation a professional and polished appearance.
The main body of your Amigurumi Mosquito Ornament – Crochet Pattern is worked in rounds using basic stitches like single crochet and increases. Don’t worry if you’re new to amigurumi — this project is perfect for practicing these techniques in a fun and manageable way.
Begin by making a magic ring and crocheting six single crochets into it. This will form the start of your mosquito’s head. From there, you’ll gradually increase stitches in each round to create a round shape. After reaching the desired width, continue crocheting several rounds without increases to form the body length.
When you reach the middle section, slightly change the yarn color to create a distinction between the head and the abdomen. This subtle color change adds a realistic touch and gives your mosquito a defined shape. Remember to keep your tension consistent throughout the process for an even texture.
Once the body reaches the right size, stuff it firmly but not too tightly with polyester fiberfill. This step ensures your mosquito maintains its shape without looking overstuffed. It’s best to stuff gradually as you crochet the final rounds.
After closing the final stitches, leave a long tail for sewing. You can now attach any additional parts such as wings, legs, or a hanging loop. Take your time to position these details symmetrically so the ornament looks balanced.
When you’re done, you’ll see your mosquito slowly coming to life. The beauty of the Amigurumi Mosquito Ornament – Crochet Pattern lies in these little details that make every handmade piece unique and full of character.
One of the most enjoyable parts of creating your Amigurumi Mosquito Ornament – Crochet Pattern is adding the wings and facial features that bring it personality. This is where you can get truly creative and customize your mosquito to make it cute or even comical.
Start with the wings by crocheting two small oval shapes using light or white yarn. You can make them slightly translucent by using thinner thread if you want a delicate effect. Once finished, sew them securely to the mosquito’s back, ensuring they are evenly placed.
Next, let’s focus on the legs. Mosquitoes have six, but for simplicity, you can add fewer if preferred. Use thin black yarn or wire covered in yarn to make the legs. Sew or glue them carefully under the body, positioning them at even intervals for balance.
For the face, use safety eyes or embroider two small black dots with thread. You can also add a small stitched smile or even tiny blush marks with pink yarn for an extra touch of cuteness. These simple details make your ornament look friendly and appealing.
The mosquito’s proboscis (its long nose) can be made by crocheting a tiny chain or using a piece of yarn or wire wrapped in thread. Attach it to the front of the head to complete the classic mosquito look.
To finish off, weave in any loose ends and trim excess yarn. A light brush with your fingers can help shape the wings and fluff the body slightly for a soft finish. This step will make your mosquito look polished and ready to display.
Now that your Amigurumi Mosquito Ornament – Crochet Pattern is complete, there are endless ways to use and display it. This little crochet creation isn’t just a cute bug — it’s a conversation piece!
You can hang it on your Christmas tree, giving your holiday decorations a humorous and handmade touch. Many crafters enjoy mixing traditional ornaments with funny or unexpected ones to create a personalized tree theme.
If you’re into home decor, consider using your mosquito ornament as part of a summer display. Place it near indoor plants or in a glass jar setup for a nature-inspired look. You can even use it as a decoration in a children’s room or classroom, turning something usually disliked into something adorable.
Another creative idea is to make several of them in different sizes and colors, then string them together to form a garland or mobile. This can add a playful vibe to any craft fair booth or handmade gift basket.
You can also turn your crochet mosquito into a keychain or car charm. Attach a metal ring or clip to the top, and you’ll have a cute and funny accessory that everyone will notice. These small creations also make great gifts for fellow crocheters or insect enthusiasts.
Lastly, if you enjoy selling your handmade crafts, this pattern can be a fantastic product. People love quirky, handmade items, and a mosquito ornament is something that stands out from the usual crochet toys. Add a tag or little story about how it was made, and it’ll be irresistible at craft fairs.
1. Is the Amigurumi Mosquito Ornament – Crochet Pattern suitable for beginners?
Yes! The pattern uses basic stitches like single crochet, increases, and decreases. It’s a great project for beginners who want to practice small amigurumi designs.
2. How long does it take to make the Amigurumi Mosquito Ornament?
Typically, it can be completed in 2 to 3 hours depending on your skill level and the details you add.
3. What type of yarn works best for this pattern?
Cotton yarn is ideal for a clean, defined finish, while acrylic yarn gives a softer texture. You can experiment with both to see which you prefer.
4. Can I customize the colors?
Absolutely! You can use traditional gray or black shades, or make a fun, colorful mosquito using bright yarns for a whimsical touch.
5. Is this pattern good for selling finished products?
Yes, many crafters sell their finished mosquito ornaments at local fairs or online. Just make sure to credit the pattern source if required.
6. How do I make the wings look realistic?
Use thin yarn or thread and keep your tension loose. You can also lightly stiffen the wings using fabric glue for better shape retention.
The Amigurumi Mosquito Ornament – Crochet Pattern is a delightful and imaginative project that shows how creativity can transform even the most unexpected subjects into something adorable. By following this step-by-step guide, you’ve learned how to crochet, shape, and personalize your mosquito ornament using simple materials and stitches.
This pattern is not only fun to make but also a great way to practice your amigurumi skills and add a touch of humor to your crochet collection. Whether you hang it, gift it, or sell it, this mosquito is sure to make people smile.
If you enjoyed this tutorial, please leave your honest opinion and suggestions below. Your feedback helps inspire more creative crochet ideas and supports this growing community of makers.


