Boat and Sailboat- Crochet Pattern
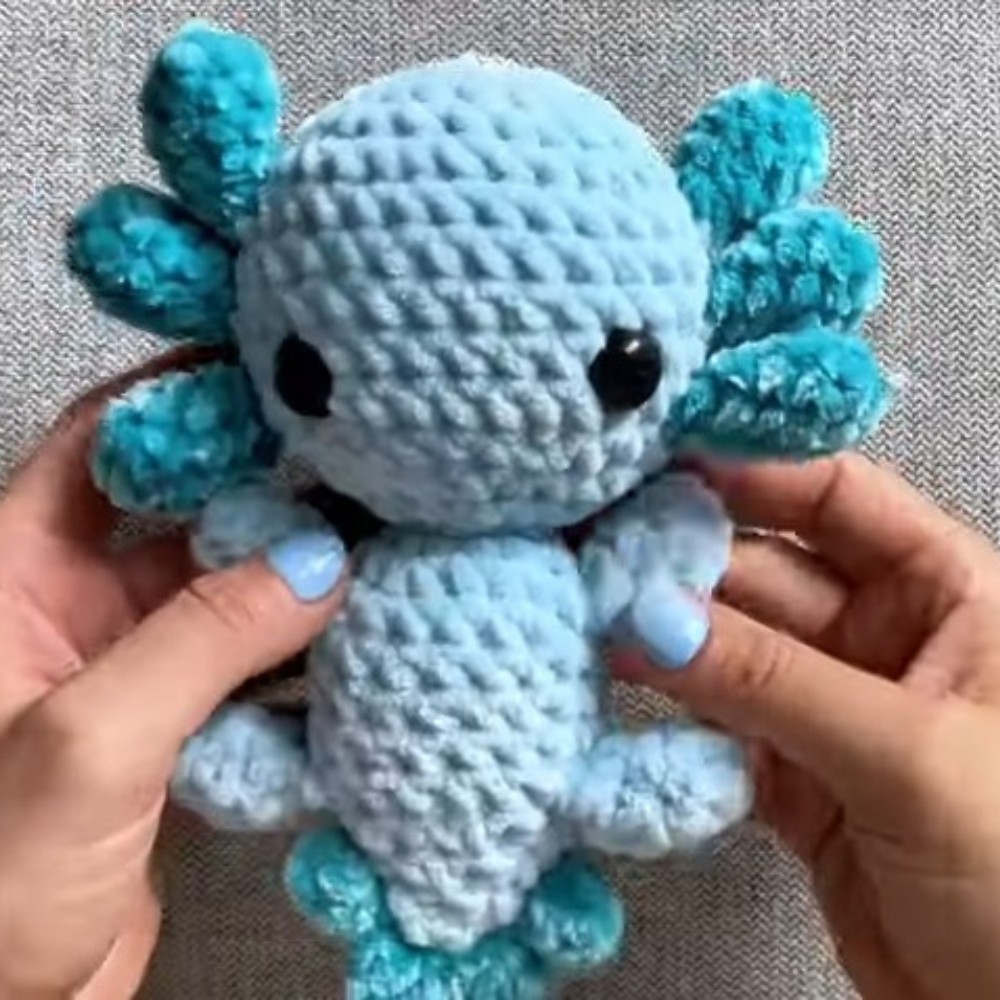
The Crochet Axolotl – Pattern is one of the most charming and creative crochet projects for crafters who love whimsical designs and adorable creatures. This cute little aquatic friend, inspired by the real-life axolotl, is quickly becoming a favorite among crocheters of all levels. Whether you’re new to amigurumi or an experienced maker, this Crochet Axolotl – Pattern will bring a smile to your face and joy to your crafting time.
Making a Crochet Axolotl – Pattern is not only fun but also rewarding. The process involves learning simple yet effective crochet stitches, combining pastel colors, and adding sweet details that bring the axolotl to life. With soft yarn and a touch of imagination, you can create a cuddly and unique handmade toy that will delight kids and adults alike. This project is perfect for those who enjoy crocheting animals and want to expand their collection with something unique and trendy.
In this complete guide, you’ll learn how to follow the Crochet Axolotl – Pattern, understand the materials you’ll need, discover useful tips to achieve perfect results, and explore creative ways to personalize your own little water creature. Let’s dive into the world of crochet and create your very own axolotl friend step by step!
Before you begin, it’s important to prepare all your materials and understand the structure of the Crochet Axolotl – Pattern. This ensures that your project flows smoothly and turns out beautifully.
To start, you’ll need medium-weight yarn in soft pastel shades such as pink, white, or lavender, which capture the axolotl’s gentle and friendly look. Cotton or acrylic yarn works great for this pattern, as they give a clean and firm finish to your stitches. Don’t forget to have a matching hook size—usually between 2.5 mm and 3.5 mm—for better control and stitch consistency.
Stuffing is also essential for giving shape and volume to your Crochet Axolotl – Pattern. Use high-quality polyester fiberfill to achieve a soft and even texture throughout the body and head. The better the stuffing quality, the more professional your finished axolotl will look.
Safety eyes or small black beads can be used for the axolotl’s eyes. They add character and a sweet expression that instantly brings the toy to life. If you’re making this for a small child, consider embroidering the eyes instead for safety reasons.
The main body of the Crochet Axolotl – Pattern is created using basic amigurumi techniques. You’ll typically start with a magic ring, increase to form the head, and then shape the body, tail, and legs. Each piece is crocheted separately and then sewn together with care.
Patience and attention to detail are key when working on this project. Each round builds upon the last, and soon you’ll see your axolotl taking shape—round cheeks, delicate gills, and a playful tail that adds the final touch to this adorable crochet creation.
To create your Crochet Axolotl – Pattern, start by forming the head and body. Use continuous rounds, keeping your stitch count even to avoid uneven shapes. The head is usually worked in one piece, transitioning smoothly into the body without seams.
Next, crochet the axolotl’s limbs. You’ll make four small legs—two front and two back—that give the toy its charming, stubby appearance. Make sure they’re evenly sized and firmly stuffed before sewing them onto the body.
The tail is another essential feature of your Crochet Axolotl – Pattern. It adds personality and helps the toy resemble the real-life amphibian. You can crochet the tail flat or in the round, depending on your preferred style. Soft shaping with stitches and light stuffing helps maintain flexibility.
Now, for the most delightful part—the gills! These are the cute frilly appendages that make axolotls so recognizable. To crochet them, use contrasting yarn colors, such as pink and coral, and create small loops or puff stitches that mimic the axolotl’s gill branches. Attach them symmetrically on both sides of the head for a balanced look.
Once all pieces are ready, carefully assemble your Crochet Axolotl – Pattern. Use a tapestry needle and matching yarn to sew each part securely. Take your time with the finishing touches; even small details like eye placement and stitch alignment can make a big difference in the final expression.
Finally, weave in all yarn ends neatly and fluff up the toy to make it soft and cuddly. You’ll be amazed at how your crochet creation comes together—full of charm, texture, and personality!
Every crocheter knows that small details can turn a simple project into something extraordinary. The Crochet Axolotl – Pattern offers plenty of opportunities for customization and improvement through thoughtful choices and clever techniques.
First, maintain consistent tension throughout your work. Uneven tension can cause lumps or distortions, especially when shaping small parts like legs or the tail. If you’re new to amigurumi, practice with a small piece of yarn before starting your main project.
Color choice also plays a big role. Axolotls are known for their pastel hues, but you can get creative! Try making a Crochet Axolotl – Pattern in mint green, soft yellow, or even rainbow tones. Using variegated yarns can create a magical, watercolor effect.
For a polished finish, make sure to stuff each part gradually while shaping. Avoid overstuffing, as it can stretch stitches and ruin the smooth look. A light, even fill gives the toy a soft and squishy feel—perfect for cuddling.
When attaching the parts, pin them in place first to visualize the proportions. This step helps ensure balance and symmetry, especially around the head and gills. Once you’re happy with the placement, sew them gently but firmly.
If you want your Crochet Axolotl – Pattern to stand out, consider adding small accessories. A tiny bow, scarf, or even a little flower can give your axolotl a personal touch. You can also embroider small details like blush spots or textured scales for extra cuteness.
Lastly, remember that practice makes progress. Don’t rush—crocheting is meant to be enjoyable and relaxing. The more you experiment, the better your stitches and shaping will become over time.
Once your Crochet Axolotl – Pattern is complete, the fun doesn’t have to stop there! This adorable handmade toy can be used in many delightful ways, making it both a fun craft and a thoughtful gift.
One popular idea is to turn your crochet axolotl into a cute plushie for kids. It’s soft, safe, and unique—something store-bought toys can’t compare with. You can even make a set of mini axolotls in different colors to create a playful collection.
The Crochet Axolotl – Pattern also makes an excellent desk companion or home decor item. Place it on a shelf, next to plants or books, and enjoy a pop of handmade charm in your space. It’s a great way to add personality to your home or office.
If you enjoy giving handmade gifts, this project is perfect for birthdays, baby showers, or holidays. Handmade gifts like the Crochet Axolotl – Pattern show love and care, making them truly memorable.
You can also use the pattern as part of educational activities. Kids love learning about axolotls, and crocheting one can be a fun way to introduce them to crafting and biology at the same time.
Lastly, if you’re a small business owner, consider selling your finished axolotls at craft fairs or online shops. Handmade crochet animals are in high demand, and the Crochet Axolotl – Pattern stands out for its originality and charm. Just remember to respect pattern copyrights if you’re using someone else’s design for resale.
1. What materials do I need to make the Crochet Axolotl – Pattern?
You’ll need pastel-colored yarn, a crochet hook (2.5–3.5 mm), fiberfill stuffing, safety eyes or embroidery thread, a tapestry needle, and scissors.
2. Is this pattern beginner-friendly?
Yes! The Crochet Axolotl – Pattern uses simple stitches and basic amigurumi techniques, making it accessible even for beginners.
3. How long does it take to complete a Crochet Axolotl?
Depending on your skill level, it can take anywhere from 5 to 10 hours to finish one axolotl.
4. Can I make the Crochet Axolotl in different sizes?
Absolutely! Adjusting your hook size and yarn thickness allows you to create larger or smaller axolotls.
5. How do I clean my crochet axolotl?
Gently handwash with mild soap and cool water. Let it air dry completely before handling.
6. Can I sell the finished crochet axolotl?
Yes, as long as the pattern creator allows it. Always check pattern usage rights if it’s not your original design.
Creating your own Crochet Axolotl – Pattern is a joyful and creative experience. From choosing the soft yarn colors to stitching the final gills, every step brings satisfaction and pride. This pattern combines artistry and comfort, resulting in an adorable handmade companion that captures hearts instantly.
If you’ve followed this tutorial, you now have all the skills to craft your own axolotl friend—or even several in different shades! We hope this guide inspired you to explore your creativity and enjoy every stitch along the way.
Did you enjoy this Crochet Axolotl – Pattern tutorial? Share your thoughts and suggestions in the comments! Your feedback helps improve future crochet guides and inspires others to join this wonderful handmade journey.