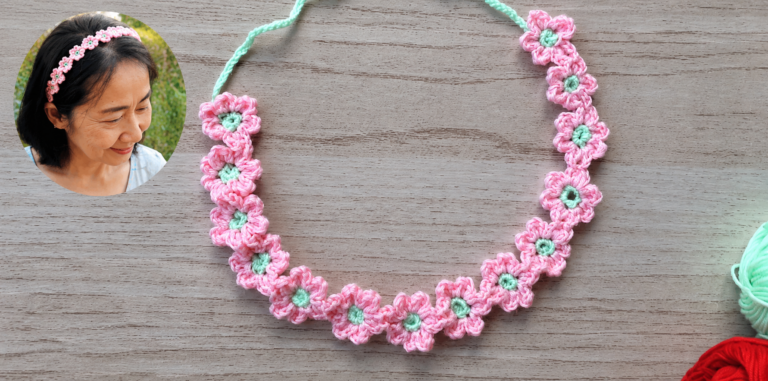
Crocheted Flower Headband - Pattern
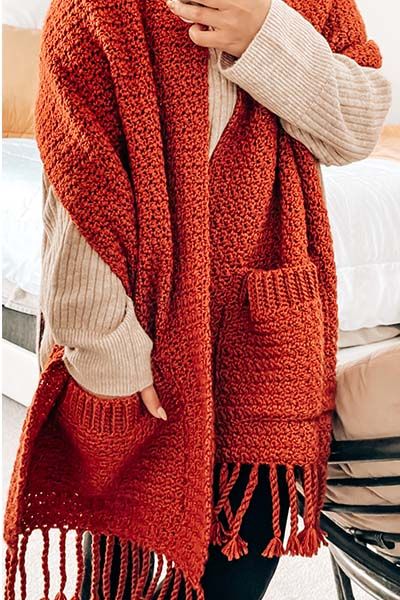
If you’ve ever dreamed of creating something both cozy and practical, learning HOW TO CROCHET A SCARF WITH POCKETS – Pattern is the perfect project to try. This fun and creative pattern combines the warmth of a traditional scarf with the functionality of built-in pockets, making it a must-have accessory for chilly days. Whether you’re a beginner looking for your first wearable project or an experienced crocheter seeking something quick and rewarding, this pattern offers the perfect blend of comfort and style.
A crochet scarf with pockets is not only stylish but also a fantastic handmade gift idea. You can personalize it with your favorite yarn colors and textures, creating something uniquely yours. The pockets add charm and functionality, giving you a place to warm your hands or keep small items like your phone or keys close. The best part is that this project works up quickly, and by following a clear pattern, you’ll have your scarf ready to wear or gift in no time.
In this article, we’ll explore step-by-step how to crochet a scarf with pockets, share useful tips for choosing the best yarn, discuss stitch techniques that work beautifully with this design, and explain how to assemble everything neatly. By the end, you’ll not only have a clear understanding of this project but also feel inspired to create more pocketed accessories for your wardrobe or gift list.
Before you start your HOW TO CROCHET A SCARF WITH POCKETS – Pattern, selecting the right materials is essential. The yarn you choose will determine how soft, warm, and durable your scarf will be. For beginners, it’s best to use a medium-weight yarn (commonly labeled as worsted weight or category 4) since it’s easy to work with and produces a cozy yet manageable thickness. Acrylic yarns are popular for this project because they are affordable, washable, and available in a wide range of colors.
Another important factor to consider is the crochet hook size. Most scarf with pockets patterns call for a hook size between 5 mm (H-8) and 6 mm (J-10). The hook size can slightly affect the texture and drape of your finished piece. A smaller hook will create tighter stitches, while a larger one will give a looser and softer feel. Always check your yarn label for a recommended hook size to ensure the best results.
You will also need a few additional tools such as scissors, a yarn needle for weaving in ends, and a measuring tape to ensure your scarf dimensions are accurate. Some crocheters also like to have stitch markers handy, especially when working on the pocket areas. These simple tools can make the process smoother and help maintain clean, even edges.
Color selection is another way to make your crochet scarf with pockets pattern unique. You can use a single solid color for a classic look or combine multiple shades for a vibrant, striped effect. Consider using neutral colors like cream, gray, or navy for versatility, or choose bold tones like mustard or burgundy for a cozy fall statement piece.
Lastly, make sure to pick a yarn that feels comfortable against your skin. Scarves are worn close to the neck and hands, so a soft texture is important. Cotton blends, acrylics, and soft wool yarns are all great choices for this kind of project. Once you’ve gathered your materials, you’re ready to move on to the next exciting step: starting your foundation chain and first stitches.
When you begin your HOW TO CROCHET A SCARF WITH POCKETS – Pattern, start by creating a foundation chain that matches the width you want your scarf to be. The standard scarf width ranges from 6 to 10 inches, depending on personal preference. Beginners may find it easier to start with a chain of around 30 to 35 stitches using a medium-weight yarn and a 5.5 mm crochet hook.
Once you’ve created your chain, work a row of single crochet stitches into each chain across. This will give your scarf a sturdy base. After your first row, you can continue building the body of the scarf using your chosen stitch pattern. Popular options include half double crochet, double crochet, or a simple textured stitch like the moss stitch. Each one provides a different feel, so try a few small swatches first to see which you prefer.
Keep crocheting rows until your scarf reaches your desired length. A typical scarf length is between 60 and 70 inches, but you can adjust this depending on your height and style preference. Remember that the pockets will add a bit of extra weight and structure to the ends of the scarf, so don’t make it too short.
To keep your edges neat, be sure to chain one and turn at the end of each row. This small detail helps maintain consistency in your stitches and gives your scarf a professional finish. If you’re new to crochet, it can help to count your stitches at the end of each row to make sure the sides stay straight.
After completing the main body of your crochet scarf with pockets, you can add a decorative border if you like. A simple single crochet border around all sides will make your piece look more polished and can also help prevent curling. Once your scarf is complete, you’ll move on to the pocket construction and attachment process.
The pockets are what make the HOW TO CROCHET A SCARF WITH POCKETS – Pattern special. They not only add functionality but also create a stylish focal point at each end of the scarf. To begin, crochet two identical rectangles using the same stitch pattern and yarn as your scarf body. The size of each pocket can vary, but a good starting point is about 6 inches wide by 7 inches tall.
Once your pocket pieces are ready, it’s time to position them. Lay your scarf flat on a clean surface and place the pockets at each end, about one inch above the bottom edge. Make sure they are aligned evenly so that when you wear the scarf, both pockets sit symmetrically.
You can attach the pockets using a yarn needle and a matching yarn color to sew them securely onto the scarf. Alternatively, you can single crochet the pockets directly onto the body of the scarf for a seamless, handmade look. Whichever method you choose, be sure to leave the top of each pocket open!
To make your pockets extra sturdy, double-check the edges after sewing or crocheting them in place. You don’t want them to stretch or come loose over time. Some crafters like to add a decorative touch by working a contrasting border around the pocket edges or attaching cute buttons for extra style.
Another great idea is to line your pockets with fabric. This adds a unique finish and makes them more durable, especially if you plan to carry small items inside. To do this, cut a piece of fabric slightly smaller than your pocket, fold the edges inward, and sew it inside before attaching the pocket to the scarf.
Once both pockets are securely attached, give your scarf a gentle stretch and block it if needed. Blocking helps smooth out the stitches and gives your finished project a professional, store-bought appearance.
After completing the main structure of your HOW TO CROCHET A SCARF WITH POCKETS – Pattern, it’s time for the finishing touches that make your creation stand out. Weaving in all loose ends is essential for a neat appearance. Use a yarn needle to carefully hide them within the stitches, ensuring they won’t unravel later.
You can also add fringe or tassels to the ends of your scarf if you like a playful look. Fringe adds texture and movement, giving your handmade piece a cozy bohemian flair. To create fringe, cut equal lengths of yarn, fold them in half, and use your crochet hook to loop them through the edge stitches.
Blocking your scarf is another step that makes a huge difference. Lightly dampen your scarf, lay it flat on a towel, and shape it to your desired dimensions. Allow it to dry completely before wearing or gifting. Blocking enhances stitch definition and helps the scarf drape beautifully around your neck.
When it comes to styling, a crochet scarf with pockets can be worn in several ways. You can drape it loosely over your shoulders, wrap it around your neck for extra warmth, or tuck your hands into the pockets while walking outdoors. The versatility of this accessory makes it a perfect addition to any winter outfit.
Another wonderful thing about this pattern is how easily customizable it is. You can experiment with different stitch textures, add color stripes, or even include a hood for an ultra-cozy look. Personalizing your project makes it truly one-of-a-kind.
Finally, don’t forget to care for your handmade scarf properly. Hand wash it gently in cold water, reshape it while damp, and lay it flat to dry. This will keep your scarf soft, beautiful, and ready to wear for many seasons to come.
1. What is the best yarn for a crochet scarf with pockets?
Medium-weight acrylic or cotton-blend yarns work best. They are soft, durable, and easy to care for, making them ideal for wearable projects like scarves.
2. How long does it take to crochet a scarf with pockets?
Depending on your skill level and stitch choice, it can take anywhere from a few hours to a weekend to complete.
3. Can beginners make this project?
Absolutely! This pattern is beginner-friendly, especially if you use simple stitches like single or half double crochet.
4. How big should the pockets be?
Around 6×7 inches is a good average size, but you can adjust them based on your preference or the scarf’s width.
5. How do I attach the pockets neatly?
You can sew them using a yarn needle or crochet them directly onto the scarf edges with single crochet stitches for a seamless look.
6. Can I add lining to the pockets?
Yes, fabric lining adds durability and a professional touch to your finished project.
Learning HOW TO CROCHET A SCARF WITH POCKETS – Pattern is a rewarding and practical project for anyone who loves crochet. You’ve learned how to choose the right materials, build the scarf foundation, create and attach pockets, and add finishing details that make your work stand out. This cozy accessory not only keeps you warm but also adds a stylish handmade touch to your wardrobe.
Now that you’ve mastered this lovely crochet scarf with pockets pattern, I’d love to hear your thoughts! Leave a sincere opinion and share your suggestions about this tutorial — your feedback helps inspire even more creative crochet projects.


