Cathedral Block - Quilt Pattern
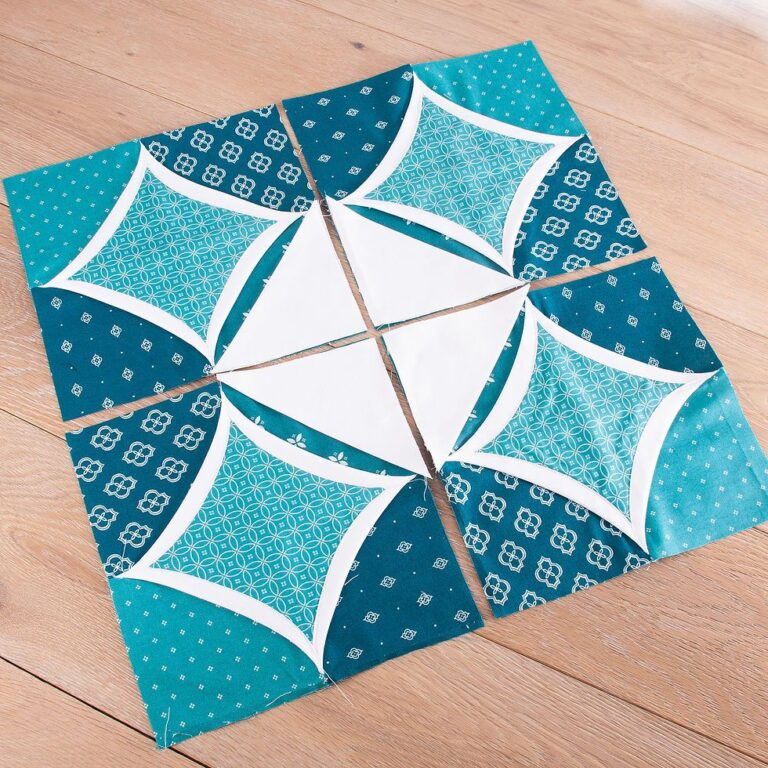
The Woven Star Quilt pattern – Pattern is one of the most captivating and classic quilting designs that combine timeless beauty with modern charm. With its intricate star motif that looks like woven fabric, this pattern has become a favorite among quilters who enjoy creating visually striking projects. Whether you’re a beginner wanting to explore new quilting techniques or an experienced maker seeking inspiration, the Woven Star Quilt pattern – Pattern offers endless creative possibilities. Its geometric layout, combined with fabric color play, turns every finished quilt into a unique piece of art.
One of the main reasons why the Woven Star Quilt pattern – Pattern continues to inspire crafters is its versatility. You can create it with soft pastels for a calm, cozy feel or with bold, contrasting colors to make it pop. The pattern can be adapted for quilts of any size—from a small wall hanging to a large bedspread. Its star design, made of interlocking strips and points, gives it the look of woven fabric while maintaining the traditional charm of a classic quilt.
In this article, we’ll explore how to create your own Woven Star Quilt pattern – Pattern step by step. You’ll learn how to choose fabrics, cut and piece the blocks, assemble your star layout, and add finishing touches that make your quilt shine. Whether you’re sewing for a gift, decorating your home, or simply quilting for joy, this tutorial will help you achieve a stunning, polished result. Let’s begin with the first step: understanding the foundation of the Woven Star design.
The Woven Star Quilt pattern – Pattern is a brilliant combination of geometry and texture. At first glance, it looks complex, but its construction is based on simple units—squares, rectangles, and triangles—that come together to form a star that appears to be woven. The illusion of interlacing fabrics is what makes this design so special and visually appealing.
To begin, it’s important to visualize how the star is formed. The star’s “woven” appearance comes from alternating fabric strips that overlap in different directions. This creates depth and motion within the quilt block. When multiple blocks are sewn together, the result is a mesmerizing quilt top that draws the eye to its intricate patterns.
Color selection plays a crucial role in this pattern. Light, medium, and dark fabric tones create the illusion of weaving. For instance, choosing contrasting fabrics helps highlight the overlapping strips, while tonal fabrics can give a softer, more blended look. Try experimenting with batiks, solids, or subtle prints to see how they interact.
When planning your Woven Star Quilt pattern – Pattern, sketch your layout or use quilting software to visualize your fabric placement. This helps prevent confusion when piecing and ensures your stars align perfectly. Preplanning also allows you to maintain balance and harmony in your color scheme across the quilt.
Another aspect that enhances the Woven Star’s beauty is precision. Accurate cutting and consistent seam allowances are key to achieving crisp points and clean intersections. Quilters often use a rotary cutter and a ruler to ensure every piece fits together smoothly. Take your time—accuracy in this step makes all the difference in your final result.
Lastly, consider the fabric texture. Mixing cottons with different weaves or using metallic accents can add a touch of sophistication to your project. Even though it’s called the Woven Star Quilt pattern – Pattern, the real magic lies in how the fabrics and colors are woven together through careful craftsmanship.
Now that we’ve explored its design concept, let’s move on to the step-by-step process of making your own Woven Star Quilt pattern – Pattern. Start by gathering your materials: a rotary cutter, quilting ruler, self-healing cutting mat, sewing machine, and high-quality quilting cotton in your chosen colors.
The first step is cutting your fabric pieces. You’ll need strips and squares for each block. Depending on your quilt size, determine the number of blocks you plan to make. Precision is essential—measure twice and cut once to ensure accuracy. Label your pieces if necessary to avoid confusion during assembly.
Next, begin piecing your fabric strips to form the woven sections of the star. Sew them together using a ¼-inch seam allowance, pressing seams open or to one side as preferred. This step gives the illusion of weaving. Keep your colors alternating to create contrast and dimension.
Once the woven units are ready, assemble the star points. Typically, you’ll use half-square triangles or diamond-shaped pieces to build the star. Align the points carefully so they meet at the center, forming a perfect star shape. Pin pieces in place before sewing to prevent shifting.
After piecing the stars, join the blocks together to form your quilt top. Arrange them on a design wall or floor before stitching to ensure the layout flows smoothly. Adjust colors or orientation as needed to maintain the woven effect. When you’re happy with the layout, sew the rows together, then attach sashing or borders if desired.
Finally, add your batting and backing, then quilt as desired. You can use straight-line quilting to emphasize the woven look or free-motion quilting for a softer, more fluid finish. Bind the edges neatly, and your Woven Star Quilt pattern – Pattern masterpiece is ready to display or gift.
The fabric and color choices you make will define the overall look of your Woven Star Quilt pattern – Pattern. To highlight the woven illusion, it’s best to use at least three contrasting tones—light, medium, and dark. These variations help the strips stand out from each other and add depth.
If you prefer a traditional quilt, try using classic prints such as florals, plaids, or reproduction fabrics. These give your quilt a vintage feel reminiscent of old-fashioned craftsmanship. On the other hand, if you want a modern twist, solid fabrics or minimalistic prints can make your stars look sleek and contemporary.
A monochromatic palette also works beautifully with the Woven Star Quilt pattern – Pattern. For example, shades of blue ranging from sky to navy create a calming, unified look. Alternatively, a rainbow color palette can turn your quilt into a cheerful, eye-catching statement piece.
When working with bold fabrics, consider using a neutral background such as white, cream, or gray. This helps the star pattern pop without overwhelming the design. For subtle quilts, blend similar tones to achieve a soft, cohesive finish.
Fabric texture adds another dimension to your quilt. Combining matte and slightly shiny fabrics (like cotton sateen) can enhance the woven appearance. Metallic thread or gold accents can also give a luxurious touch, especially if you plan to display the quilt as a decorative piece.
Lastly, before finalizing your fabric selection, lay all your choices together in good lighting. This will allow you to see how the colors interact. The harmony between tones is what brings out the true elegance of the Woven Star Quilt pattern – Pattern.
Once your Woven Star Quilt pattern – Pattern is pieced together, it’s time to focus on the finishing touches that turn your quilt top into a completed masterpiece. Quilting, binding, and labeling are the final steps that showcase your craftsmanship.
Begin by layering your quilt top, batting, and backing fabric. Smooth each layer to remove wrinkles and secure them with safety pins or basting spray. Choose your quilting style—straight-line quilting works beautifully for this pattern, emphasizing the woven structure.
For a more artistic finish, try free-motion quilting with flowing patterns like swirls or loops. These contrast nicely with the geometric stars, adding texture and interest. Stitch in the ditch (along the seams) is another great technique to highlight the woven intersections.
Next comes binding, the frame that completes your quilt. Choose a fabric that complements your color scheme. Cut binding strips, join them end to end, and sew around the edges. Hand-stitching the final seam gives a professional finish and allows you to enjoy the process one last time.
Don’t forget to label your quilt! Include your name, the quilt’s title, and the date it was completed. This adds a personal touch and turns your creation into a lasting heirloom.
Finally, display your Woven Star Quilt pattern – Pattern proudly. You can drape it over a bed, hang it on a wall, or gift it to someone special. Every time you see it, you’ll appreciate the beauty of its design and the care you put into every stitch.
1. Is the Woven Star Quilt pattern – Pattern suitable for beginners?
Yes! While it looks intricate, the pattern is based on simple piecing methods. Beginners can start with a small project like a wall hanging before making a full quilt.
2. What size should I cut my fabric pieces?
That depends on your desired quilt size. Start with 2½-inch strips for smaller stars or larger strips for a bolder effect. Consistent measurements are key.
3. Can I use pre-cut fabrics like jelly rolls?
Absolutely. Jelly rolls are perfect for this pattern since they contain pre-cut 2½-inch strips, saving time and maintaining accuracy.
4. What quilting design complements this pattern best?
Straight-line or stitch-in-the-ditch quilting enhances the woven look, while free-motion quilting adds artistic flair. Both work beautifully depending on your style.
5. How can I keep my star points sharp and precise?
Use a ¼-inch seam allowance and press carefully. Pin your points before stitching and check alignment after each seam.
6. What fabrics work best for this quilt?
High-quality 100% cotton fabrics are ideal. They press well, hold their shape, and make piecing easier.
The Woven Star Quilt pattern – Pattern beautifully combines tradition and artistry, transforming simple geometric shapes into a mesmerizing woven star design. With careful color choices, precise cutting, and thoughtful stitching, you can create a quilt that radiates warmth and craftsmanship. Whether you’re quilting for pleasure, gifting, or home décor, this pattern offers an opportunity to showcase your creativity and skill.
Now that you’ve learned the steps and techniques to master the Woven Star Quilt pattern – Pattern, it’s time to bring your vision to life. Let your colors shine, enjoy the process, and don’t forget to share your finished quilt with pride! Would you like to see more tutorials like this one? Share your thoughts in the comments—I’d love to hear from you!


