Cathedral Block - Quilt Pattern
How to Sew Curves – The New York Beauty – Quilt Tutorial is one of the most fascinating and artistic quilting techniques you can explore. Known for its intricate arcs, vibrant fabrics, and unique geometric balance, this quilt style has stood the test of time as a favorite among experienced quilters and daring beginners alike. Learning how to sew curves can feel intimidating at first, but with patience, precision, and the right methods, you can master this classic design and create your own stunning version of the New York Beauty Quilt.
This pattern is celebrated for its sharp points and graceful curves, resembling the iconic skyline and radiating energy of New York City. Each block features pieced arcs, often set against contrasting backgrounds, which together form a breathtaking mosaic effect. Whether you are making a small wall hanging or a full-sized quilt, understanding the basics of curved piecing will help you build confidence and achieve beautiful, professional-looking results.
In this quilt tutorial, we will cover essential techniques, including fabric selection, accurate cutting, pinning, and sewing curves without stress. You’ll also discover how to assemble and press your blocks effectively, ensuring that your New York Beauty Quilt maintains its crisp shape and precise seams. Let’s dive in and learn how to sew curves step by step with this inspiring and colorful project!
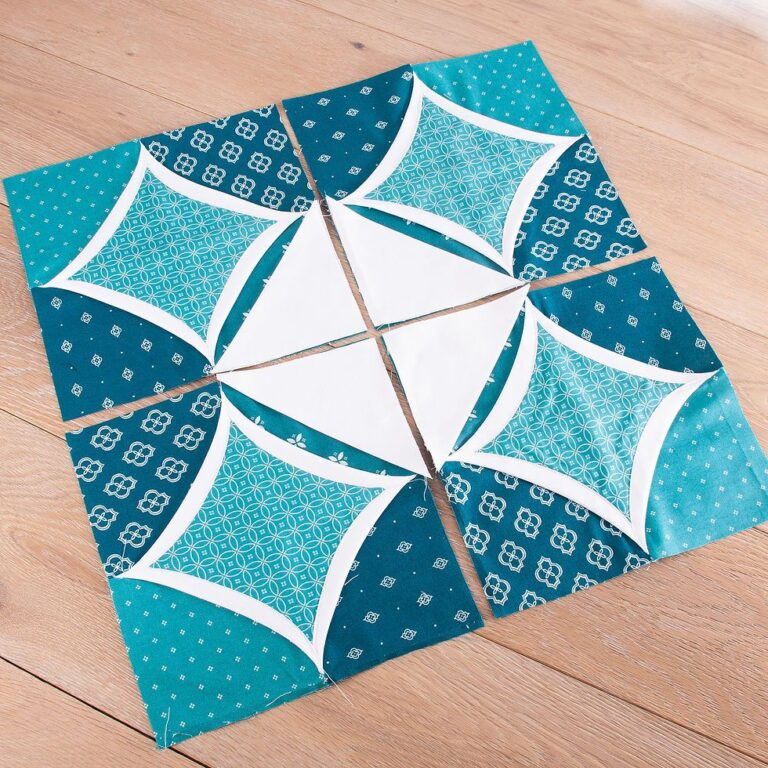
Before diving into the sewing process, it’s important to understand what makes the New York Beauty Quilt so special. This pattern combines curved piecing with foundation paper piecing, resulting in sharp, consistent points and smooth arcs. Each section of the quilt is built using a combination of spiked fans and soft curves that, when joined, create a captivating circular motif.
When learning how to sew curves, precision is key. Each arc must align perfectly with its background piece. Using templates or printed foundation papers helps maintain accuracy. Many quilters find that working with paper piecing ensures that the points stay sharp and the arcs stay smooth. This is especially useful for beginners tackling curves for the first time.
Fabric selection plays a huge role in how your New York Beauty Quilt turns out. Choose contrasting fabrics to make the curved sections stand out. Bright solids against dark backgrounds, or even subtle tonal combinations, can create an eye-catching balance that showcases your sewing skills.
The design’s structure may look complex, but once you break it down into sections, it becomes manageable. Each block is typically made of a spiked fan and a quarter-circle piece, which are sewn together to form a full circular motif when combined with others. Working one block at a time makes the process less overwhelming.
A good tip is to start with a few test blocks before cutting into your final fabric. This helps you get comfortable with curved seams and check your seam allowance accuracy. Practice leads to smoother sewing and fewer puckers along your curves.
Finally, remember that patience and practice are your best allies. The beauty of this pattern lies in its complexity, and each curve you sew brings you one step closer to mastering this timeless design.
Proper preparation ensures success when learning how to sew curves in quilting. Begin by printing or tracing your New York Beauty Quilt templates onto sturdy paper or foundation sheets. Accuracy at this stage determines the final alignment of your blocks. Make sure all your templates are consistent in size before cutting your fabrics.
Cut your fabric pieces with extra seam allowance to allow flexibility when piecing curves. Rotary cutters and sharp scissors are essential tools for achieving clean edges. Always double-check your cutting lines, as even small deviations can affect the way your arcs fit together.
For this quilt, using high-quality cotton fabric is recommended. The smooth texture and consistent weave make it easier to handle, especially when pressing curved seams. Starch your fabric lightly to add stability—this prevents stretching or distortion while sewing.
Choose a thread that blends well with your fabrics or one that complements your color scheme. A neutral thread is often best when assembling multiple-colored quilts, as it reduces visible stitching and helps maintain a neat finish.
Another essential aspect of preparation is pinning. When piecing curves, align the center points first, then pin the edges, adding a few extra pins in between. This technique helps control the curve and minimizes fabric shifting during sewing.
Lastly, set up your sewing machine properly. Use a ¼-inch seam foot for accurate seam allowance and adjust your stitch length to medium. A slower sewing speed gives you better control, especially when navigating tight curves.
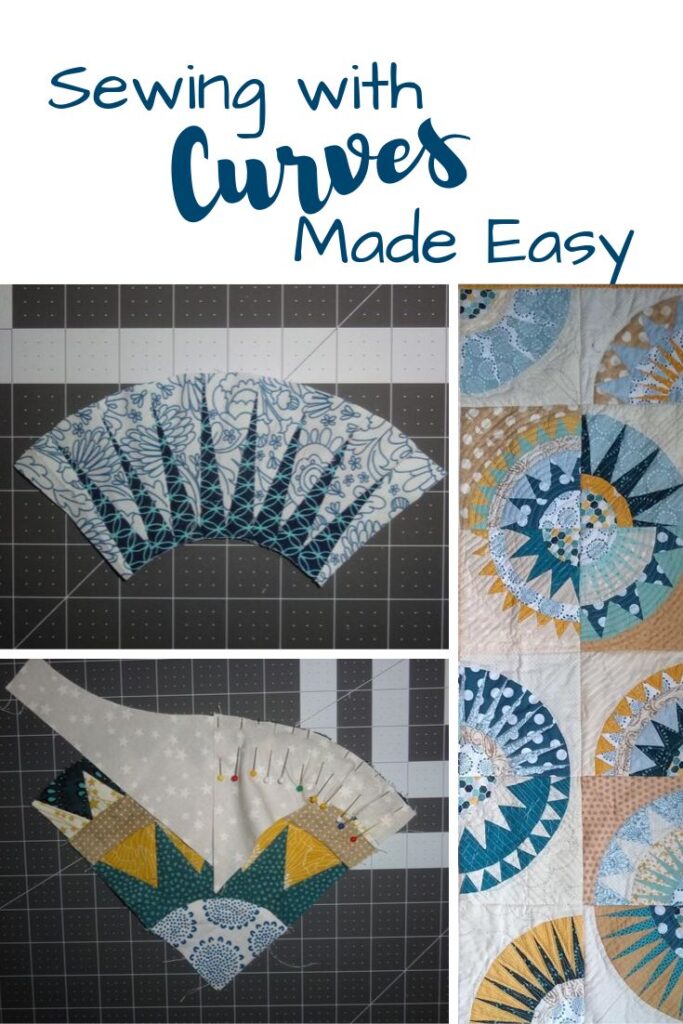
Now that you have your pieces ready, let’s explore how to actually sew those smooth, perfect curves in your New York Beauty Quilt. Start by placing your curved pieces right sides together, matching the center notch and pinning outward toward the edges. Don’t be afraid to use several pins—this will help hold the fabric in place as you sew.
Begin sewing slowly from one edge to the other, gently guiding the fabric rather than pulling it. The key to mastering how to sew curves is to let the fabric naturally follow the curve of the seam. If you feel tension building, stop and adjust your layers carefully before continuing.
Pressing after sewing is crucial. Always press the seam allowance toward the background fabric to reduce bulk. Use steam and a tailor’s ham or curved pressing surface for best results. Proper pressing keeps your blocks flat and enhances the visual flow of the design.
When piecing multiple arcs, check that each section fits precisely with the next. Minor adjustments can be made by slightly trimming the curved edges before joining. Consistency ensures that when you assemble your quilt top, all circles and spikes align beautifully.
If you encounter puckers, don’t worry—it happens even to experienced quilters. Unpick small sections and resew carefully. Practice on scrap pieces to gain confidence before assembling your main blocks. Over time, your stitches will become smoother and more even.
Once you’ve completed several curved blocks, lay them out on a design wall or table. This helps you visualize the overall composition and decide how to arrange colors and contrast. Each block adds movement and rhythm to the final New York Beauty Quilt, transforming your careful piecing into a true work of art.
After sewing your curved blocks, the next step is assembling your New York Beauty Quilt into a cohesive top. Arrange your blocks into a layout that highlights your color choices and curved design. Often, alternating light and dark backgrounds helps emphasize the circular flow of the pattern.
Sew your blocks together using consistent ¼-inch seams, paying close attention to how the points and arcs align. Press the seams open or to one side, depending on which method creates less bulk. Take your time during assembly—precision here ensures a smooth final appearance.
Once the quilt top is completed, it’s time to prepare your backing and batting. Choose a soft, complementary backing fabric that enhances the quilt’s aesthetic. Baste your layers using pins or spray adhesive, smoothing out any wrinkles to avoid puckering during quilting.
For quilting, you can choose designs that follow the natural curves of the New York Beauty Quilt. Echo quilting, free-motion swirls, or radiating lines all work beautifully to accentuate the movement of the design. Use thread colors that either blend subtly or contrast boldly, depending on your desired effect.
After quilting, trim the edges neatly and attach the binding. Bias binding is ideal for curved quilts because it stretches and conforms smoothly around the edges. Take care to miter corners and secure the binding by hand or machine for a polished finish.
Finally, admire your work! The New York Beauty Quilt is not just a project—it’s an accomplishment. Each curve and seam represents patience, creativity, and skill. Display it proudly as a wall hanging, a decorative throw, or even a family heirloom.
1. Is the New York Beauty Quilt suitable for beginners?
While this quilt includes curved and paper piecing techniques, beginners can still attempt it by starting with simpler arcs and using clear templates. Practice on scraps before working on the main fabric.
2. What’s the best fabric for sewing curves?
High-quality 100% cotton is the best choice because it’s stable, easy to press, and less likely to stretch along curves. Light starching helps maintain accuracy.
3. How do I prevent puckers when sewing curves?
Pin carefully, sew slowly, and let the fabric move naturally. Avoid pulling or stretching. Press gently with steam afterward to smooth out minor imperfections.
4. Do I need special tools to sew curves?
You’ll need sharp scissors or a rotary cutter, curve templates, plenty of pins, and a ¼-inch presser foot. A tailor’s ham is also helpful for pressing curved seams.
5. Can I make a modern version of the New York Beauty Quilt?
Absolutely! Use bold solids, gradient fabrics, or minimalistic color palettes to give the traditional New York Beauty a modern twist.
6. What quilting design works best for curved quilts?
Echo quilting, gentle waves, or concentric circles work beautifully to highlight curved piecing and enhance the flowing movement of the design.
Learning How to Sew Curves – The New York Beauty – Quilt Tutorial opens the door to one of quilting’s most striking and rewarding patterns. From mastering curved seams to choosing the perfect fabrics, every step of this project challenges your precision and creativity. With practice, you’ll find that curved piecing becomes second nature—and the result is a stunning, timeless quilt full of energy and elegance.
Whether you’re crafting your first curved project or refining your quilting artistry, the New York Beauty Quilt stands as a symbol of patience, skill, and passion. Try it, enjoy the process, and don’t forget to share your beautiful results. What did you think of this tutorial? Let me know your thoughts and how your version of this masterpiece turned out!


