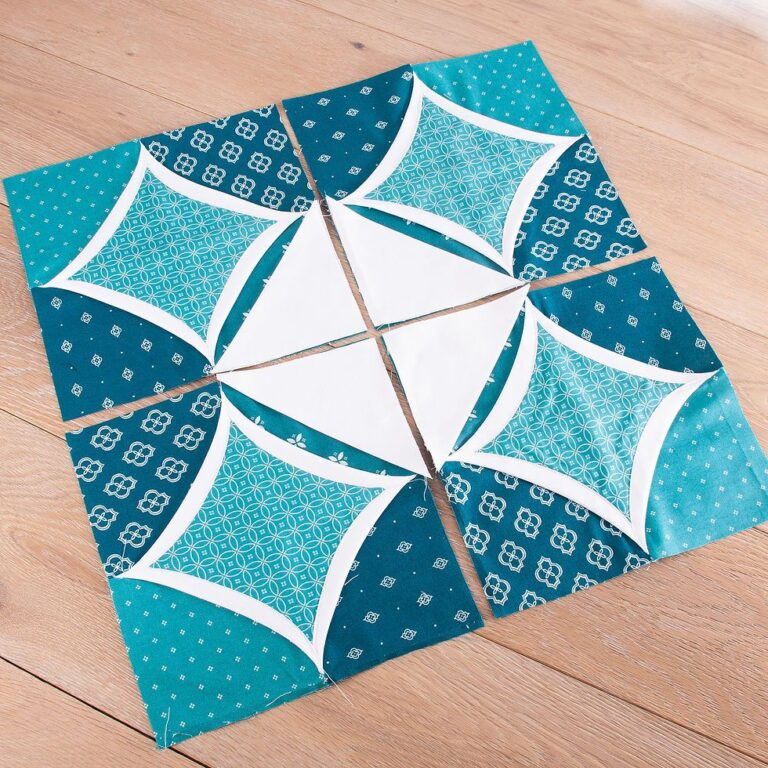
Cathedral Block - Quilt Pattern
How To Make a Patchwork Skirt – Quilt Pattern is a fun and creative project that brings together the beauty of quilting and the art of sewing clothing. If you love working with fabrics and want to create something unique to wear, this tutorial will help you transform colorful fabric scraps into a fashionable and sustainable skirt. A patchwork skirt is not only a lovely handmade garment but also a statement of creativity and eco-consciousness, as it allows you to repurpose leftover materials into something stunning and wearable.
The charm of a patchwork skirt lies in its individuality—no two skirts are ever the same. Each fabric piece tells a different story, creating a mosaic of colors and textures that reflects your personal style. Whether you’re an experienced quilter or a beginner in sewing, this quilt pattern is simple enough to follow and can be adjusted to your size, fabric preference, and desired length.
This guide will walk you through every step of how to make a patchwork skirt, from choosing the right fabrics and cutting your quilt blocks, to assembling and finishing the skirt with a professional look. Along the way, you’ll also learn helpful tips for sewing evenly, aligning your seams perfectly, and adding those special touches that make your project stand out.

When learning how to make a patchwork skirt – quilt pattern, the first and most important step is selecting your fabrics. The secret to a visually appealing patchwork skirt is variety. Choose at least six to ten different cotton prints that coordinate well. Quilting cottons are ideal for this project because they are durable, easy to sew, and available in countless colors and designs.
You can create a theme based on your style—floral prints for a romantic look, geometric patterns for something modern, or even vintage fabrics for a nostalgic touch. If you want to add depth, mix light and dark shades together to achieve balance and contrast.
Next, make sure to wash and press all fabrics before cutting. Pre-washing prevents the fabric from shrinking later and ensures that colors do not bleed during washing. Pressing the fabric smooths out wrinkles and makes cutting more accurate.
Prepare your basic tools: rotary cutter, cutting mat, quilting ruler, sewing pins, iron, and sewing machine. Having these tools ready before you start will make your project run smoothly and help you achieve professional results.
You’ll also need a waistband fabric, elastic or a zipper (depending on your preference), and lining fabric if you want extra comfort. Keeping your materials organized is key—label each fabric piece to avoid confusion during assembly.
Finally, plan your layout before sewing. Lay the fabric pieces on a flat surface and rearrange them until you’re happy with the overall look. This step helps you visualize how your patchwork skirt will appear once completed.
The cutting stage defines the foundation of your patchwork skirt quilt pattern. Using a rotary cutter and ruler, cut your fabrics into equal-sized squares or rectangles. A common choice is to cut 5-inch squares, but you can adjust the size based on the look you’re going for—larger squares for a bold patchwork, smaller ones for a more detailed mosaic effect.
For a fuller skirt, you’ll need more pieces to create extra volume. The number of squares depends on your waist and the desired skirt length. To estimate, measure your waist and multiply by two for a gathered style, or by 1.5 for a less flared skirt.
Once you’ve cut your pieces, arrange them on your work surface in horizontal rows. Experiment with the placement until the colors and prints feel balanced. Try to avoid placing two similar fabrics next to each other to maintain contrast and visual interest.
When satisfied with the layout, label each row numerically and stack them in order to keep them organized. This makes it easier when you start stitching your quilt blocks together later.
Now, sew each row using a ¼-inch seam allowance. Press the seams flat with an iron—alternating the direction of each row’s seams helps them nest together neatly when you join the rows. A flat and well-pressed seam gives your patchwork skirt a more polished appearance.
After joining all the rows, you’ll have a rectangular fabric panel made of your patchwork pieces. This panel will serve as the main body of your skirt before shaping and assembling it into a wearable garment.
Now comes the exciting part—turning your patchwork panel into a real patchwork skirt! First, fold your panel in half, right sides together, and sew along the side seam to form a tube. Make sure the seams align correctly to maintain a continuous patchwork design.
Next, decide on your waistband style. If you want a comfortable and adjustable skirt, an elastic waistband is the easiest choice. Measure your waist, subtract about two inches for the elastic’s stretch, and cut it to size.
Fold down the top edge of your skirt by one inch, then fold again to create a casing wide enough for the elastic. Stitch along the bottom edge of the fold, leaving a small opening to insert the elastic. Use a safety pin to guide the elastic through the casing, then sew the ends of the elastic together and close the opening.
For a more tailored look, you can add a fitted waistband with a zipper closure. To do this, cut a long strip of fabric matching your waist measurement plus seam allowance. Attach it to the top edge of the skirt, right sides together, then insert the zipper on the side seam. This gives your skirt a clean, professional appearance.
After attaching the waistband, try the skirt on to ensure a comfortable fit. Adjust the elastic or seams if necessary before moving on to hemming.
Finish by sewing the hem at your preferred length. You can create a narrow rolled hem for a delicate edge or a wider double-fold hem for added weight and durability. Press everything well to give your patchwork skirt a crisp, polished look.
Once your patchwork skirt – quilt pattern is complete, it’s time to enjoy styling it! The best part of creating your own skirt is that it’s one-of-a-kind. Pair it with a simple blouse or t-shirt to let the patchwork design shine. Add a denim jacket or a light cardigan for a cozy, layered look.
Patchwork skirts are versatile—they can be worn for casual outings, picnics, or even festive occasions. Depending on the fabrics you used, you can create seasonal versions: bright prints for summer or earthy tones for fall.
For accessories, keep things simple. A neutral belt or a woven bag complements the handmade feel of your skirt without overpowering it. If your patchwork features lots of colors, choose solid-colored tops to balance your outfit.
When it comes to care, always wash your patchwork skirt gently. Use cold water and mild detergent to preserve the colors and prevent fabric shrinkage. If your skirt has delicate stitching or embellishments, consider hand washing for better longevity.
Iron your skirt on a medium heat setting, using steam if necessary, to keep the fabric smooth. Store it neatly folded or hung up to maintain its shape and prevent wrinkles.
Lastly, don’t be afraid to make more! Once you learn how to make a patchwork skirt, you can experiment with different patterns, skirt styles, and fabric combinations. Each new piece will reflect your growth as a quilter and seamstress.
1. Can I make a patchwork skirt without a sewing machine?
Yes, it’s possible to sew a patchwork skirt by hand, but it will take more time and patience. Use small, even stitches and sturdy thread to ensure durability.
2. What fabrics are best for a patchwork skirt?
Quilting cotton is the most recommended fabric. It’s easy to work with, washable, and comes in many designs. Avoid stretchy or slippery fabrics if you’re a beginner.
3. How do I make sure my seams match?
Always press your seams flat and alternate the direction of each row. Use pins or clips to keep pieces aligned before stitching.
4. Can I add lining to my patchwork skirt?
Absolutely! A lining adds comfort and structure, especially if your fabrics are light. Choose a soft cotton or lightweight muslin for the lining.
5. How long does it take to make a patchwork skirt?
Depending on your experience level, it can take anywhere from one afternoon to a weekend project. Cutting and arranging the fabrics usually takes the most time.
6. Can I recycle old clothes for a patchwork skirt?
Yes! That’s one of the best ways to make your project sustainable. Old shirts, dresses, or fabric scraps can all be transformed into unique patchwork pieces.
7. Do I need a pattern for every skirt?
Once you’ve made one patchwork skirt, you can easily adjust the pattern to fit different sizes or lengths. The basic construction remains the same.
Learning How To Make a Patchwork Skirt – Quilt Pattern is not just about sewing—it’s about creativity, sustainability, and self-expression. With simple materials and a little imagination, you can turn fabric scraps into a wearable work of art. Each stitch carries a story, and every skirt you make reflects your individuality.
Now that you’ve discovered the full process—from fabric selection to finishing touches—you can confidently create your own patchwork skirt. Try experimenting with new color palettes and patterns each time. Whether you wear it or gift it, your handmade skirt will always stand out as a beautiful testament to your craft.
What did you think of this tutorial on How To Make a Patchwork Skirt – Quilt Pattern? Share your thoughts and let me know how your project turned out!


