Boat and Sailboat- Crochet Pattern
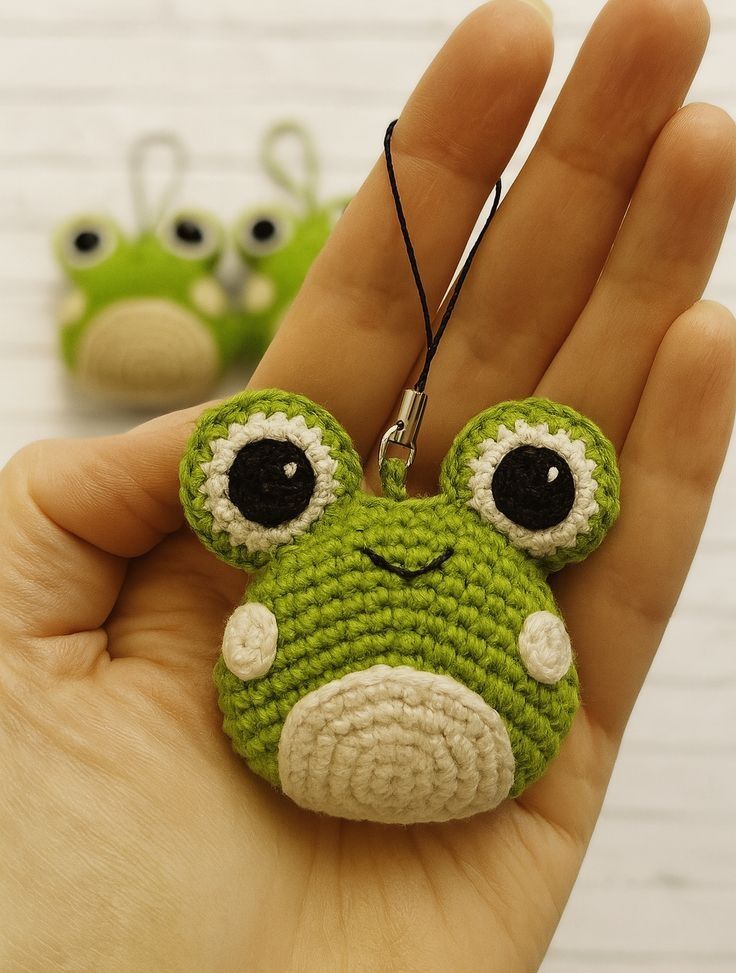
The Amigurumi Frog – Crochet Pattern is one of the most charming and beginner-friendly projects in the world of crochet. If you love creating adorable handmade animals, this cute frog will surely capture your heart. Amigurumi, the Japanese art of crocheting small stuffed toys, combines creativity, patience, and joy in every stitch. This pattern allows crafters to bring to life a delightful frog full of character, perfect as a gift, decoration, or collectible.
Crocheting an Amigurumi Frog is not only a fun craft but also a relaxing and rewarding activity. With just a few materials — yarn, a crochet hook, stuffing, and safety eyes — you can create a cute and huggable frog that brings smiles to anyone who sees it. This crochet pattern is suitable for all skill levels, from complete beginners to experienced crocheters looking for a quick and joyful project.
In this article, we’ll explore how to make your own Amigurumi Frog – Crochet Pattern, from materials and techniques to detailed instructions and customization tips. We’ll also discuss how you can personalize your frog, use it as a gift, and make your crochet projects even more special. Let’s jump right in and start crafting this delightful little friend!
Before you start crocheting your Amigurumi Frog, it’s essential to gather all the materials you’ll need. The most common yarn used for amigurumi is cotton or acrylic, as both provide great texture and durability. Choose a soft yarn in shades of green, and remember to have a small amount of white and black yarn for the frog’s eyes and mouth details.
Next, you’ll need a crochet hook that matches your yarn thickness. Typically, a 2.5mm to 3.5mm hook works perfectly for amigurumi projects. You’ll also need fiberfill stuffing to give your frog shape and softness. Safety eyes are highly recommended, but if you’re making this toy for a small child, you can crochet or embroider the eyes for extra safety.
The Amigurumi Frog – Crochet Pattern usually begins with the frog’s head and body, worked in continuous rounds using the single crochet stitch. This technique creates a seamless and smooth structure, perfect for small stuffed toys. Using a stitch marker helps keep track of each round, preventing mistakes in your stitch count.
It’s important to maintain consistent tension while crocheting, as this ensures your frog’s fabric remains even and tightly woven. Loose stitches may cause gaps where stuffing can show through. A tip for beginners is to practice a few rounds before starting your actual project to get comfortable with your tension.
When you begin assembling your frog, make sure all pieces are stuffed evenly and sewn together carefully. Use a yarn needle to attach the limbs to the body, ensuring symmetry and balance. Small details, such as a smiling mouth or a rosy cheek, can bring your Amigurumi Frog to life with personality and charm.
Finally, keep your workspace well-lit and organized. Having all your tools, yarn, and patterns nearby helps the process flow smoothly. Crocheting is a relaxing hobby, and creating your own frog can become a meditative, joyful experience.
The first step in your Amigurumi Frog – Crochet Pattern is to start with the head. Begin by creating a magic ring and working single crochet stitches into it. Continue increasing each round until you reach the desired head size. This will form the top of the frog’s head, where you can later attach the eyes.
Once the head shape is complete, you can crochet the body by decreasing stitches gradually. The body is typically smaller than the head, giving the frog a cute, cartoonish appearance. Remember to stuff the body as you go, ensuring the shape stays even.
Next, crochet the arms and legs. These parts are usually thin and elongated, and they can be made in two separate pieces each. You can adjust the length of the legs depending on how playful or realistic you want your frog to look. Attach the limbs securely to the body using a yarn needle, making sure they are positioned symmetrically.
The eyes are what give your Amigurumi Frog its adorable character. You can use safety eyes or crochet small white and black circles to sew onto the head. Placing the eyes close together creates a sweet, innocent look, while spacing them apart gives a more playful expression.
Don’t forget to embroider a small smile or use black yarn to crochet a tiny mouth. You can also add a little blush with pink yarn or fabric paint for an extra touch of cuteness. Every small detail adds personality and makes your crochet frog pattern unique.
Once all the parts are assembled, give your frog a final touch by shaping it gently with your hands. You can adjust the stuffing to ensure it sits evenly. Your Amigurumi Frog – Crochet Pattern is now ready to be displayed, gifted, or cherished as a handmade keepsake.
The beauty of the Amigurumi Frog – Crochet Pattern lies in its versatility. You can easily personalize your frog to match your taste or the recipient’s personality. Changing yarn colors, adding accessories, or modifying features are great ways to make each frog special.
For instance, try using pastel colors for a whimsical and dreamy frog, or vibrant neon yarns for a fun and modern twist. You can even create a whole family of frogs in different shades of green, yellow, or blue. Each one will have its own charm and character.
Accessories can make your Amigurumi Frog even more delightful. Add a tiny crochet hat, scarf, or bow tie to give your frog a stylish flair. Some crocheters even add small props like flowers, umbrellas, or lily pads to display alongside their frogs.
If you’re making your frog as a toy for a child, consider adding a rattle insert inside the body to make it interactive. Just make sure the stuffing and stitches are tightly secured to ensure safety.
For home décor lovers, your crochet frog pattern can become part of themed decorations — think springtime arrangements, nursery décor, or garden-inspired displays. Handmade frogs can bring warmth and joy to any space.
Finally, you can combine the Amigurumi Frog with other crochet animals to create an adorable collection. Whether displayed on a shelf or given as gifts, these handmade friends carry a special sentimental value that factory-made toys simply can’t match.
To achieve professional-looking results with your Amigurumi Frog – Crochet Pattern, it’s essential to pay attention to small details and finishing techniques. The way you assemble and finish your toy can make a huge difference in the final appearance.
One of the most important tips is to stuff gradually and evenly. Overstuffing can stretch the stitches and distort the shape, while under-stuffing may cause your frog to appear flat. Take your time, using small amounts of fiberfill at a time.
When sewing parts together, use invisible or whip stitches with the same yarn color as your frog’s body. This ensures the seams blend seamlessly, creating a clean and polished look. Proper stitching gives your Amigurumi Frog a durable and neat finish.
Blocking is another technique that can improve the overall appearance of your crochet work. Lightly steam your finished frog to help the yarn relax and the shape set beautifully. Be cautious not to overheat or wet the piece too much, as it could damage the yarn.
You can also add small personal touches to make your frog one of a kind. Embroidering initials, sewing on tiny hearts, or giving your frog a cheerful expression makes it more personal and meaningful.
Finally, don’t forget to take care of your handmade creation. To clean it, gently wipe with a damp cloth or hand wash using mild soap. Avoid harsh detergents, as they can weaken the fibers and fade the colors. With proper care, your Amigurumi Frog will remain adorable for years to come.
1. What skill level is needed for the Amigurumi Frog – Crochet Pattern?
This pattern is perfect for beginners and intermediate crocheters. It uses basic stitches like single crochet, increases, and decreases.
2. How long does it take to make an Amigurumi Frog?
Depending on your skill level, it can take anywhere from 4 to 8 hours to complete.
3. What kind of yarn should I use for the Amigurumi Frog?
Cotton or acrylic yarn works best because they are durable and hold their shape well.
4. Can I wash my crochet frog?
Yes, you can gently hand wash your frog with mild soap and let it air dry. Avoid using hot water or machine drying.
5. What size should my Amigurumi Frog be?
The size depends on your yarn and hook, but most patterns create frogs between 4 and 8 inches tall.
6. Is it safe for babies and toddlers?
Yes, but if the toy is for small children, replace safety eyes with embroidered ones to avoid choking hazards.
7. Can I sell the frogs I make using this pattern?
Yes, handmade creations can be sold, but always give credit to the pattern designer if required.
8. What other animals can I make with similar techniques?
You can use the same principles to make other amigurumi animals like bears, rabbits, or turtles.
Creating an Amigurumi Frog – Crochet Pattern is a joyful and fulfilling experience that combines creativity, patience, and love for handmade art. From gathering materials to adding the final touches, each step brings you closer to a unique and charming little friend. This project is perfect for anyone who wants to learn amigurumi or simply enjoys crocheting cute animals.
I hope this guide has inspired you to create your own Amigurumi Frog and explore the endless possibilities of crochet art. Don’t forget to share your thoughts, suggestions, and experiences — your feedback helps inspire even more creative projects in the crochet community!
