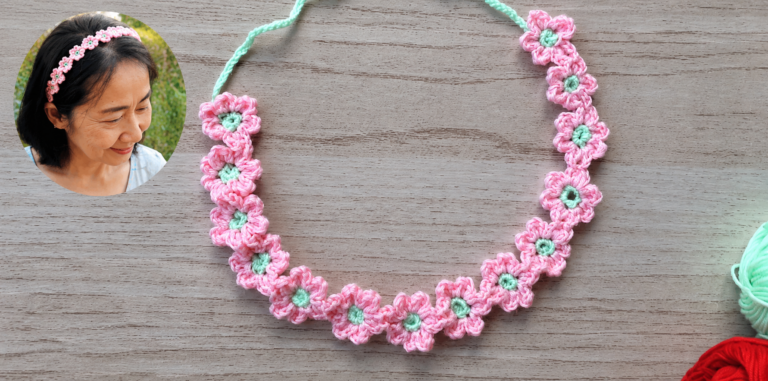
Crocheted Flower Headband - Pattern
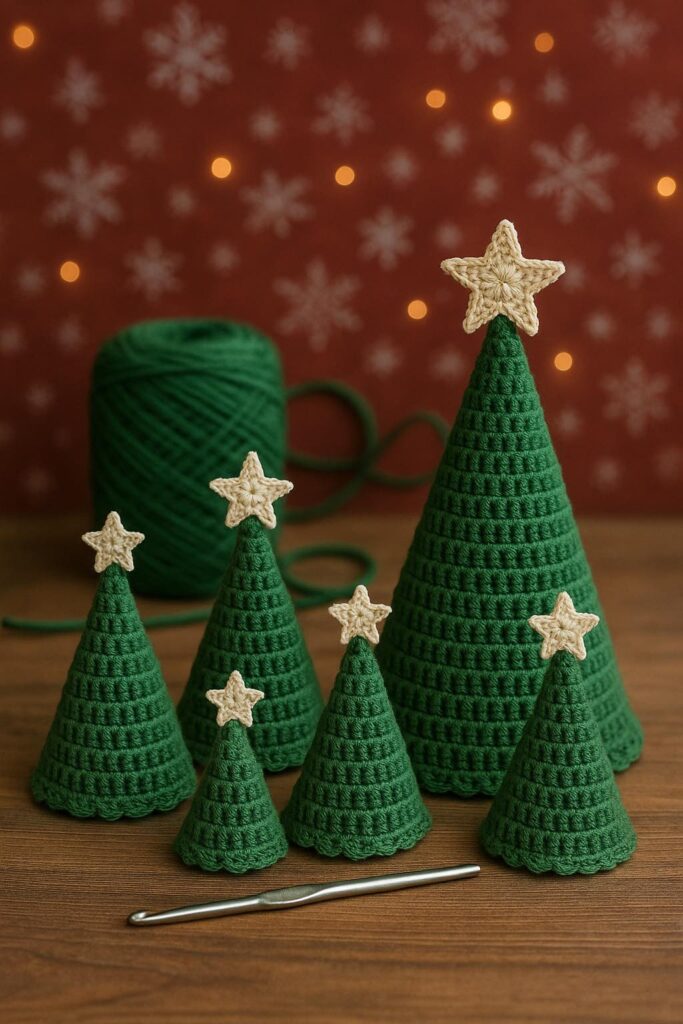
The Crochet Cone Tree – Crochet Pattern is one of the most delightful and versatile seasonal crochet projects you can make. Whether you’re preparing for Christmas, decorating your home for winter, or simply enjoying a creative afternoon, this pattern offers endless possibilities for personalization. The simplicity of the cone shape, combined with the beauty of crochet stitches, makes this project suitable for beginners and experienced crocheters alike.
One of the reasons the Crochet Cone Tree – Crochet Pattern has gained popularity is because it allows you to explore your creativity. You can choose from a variety of yarn textures, colors, and embellishments to match your personal style or seasonal theme. Some crafters like to make a minimalist version in pure white, while others love to use bright metallic yarns and beads to create a more festive look. The result is always stunning and perfect for displaying on tables, mantels, or as part of a handmade gift set.
Another advantage of working with the Crochet Cone Tree – Crochet Pattern is its practicality. It doesn’t require a lot of yarn or time to complete, yet it delivers a beautiful result. You can easily make multiple trees in different sizes to create a decorative forest display. These trees are also a charming eco-friendly alternative to plastic decorations, giving your home a cozy and handmade touch.
To start your Crochet Cone Tree – Crochet Pattern, gather a few basic supplies. You’ll need yarn in your desired color, a matching crochet hook, scissors, and a yarn needle. The yarn choice can completely change the final look — cotton yarn gives a more structured finish, while acrylic or metallic yarns offer shine and softness.
For beginners, a medium-weight yarn (such as worsted weight) is ideal, as it’s easy to handle and creates a tree that stands firmly. You can also experiment with smaller hooks for tighter stitches or larger hooks for a looser, more flexible texture. The key is to keep your tension consistent throughout the project.
In addition to yarn and hooks, you might want to use a cardboard cone or foam cone as a base. This helps the crochet tree maintain its shape. You can also fill the cone with polyester stuffing if you prefer a soft, plush design. Some crocheters like to add a small wooden base or stand to give the tree extra stability.
When choosing colors for your Crochet Cone Tree – Crochet Pattern, think about the ambiance you want to create. Classic Christmas colors like green, red, and gold work beautifully, but pastel tones or neutral shades can make a modern and elegant decoration. You could even create an ombre effect by changing yarn colors as you crochet upward.
Don’t forget about optional embellishments. Adding buttons, beads, ribbons, or even small crocheted stars can bring your cone tree to life. If you plan to give it as a gift, you can personalize it with the recipient’s favorite color scheme or initials for an extra thoughtful touch.
Lastly, keep your crochet tools organized. Having your scissors, yarn needle, and stitch markers nearby will make the process smoother and more enjoyable.
To begin your Crochet Cone Tree – Crochet Pattern, start by making a magic ring. This will be the top of your cone. Work a few single crochet stitches into the ring and pull it tight. Continue working in rounds, increasing gradually to widen the base of the tree. This gradual increase gives the cone its signature shape.
After the first few rounds, remember to place a stitch marker at the beginning of each round to keep track of your progress. Depending on the size of the tree you want to make, you can continue increasing until you reach the desired diameter. For a small tree, 20–25 rounds may be enough, while a larger version might require 40–50 rounds.
The type of stitches you use will define the texture of your Crochet Cone Tree – Crochet Pattern. You can stick with single crochet stitches for a classic, tight look or switch to half-double or double crochet for a looser texture. For a decorative twist, you can alternate rows with front-post or back-post stitches to create a ribbed, tree-like effect.
As you reach the bottom of your tree, make sure the edges are even and smooth. You can fasten off and weave in the ends neatly. If you’re using a foam cone or cardboard structure inside, carefully slip the crochet cover over it, adjusting the stitches as needed to fit snugly.
For those who love adding personal touches, consider finishing the top of your tree with a small crocheted star or pom-pom. You can also crochet a chain to wrap around the tree as a garland. This kind of customization makes every Crochet Cone Tree – Crochet Pattern unique.
Finally, give your completed project a light steam blocking to set the stitches. This helps it keep its shape and gives a more professional finish.
Once you master the basic Crochet Cone Tree – Crochet Pattern, you can start experimenting with different styles and designs. The beauty of this project lies in its adaptability. You can make trees in varying heights and colors to match any season or event.
One creative variation is to use multicolored yarn to create a striped or gradient effect. Self-striping yarns work wonderfully for this and eliminate the need to change colors manually. If you want a frosty winter vibe, choose yarns with metallic threads or soft white fibers that mimic snow.
Another fun idea is to turn your Crochet Cone Tree – Crochet Pattern into a functional decoration. You can make it hollow and use it as a gift container or hide small surprises inside for children. Some crafters even place fairy lights inside the cone to make it glow at night, creating a magical atmosphere.
You can also play with texture. Use bobble stitches, puff stitches, or shells to make your tree more three-dimensional. This not only adds visual interest but also gives your handmade decor a tactile charm.
If you’re looking for eco-friendly ideas, crochet your tree using leftover yarn scraps. Mixing colors can result in a rustic, patchwork look that’s both sustainable and stylish. It’s a wonderful way to make use of every bit of yarn you have at home.
Lastly, consider making sets of Crochet Cone Trees to sell at craft fairs or as holiday gifts. They are quick to produce, easy to customize, and always appreciated by anyone who loves handmade home decor.
To make your Crochet Cone Tree – Crochet Pattern project more enjoyable, keep a few tips in mind. First, always check your gauge. Although this project doesn’t require precise measurements, keeping a consistent stitch size ensures your cone looks balanced and professional.
Blocking is another key step that many beginners overlook. Lightly steam-blocking your finished piece helps relax the stitches and gives your tree a clean, symmetrical shape. This is especially useful if you’re making a display of multiple trees in different sizes.
When working with metallic or novelty yarns, be gentle with tension. These yarns can sometimes be slippery or prone to splitting, so take your time to crochet slowly and evenly. If you prefer a more rustic look, natural fiber yarns like wool or jute add a warm texture.
To make your Crochet Cone Tree – Crochet Pattern stand upright, you can use a foam cone or stuff the inside with fiberfill. If you want to avoid plastic, a cardboard cone or even tightly rolled paper can serve as a sustainable alternative.
If your cone starts curling or losing shape, try adjusting your stitch count or hook size. Sometimes, using a slightly larger hook can help your crochet fit better over a cone base. Don’t be afraid to experiment — that’s part of the fun of handmade crafting.
Lastly, have fun decorating! Tiny ornaments, glitter threads, ribbons, or mini crochet stars can transform a simple tree into a show-stopping centerpiece. Let your creativity shine in every stitch.
1. Is the Crochet Cone Tree – Crochet Pattern suitable for beginners?
Yes, it’s a perfect beginner project. The stitches are simple, and the pattern is easy to follow.
2. What type of yarn works best for this pattern?
Medium-weight yarns, such as acrylic or cotton, are ideal. You can experiment with textures and colors depending on your desired effect.
3. Can I make the Crochet Cone Tree in different sizes?
Absolutely! Just add or reduce the number of rounds to adjust the height and width of your cone.
4. How can I make my crochet tree stand upright?
You can use a foam cone, cardboard cone, or fill the inside with stuffing for structure.
5. Can I decorate my tree with other materials?
Yes! Beads, ribbons, mini stars, or even LED lights look fantastic when added to your Crochet Cone Tree – Crochet Pattern.
6. Is this project suitable for holiday markets or gifts?
Definitely. These crochet trees are beautiful, affordable, and loved by everyone who appreciates handmade crafts.
The Crochet Cone Tree – Crochet Pattern is a joyful, creative, and practical project for any crochet lover. From festive decorations to elegant home displays, this design offers endless opportunities for personalization. With just a bit of yarn and imagination, you can create something truly special that adds warmth and charm to your space.
If you’ve enjoyed this tutorial, I’d love to hear your thoughts! Please share your honest opinion and suggestions below — your feedback helps make future patterns even better.


