
Charming Quilt Homes - Pattern
The Teddy Bear – Quilt Pattern is one of the most heartwarming and timeless designs in the world of quilting. Loved by crafters of all ages, this delightful pattern captures the innocence of childhood and adds a touch of warmth to any nursery, bedroom, or family space. Whether you’re a seasoned quilter or just starting your sewing journey, creating a Teddy Bear – Quilt Pattern is a wonderful way to combine creativity with comfort. The gentle curves, soft fabrics, and cozy finish make this project perfect for gifts, keepsakes, or even heirloom quilts to pass down through generations.
When it comes to making a quilt that radiates love and nostalgia, few designs compare to a Teddy Bear – Quilt Pattern. This adorable project allows you to experiment with various fabric textures, from cotton and flannel to plush minky. You can personalize your quilt by mixing prints, solid colors, and appliqué pieces that bring your bear to life. The best part? Every finished quilt tells its own story — a story stitched with affection, patience, and artistic touch.
Whether you are creating this quilt for a baby shower, decorating a child’s room, or simply indulging in your passion for patchwork, the Teddy Bear – Quilt Pattern will fill your creative time with joy. In this detailed tutorial, we will explore how to select the right materials, plan your quilt design, assemble the blocks, and finish your project beautifully. Let’s begin this sewing adventure and discover how to make your own snuggly bear-inspired masterpiece.
The foundation of a beautiful Teddy Bear – Quilt Pattern lies in the careful selection of fabrics and materials. Opt for soft, high-quality fabrics that feel gentle against the skin, especially if you plan to use the quilt for babies or children. Cotton fabrics are always a safe and versatile choice, while flannel adds extra warmth and coziness.
Consider choosing fabric colors that complement your overall theme. Pastel shades such as baby blue, pink, cream, or light brown work wonderfully for a classic teddy bear look. For a modern touch, you can experiment with bright patterns, polka dots, or even geometric prints. The versatility of this pattern allows endless possibilities.
You will also need essential quilting tools like a rotary cutter, self-healing cutting mat, quilting ruler, pins, and a reliable sewing machine. If you plan to add appliqué teddy bear shapes, fusible webbing or interfacing will help secure them in place before stitching.
For batting, a medium-loft cotton or polyester blend is ideal, giving your quilt the perfect balance between softness and durability. Choose a backing fabric that complements your front design — a soft flannel or coordinating print adds a lovely finish.
When planning your Teddy Bear – Quilt Pattern, consider the overall size of your quilt. Baby quilts often measure around 36” x 48”, but you can easily adjust the dimensions for larger projects. The pattern is flexible enough to be adapted into wall hangings, play mats, or lap quilts.
Finally, make sure to prewash your fabrics before cutting to avoid any shrinking or color bleeding after your quilt is finished. This step ensures a professional look and longevity for your handmade treasure.
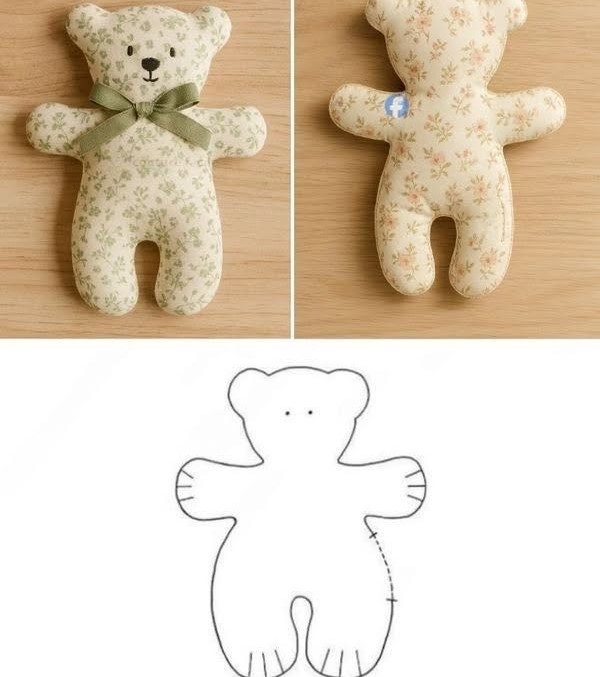
The highlight of the Teddy Bear – Quilt Pattern is, of course, the bear design itself. You can find pre-made teddy bear templates or sketch your own for a personalized touch. The shape usually consists of a round head, small ears, body, and limbs — simple enough for beginners yet charmingly effective.
Once you’ve selected your design, transfer it onto fusible web and then iron it onto the fabric of your choice. Carefully cut around the edges to create neat appliqué shapes. Use different fabrics to add character — for example, a floral print for the belly or a plaid fabric for the bear’s bowtie.
Arrange your teddy bears on your quilt blocks before ironing or stitching them in place. You can position them in a uniform pattern or create a playful layout with bears facing different directions. Adding small decorative details such as embroidered eyes, buttons, or patches enhances the whimsical feel of your quilt.
For cutting the background pieces, use a rotary cutter and ruler to achieve straight, even edges. Common block sizes range from 8” to 12”, depending on your design. Each block can feature a teddy bear or a mix of complementary patchwork squares.
Before sewing, lay out all your blocks on a flat surface to visualize the final arrangement. This step helps ensure color balance and prevents repetitive patterns. Once satisfied, take a photo for reference while assembling your quilt top.
By taking your time with the design process, you set the foundation for a quilt that is both visually appealing and deeply personal. The Teddy Bear – Quilt Pattern shines when creativity and careful planning come together in harmony.
Now that your fabric pieces are ready, it’s time to assemble the quilt top. Begin by sewing your blocks together using a ¼-inch seam allowance. Press each seam carefully to one side or open, depending on your preference. Consistency is key to achieving a polished finish.
After joining the blocks, add borders around the quilt top if desired. Borders frame your design beautifully and help you reach your target quilt size. For a cohesive look, choose border fabrics that echo the tones of your teddy bear or background prints.
Next, create your quilt sandwich — this consists of the quilt top, batting, and backing fabric. Lay the backing fabric right side down, place the batting in the middle, and finally, position the quilt top on top, right side up. Smooth out any wrinkles and pin or baste the layers together.
When it comes to quilting, you can choose from hand quilting, free-motion quilting, or simple straight-line stitching. For a Teddy Bear – Quilt Pattern, gentle curves or echo quilting around each bear shape works wonderfully. It accentuates the design without overpowering it.
Be sure to use a coordinating thread color that blends nicely with your fabrics. Take your time to quilt evenly, keeping the layers smooth and taut throughout the process.
Once your quilting is complete, trim any excess batting and backing fabric. Prepare your binding by cutting strips of fabric, folding them lengthwise, and sewing them along the edges of your quilt. This final step gives your piece a clean and professional finish.
The finishing stage of your Teddy Bear – Quilt Pattern is where your creativity truly shines. Adding personal touches transforms your quilt from a simple project into a meaningful keepsake. Consider embroidering a child’s name, birthdate, or a loving message on one corner of the quilt.
You can also embellish your teddy bear appliqués with small accessories like bows, patches, or even textured fabric pieces to create a 3D effect. Buttons, ribbons, and soft felt pieces can add charm, but remember to secure them tightly if the quilt is intended for a baby or toddler.
Labeling your quilt is another beautiful way to leave your mark. A small, hand-stitched label with your name and the date of completion adds a personal and historical touch that future generations will appreciate.
If you plan to gift your Teddy Bear – Quilt Pattern, consider wrapping it in tissue paper or a handmade fabric bag for an extra-special presentation. Nothing compares to the joy of giving a quilt that was made with care and intention.
Once completed, display your quilt proudly or store it in a dry, cool place. Avoid prolonged exposure to direct sunlight, as it can fade your fabrics over time. Regular gentle washing and air drying will keep it looking beautiful for years to come.
This project is not just about sewing fabric together — it’s about creating warmth, love, and memories. The Teddy Bear – Quilt Pattern stands as a symbol of comfort, creativity, and affection.
1. Is the Teddy Bear – Quilt Pattern suitable for beginners?
Yes! This pattern is perfect for beginners because it involves simple appliqué and basic quilting techniques. It’s a wonderful introduction to creative sewing.
2. What fabrics work best for this quilt?
Soft cottons, flannel, and lightweight minky fabrics work beautifully. They are comfortable, durable, and easy to sew.
3. Can I make this quilt in different sizes?
Absolutely! The Teddy Bear – Quilt Pattern can be resized to fit cribs, beds, or as wall art. Simply adjust the block size and number of teddy bears.
4. How can I personalize my quilt?
Add embroidered names, dates, or small fabric details like hearts and bows. These touches make the quilt truly unique.
5. How do I care for my finished quilt?
Wash your quilt on a gentle cycle with mild detergent, then air dry it flat. Avoid high heat and direct sunlight to preserve the colors.
6. Can I sell quilts made from this pattern?
Yes, as long as you have designed it yourself or used a pattern with permission. Handmade Teddy Bear – Quilt Patterns make wonderful gifts or boutique items.
Creating a Teddy Bear – Quilt Pattern is more than just a craft — it’s an act of love stitched into every seam. From choosing fabrics to adding your final touches, this project invites you to slow down, create with purpose, and share joy through your handmade work. Whether you keep it, gift it, or display it proudly, your quilt will always carry the warmth and heart of its maker.
If this tutorial inspired you, share your experience or thoughts — we’d love to hear how your Teddy Bear – Quilt Pattern turned out!


