
Charming Quilt Homes - Pattern
Simple Pincushion Tutorial – Quilt Pattern is the perfect starting point for quilters who want a small, practical, and satisfying project that combines creativity with functionality. From beginners threading their first needle to experienced quilters looking for a quick and thoughtful handmade gift, this project fits beautifully into any sewing routine. A pincushion may be small, but it plays a big role in keeping your workspace organized and enjoyable.
The Simple Pincushion Tutorial – Quilt Pattern is designed to be approachable, flexible, and easy to personalize. Using basic quilting techniques, fabric scraps, and simple tools, you can create a useful accessory that reflects your personal style. This makes it an excellent project for learning, practicing precision, and experimenting with color and texture without pressure.
Throughout this article, you will learn not only how the Simple Pincushion Tutorial – Quilt Pattern works, but also why it is such a popular choice in the quilting world. We will explore essential quilting terms, explain techniques step by step, and highlight how this pattern supports sustainable crafting by using leftover materials.
The Simple Pincushion Tutorial – Quilt Pattern refers to a small quilted project designed specifically to hold pins and needles safely. Unlike complex quilt blocks, this pattern focuses on simplicity, making it ideal for quilters of all skill levels.
A key term associated with this project is quilt pattern, which means a set of instructions that guide fabric cutting, piecing, and assembly. In this tutorial, the quilt pattern emphasizes straight seams and basic shapes, ensuring accuracy without overwhelming details.
Another important concept is pincushion, a soft, stuffed item used to store pins. In quilting, a well-made pincushion improves workflow by keeping tools accessible and preventing damage to fabric or fingers.
The Simple Pincushion Tutorial – Quilt Pattern often uses scrap fabric, making it a sustainable choice. Scraps are leftover pieces from larger quilt projects, and using them reduces waste while adding charm through color variety.
This pattern also introduces the idea of mini quilting projects, which are small items completed quickly. These projects are perfect for practice, gifts, or testing new techniques before applying them to larger quilts.
Finally, understanding seam allowance is essential. Most versions of the Simple Pincushion Tutorial – Quilt Pattern use a standard quarter-inch seam, reinforcing a foundational quilting skill that applies to all quilt patterns.
The Simple Pincushion Tutorial – Quilt Pattern requires only basic materials, making it accessible to anyone with a sewing kit. Common materials include cotton fabric, batting or stuffing, and thread.
Quilting cotton is the most recommended fabric for this project. It is durable, easy to sew, and available in countless colors and prints, allowing endless customization of your pincushion.
Batting or stuffing is another key material. Batting is typically used in quilts to add structure, while stuffing provides softness. Either option works well in the Simple Pincushion Tutorial – Quilt Pattern, depending on the firmness you prefer.
Essential tools include a sewing machine or needle for hand sewing, fabric scissors or a rotary cutter, pins, and a ruler. These basic tools support accuracy and ease throughout the process.
Thread choice matters as well. Using quality thread helps ensure durability, especially since pincushions are handled frequently. Neutral or matching thread colors are often preferred in quilt patterns.
Lastly, marking tools such as fabric chalk or washable pens can help guide stitching. While optional, they improve precision when following the Simple Pincushion Tutorial – Quilt Pattern instructions.
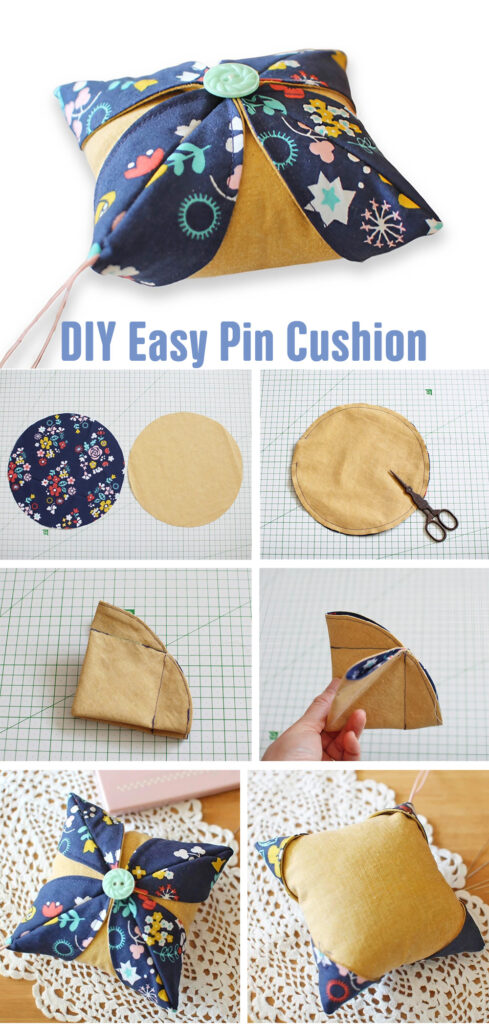
The first step in the Simple Pincushion Tutorial – Quilt Pattern is cutting the fabric. Typically, this involves cutting squares or rectangles, which helps beginners practice accurate measuring.
Next comes piecing, where fabric pieces are sewn together to form the pincushion top. This step introduces basic patchwork techniques commonly used in quilting.
After piecing, the top layer is paired with batting and a backing fabric. This creates a quilt sandwich, a fundamental quilting concept that builds structure and softness.
Quilting the layers together is optional but recommended. Simple straight-line quilting secures the layers and adds texture, enhancing the finished look of the pincushion.
Once quilted, the piece is folded or paired with another square, sewn around the edges, and turned right side out. This step transforms flat fabric into a three-dimensional object.
The final step in the Simple Pincushion Tutorial – Quilt Pattern is stuffing and closing the opening. Careful hand stitching ensures a neat finish and long-lasting use.
One major benefit of the Simple Pincushion Tutorial – Quilt Pattern is skill development. It allows quilters to practice straight seams, accurate cutting, and basic assembly.
This project also promotes creative freedom. By choosing different fabrics, colors, and quilting styles, each pincushion becomes a unique expression of creativity.
The Simple Pincushion Tutorial – Quilt Pattern is time-efficient. Many quilters complete it in a single session, making it ideal for busy schedules.
Another advantage is its suitability for gifts. Handmade pincushions are thoughtful, practical, and appreciated by sewists and crafters alike.
This pattern supports sustainable crafting by encouraging the use of fabric scraps. Reducing waste while creating something useful aligns with mindful quilting practices.
Finally, completing a small project like this builds confidence. Success with the Simple Pincushion Tutorial – Quilt Pattern often inspires quilters to tackle larger and more complex quilt patterns.
What skill level is required for the Simple Pincushion Tutorial – Quilt Pattern?
This pattern is beginner-friendly and suitable for anyone learning basic quilting techniques.
Can the Simple Pincushion Tutorial – Quilt Pattern be sewn by hand?
Yes, the entire project can be completed with hand sewing, although a sewing machine speeds up the process.
What size is typical for a pincushion made from this quilt pattern?
Most pincushions measure between four and five inches square, but sizes can be easily adjusted.
Is batting necessary for the Simple Pincushion Tutorial – Quilt Pattern?
Batting is optional. Some quilters prefer stuffing alone, while others like the added structure batting provides.
Can this quilt pattern be customized?
Absolutely. Fabric choices, quilting lines, and embellishments can all be adapted to personal taste.
How long does it take to complete the Simple Pincushion Tutorial – Quilt Pattern?
Most quilters finish the project in under an hour, making it a quick and rewarding experience.
In conclusion, the Simple Pincushion Tutorial – Quilt Pattern is a small project with big value. It teaches essential quilting skills, encourages creativity, and provides a useful handmade tool for everyday sewing. By understanding the materials, steps, and benefits involved, quilters of all levels can enjoy a successful and satisfying experience.
Whether you are using scraps, practicing techniques, or creating a heartfelt gift, this pattern proves that even the simplest quilt projects can bring lasting joy and confidence to your quilting journey.


