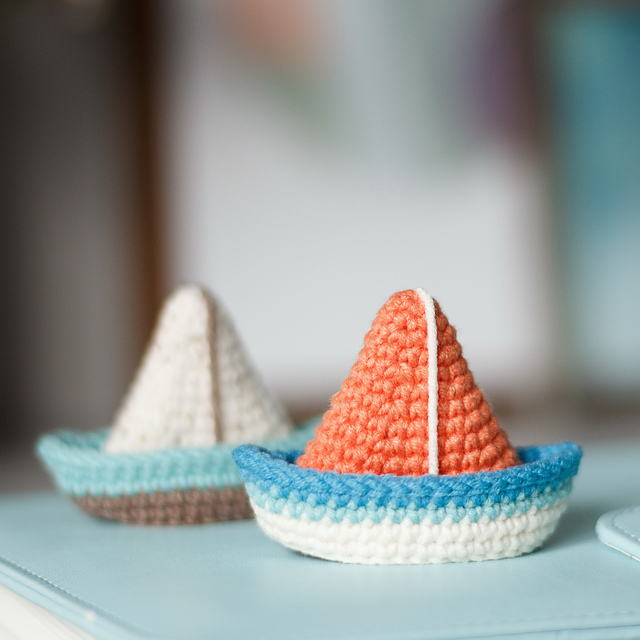
Boat and Sailboat- Crochet Pattern
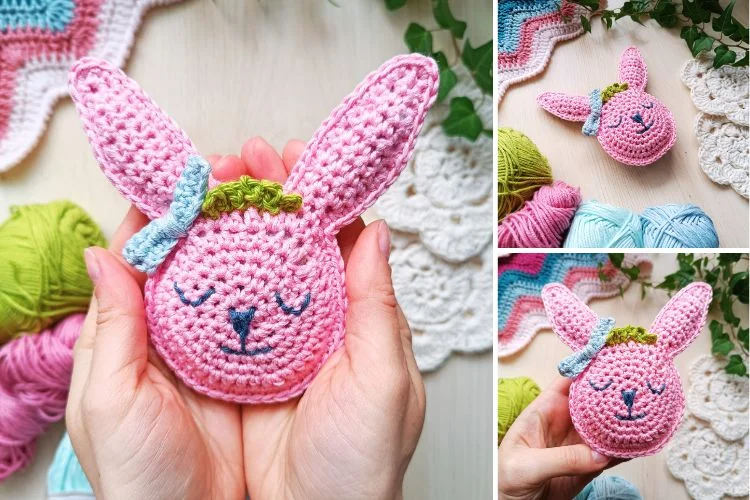
Ragdoll Bunny Amigurumi – Crochet Pattern is a charming and versatile project that combines the sweetness of a ragdoll style with the delicate art of crochet. This delightful handmade bunny has become a favorite among crafters who love creating soft toys filled with personality, warmth, and creativity. Whether you are an experienced crocheter or just starting your journey in the world of amigurumi, this pattern offers a rewarding and enjoyable experience.
The beauty of the Ragdoll Bunny Amigurumi – Crochet Pattern lies in its simplicity and adaptability. With its flat yet dimensional construction, the ragdoll technique creates a lovely stitched outline that gives the bunny a soft, quilted appearance. It is perfect as a gift for children, a decorative piece for nurseries, or even as a seasonal craft for spring and Easter celebrations.
In this comprehensive guide, you will learn everything you need to know about the Ragdoll Bunny Amigurumi – Crochet Pattern, from understanding the concept of ragdoll amigurumi to selecting materials, following step-by-step instructions, and customizing your bunny for a truly unique result. Let’s explore how to bring this adorable crochet bunny to life.
The term Ragdoll Bunny Amigurumi refers to a specific crochet technique where two flat pieces are created separately and then joined together with a border stitch, often single crochet. Unlike traditional amigurumi that is worked in continuous rounds, the ragdoll style emphasizes a layered construction that gives a charming stitched edge around the entire piece.
One of the main advantages of the Ragdoll Bunny Amigurumi – Crochet Pattern is its beginner-friendly structure. Because the pieces are worked flat, crocheters who are more comfortable with rows rather than rounds often find this method easier to follow. It also allows for clear shaping of ears, head, and body without complex increases and decreases.
The ragdoll technique also creates a sturdy outline that enhances the overall durability of the toy. This makes the bunny suitable for gentle play and decorative use. The visible edging adds a handcrafted touch that highlights the care and attention placed into each stitch.
Another appealing aspect of the Ragdoll Bunny Amigurumi – Crochet Pattern is the creative freedom it offers. You can experiment with different yarn textures, such as cotton for a structured look or plush yarn for extra softness. Each material choice influences the final personality of your bunny.
This pattern is also ideal for themed variations. By adjusting colors and small details, you can transform your bunny into a seasonal character, a pastel nursery companion, or even a gift personalized with embroidered initials.
Overall, understanding the ragdoll technique is the foundation for successfully completing your Ragdoll Bunny Amigurumi – Crochet Pattern, and once mastered, it opens the door to many other ragdoll-style crochet projects.
Selecting the right materials is essential when working on your Ragdoll Bunny Amigurumi – Crochet Pattern. The most commonly used yarn for this project is medium-weight cotton or acrylic yarn, as both provide good stitch definition and durability.
A suitable crochet hook is equally important. Typically, a hook size slightly smaller than recommended for your yarn helps create tighter stitches, preventing stuffing from showing through. For most medium-weight yarns, a 3.0 mm to 4.0 mm hook works well.
You will also need fiberfill stuffing to give your bunny its soft and cuddly shape. Choose high-quality polyester fiberfill that maintains its volume without clumping over time. Proper stuffing ensures that your Ragdoll Bunny Amigurumi looks evenly shaped and well-finished.
Safety eyes or embroidered facial features are key design elements. If the bunny is intended for young children, embroidered eyes are often recommended for added safety. Always secure attachments firmly and check for durability.
Other helpful tools include a yarn needle for sewing pieces together and weaving in ends, stitch markers to keep track of rows, and sharp scissors for clean cuts. Having these tools prepared in advance makes the crocheting process smoother and more enjoyable.
Careful preparation of materials ensures that your Ragdoll Bunny Amigurumi – Crochet Pattern turns out beautifully and stands the test of time, whether displayed on a shelf or gifted to a loved one.
The first step in the Ragdoll Bunny Amigurumi – Crochet Pattern is creating two identical flat bunny shapes. These shapes typically include the head, body, and ears worked in a single piece. Start by chaining the required number of stitches and follow the pattern’s row-by-row instructions carefully.
Shaping the ears often involves simple increases and decreases along the rows. This gives the bunny its characteristic long and soft appearance. Maintain even tension throughout the project to ensure both pieces match perfectly in size and shape.
Once both flat pieces are complete, place them together with wrong sides facing inward. Using single crochet stitches around the edges, join the two pieces together. This edging not only secures the layers but also creates the signature border of the ragdoll style.
Before fully closing the border, add fiberfill stuffing gradually. Insert small amounts at a time, shaping the head and body gently with your fingers. Avoid overstuffing, as this may distort the flat charm of the ragdoll design.
After stuffing, complete the edging stitches and fasten off securely. Weave in all loose ends neatly using a yarn needle. Attention to finishing details enhances the professional look of your Ragdoll Bunny Amigurumi.
Finally, add facial features and optional decorative elements such as bows, scarves, or embroidered details. These finishing touches give personality and warmth to your completed Ragdoll Bunny Amigurumi – Crochet Pattern project.
One of the most exciting aspects of the Ragdoll Bunny Amigurumi – Crochet Pattern is the opportunity for customization. Changing yarn colors can dramatically transform the look of your bunny. Soft pastels create a gentle nursery vibe, while bold tones add playful energy.
You can experiment with textured stitches in certain areas, such as using a slightly fluffy yarn for the tail. Mixing textures adds dimension and visual interest without complicating the overall pattern.
Personalized details make your Ragdoll Bunny Amigurumi even more special. Consider embroidering a small heart on the chest or adding a tiny pocket with a crocheted carrot. These subtle additions enhance the storytelling element of your handmade piece.
Seasonal adaptations are also popular. For spring, use floral-inspired colors; for winter, create a bunny with a tiny crocheted scarf. The base structure of the Ragdoll Bunny Amigurumi – Crochet Pattern remains the same, making it easy to adapt for different occasions.
If you enjoy gifting handmade items, this pattern can be scaled slightly by adjusting yarn weight and hook size. A larger version becomes a cozy decorative pillow, while a smaller one can serve as a keychain charm.
The versatility of the Ragdoll Bunny Amigurumi – Crochet Pattern ensures that each project feels unique and meaningful, reflecting your creativity and personal style. Ragdoll Bunny Amigurumi – Crochet Pattern
What is the difference between ragdoll amigurumi and traditional amigurumi?
Ragdoll amigurumi is typically worked in flat pieces that are joined together, while traditional amigurumi is crocheted in continuous rounds to form a three-dimensional shape.
Is the Ragdoll Bunny Amigurumi – Crochet Pattern suitable for beginners?
Yes, many beginners find ragdoll patterns easier because they involve working in rows. Basic knowledge of single crochet, increases, and decreases is helpful.
What type of yarn works best for this crochet pattern?
Medium-weight cotton or acrylic yarn is commonly recommended due to its durability and clear stitch definition. However, plush yarn can be used for a softer finish.
How do I make the bunny safe for children?
Use embroidered facial features instead of plastic safety eyes and ensure all parts are securely stitched. Avoid small detachable pieces.
Can I wash the finished Ragdoll Bunny Amigurumi?
Most yarns used for amigurumi are machine washable on a gentle cycle, but hand washing and air drying are often recommended to preserve shape and texture.
How long does it take to complete the Ragdoll Bunny Amigurumi – Crochet Pattern?
The time varies depending on skill level, but most crocheters can complete the project within a few hours to a couple of days.
The Ragdoll Bunny Amigurumi – Crochet Pattern is a delightful and rewarding project that combines simplicity, creativity, and charm. Throughout this guide, we explored the concept of ragdoll amigurumi, the essential materials and tools, the step-by-step construction process, and various customization ideas to make your bunny truly unique.
By understanding the structure of the Ragdoll Bunny Amigurumi – Crochet Pattern, selecting quality materials, and paying attention to finishing details, you can create a beautiful handmade bunny that reflects your personal style. Whether you craft it as a heartfelt gift, a decorative piece, or a relaxing creative project, this pattern offers endless possibilities and lasting satisfaction.
Now that you have learned the essentials of the Ragdoll Bunny Amigurumi – Crochet Pattern, you are ready to start crocheting your own adorable bunny and bring warmth and joy to every stitch.