Ragdoll Bunny Amigurumi - Crochet Pattern
If you love creating adorable crochet animals, then the CROCHET AMIGURUMI PENGUIN – Pattern is a perfect project to bring a touch of winter charm into your craft collection. This delightful penguin amigurumi pattern allows crafters of all levels to enjoy the process of making something truly heartwarming and cute. Whether you want to make it as a gift, decoration, or simply to add to your handmade toy collection, this CROCHET AMIGURUMI PENGUIN – Pattern is an ideal choice for all crochet enthusiasts.
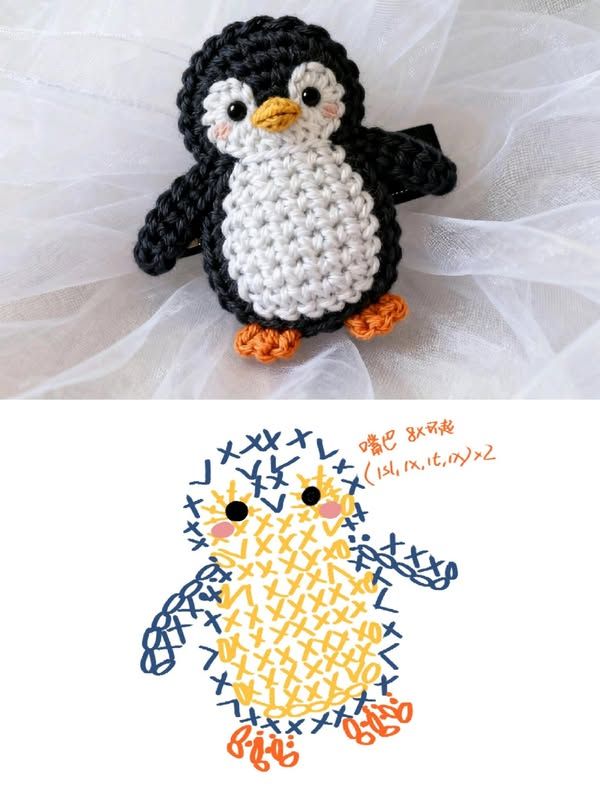
Amigurumi, the Japanese art of crocheting small stuffed creatures, has become a global trend. With this CROCHET AMIGURUMI PENGUIN – Pattern, you can dive into this fun craft and create a charming little penguin with personality. The pattern involves basic crochet stitches like single crochet, increases, and decreases, making it accessible even for beginners. The best part? You can customize your penguin’s colors, accessories, and even facial expressions to make it truly unique.
If you’ve been searching for a creative, relaxing, and rewarding crochet project, this CROCHET AMIGURUMI PENGUIN – Pattern will be one of your favorites. The finished result is soft, cuddly, and makes a perfect handmade gift for kids or anyone who loves penguins. With the right yarn and a few crochet tools, you can create an adorable keepsake that brings joy and warmth during any season.
Before you begin your CROCHET AMIGURUMI PENGUIN – Pattern, gather all the necessary materials. You’ll need soft acrylic yarn in black, white, orange, and possibly gray or blue for variations. A 2.5mm or 3mm crochet hook works best to achieve tight stitches, ensuring that the stuffing won’t show through. You’ll also need safety eyes, stuffing material, scissors, and a tapestry needle for assembling the parts.
Choosing the right yarn is essential for your CROCHET AMIGURUMI PENGUIN – Pattern. The yarn should be soft yet durable, as it determines how smooth and neat your final stitches will appear. Acrylic yarn is a great option because it maintains its shape and is easy to clean, especially if you’re gifting the toy to children.
When working with amigurumi, stitch tension plays a key role. To make your penguin firm and well-shaped, keep your stitches consistent and tight. If your tension is too loose, the stuffing may peek through. Beginners might want to practice on a small piece first before starting the penguin body.
The CROCHET AMIGURUMI PENGUIN – Pattern usually begins with a magic ring, followed by a series of increases to form a round body. Don’t rush through the steps—amigurumi is about patience and precision. Each round contributes to the penguin’s balanced shape. Using stitch markers can help you keep track of your rounds easily.
Stuffing is another crucial part of amigurumi. For your penguin, use polyester fiberfill to give it a soft yet firm texture. Be sure to stuff gradually as you go along; this helps you maintain an even shape. Too much stuffing at once can distort the penguin’s proportions.
Finally, once all body parts—head, wings, beak, and feet—are ready, you can start assembling. Take your time sewing each part onto the body using a tapestry needle. Proper assembly ensures your CROCHET AMIGURUMI PENGUIN – Pattern looks professional, symmetrical, and charming.
The body is the heart of your CROCHET AMIGURUMI PENGUIN – Pattern. Begin with a magic ring and work single crochets around it to form the base. Gradually increase your stitches until the shape starts resembling a rounded ball. Depending on your chosen size, you can adjust the number of rounds and stitches accordingly.
Once you’ve reached the desired width, maintain your stitch count for several rounds to build height. This creates the middle section of the penguin’s body. Afterward, you’ll begin decreasing gradually to close off the top. Don’t forget to stuff your penguin before sealing it completely.
For a classic penguin look, use black yarn for the back and white for the belly. You can switch colors in the middle of your rounds using the color-change technique. Make sure to weave in your ends neatly so that no threads are visible from the outside.
Adding the white belly patch gives your penguin its signature look. Some crocheters prefer to crochet a separate oval patch and sew it onto the front of the body. Others integrate the white section while crocheting. Both methods work beautifully, depending on your comfort level.
The wings are small, flat ovals that can be crocheted separately and attached on both sides. They add a cute and balanced touch to the overall figure. When sewing them, ensure symmetry to maintain your penguin’s adorable proportions.
Once your penguin’s body is shaped and stuffed, you can add facial features. Safety eyes are easy to install, but for small children, embroidered eyes might be a safer option. Either way, this step brings your CROCHET AMIGURUMI PENGUIN – Pattern to life with personality and charm.
Now comes the fun part—details! The beak and feet are what truly define your penguin’s character. Use bright orange or yellow yarn for these parts to contrast beautifully with the darker body colors. The beak is typically a small triangle crocheted separately and sewn carefully between the eyes.
For the feet, crochet two small ovals or rounded shapes. These can be lightly stuffed before attaching them to the base of the penguin. Positioning is key—make sure both feet are even, so your penguin can “stand” properly.
You can also personalize your CROCHET AMIGURUMI PENGUIN – Pattern with accessories. Add a tiny scarf, hat, or bowtie for extra charm. These simple additions make your project look festive and are perfect for gifts during the winter holidays.
If you want to give your penguin extra personality, experiment with facial expressions. Try different positions for the eyes or a tiny embroidered smile. Small changes can dramatically alter the penguin’s mood—from sleepy and shy to cheerful and curious.
Use blush or a touch of pink yarn to create rosy cheeks, giving your penguin a warm and friendly expression. Many crocheters enjoy adding this small detail because it makes the toy look even more lovable.
Once all details are complete, give your penguin a gentle shape adjustment by pressing and rolling it slightly in your hands. This helps even out the stuffing and refine its final form. The CROCHET AMIGURUMI PENGUIN – Pattern allows endless creativity, so feel free to customize it however you like.
Your handmade CROCHET AMIGURUMI PENGUIN – Pattern deserves proper care so it can stay adorable for years. To clean it, gently hand wash with mild soap and let it air dry. Avoid using hot water or wringing it out, as this may distort the shape or loosen stitches.
For long-term storage, keep your penguin in a cool, dry place. Avoid direct sunlight to prevent color fading. If displayed on a shelf, occasional dusting will keep it fresh and vibrant.
If you plan to give it as a gift, consider packaging it in a clear box or decorative bag. Handmade toys like this CROCHET AMIGURUMI PENGUIN – Pattern make heartfelt presents for birthdays, baby showers, or festive occasions.
You can also use your penguin as part of seasonal décor. During winter or Christmas, place it alongside snowflake ornaments, mini trees, or candles. Its soft and cozy appearance adds warmth to any room.
Photographing your finished project is another great way to showcase your crochet talent. Share your work online or in crafting communities to inspire others to try this pattern too. The CROCHET AMIGURUMI PENGUIN – Pattern is an excellent way to connect with fellow crocheters and spread creativity.
Lastly, remember that every handmade item is unique. The slight variations in stitches and shapes make each penguin special. Embrace these small imperfections—they are what make your crochet piece truly one-of-a-kind.
1. Is the CROCHET AMIGURUMI PENGUIN – Pattern suitable for beginners?
Yes! This pattern is beginner-friendly as it primarily uses single crochet stitches, increases, and decreases.
2. What type of yarn is best for this pattern?
Soft acrylic or cotton yarn works best. They provide durability and hold the shape of the penguin well.
3. How long does it take to make one penguin?
It depends on your skill level, but typically between 4 to 6 hours for experienced crocheters, or a full day for beginners.
4. Can I make the penguin larger or smaller?
Absolutely. Adjusting the hook size or yarn thickness will change the overall size of your amigurumi penguin.
5. What safety precautions should I take for children’s toys?
If the toy is for small children, avoid using safety eyes and instead embroider the eyes to prevent choking hazards.
6. Can I customize the colors?
Yes! Feel free to use your imagination—blue, gray, or pastel shades make adorable variations.
7. Do I need a lot of materials?
Not at all. The CROCHET AMIGURUMI PENGUIN – Pattern requires only small amounts of yarn and simple tools.
The CROCHET AMIGURUMI PENGUIN – Pattern is a delightful and rewarding project that combines creativity, patience, and fun. From shaping the body to adding tiny details, each step brings your penguin to life in your hands. This craft is not only therapeutic but also produces a beautiful handmade keepsake or heartfelt gift.
We hope this detailed guide has inspired you to try making your own penguin amigurumi. Don’t forget to share your experiences—leave a sincere opinion below and tell us how your penguin turned out! Your feedback and suggestions help keep this creative community thriving and connected.