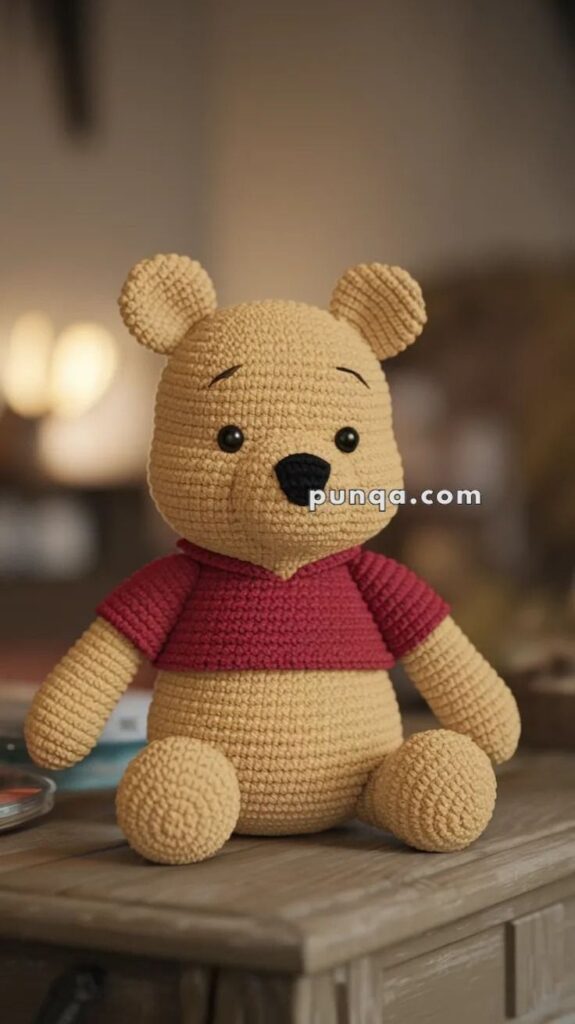
The adorable and timeless character of Winnie the Pooh has captured hearts for generations, and now, fans can bring him to life with a creative twist through the art of Crochet Winnie the Pooh. Whether you’re a seasoned crocheter or just starting your yarn journey, crafting this lovable bear in soft stitches can be a rewarding experience. This article explores how to make your very own Crochet Winnie the Pooh, sharing helpful insights, ideas, and a step-by-step approach to getting started.
Creating your own Crochet Winnie the Pooh is not just a crafting activity—it’s an opportunity to build something filled with warmth, nostalgia, and personal flair. Crochet allows you to control every detail of your project, from the size and texture to the shade of yellow that best matches Pooh’s classic appearance. This handmade touch transforms your project into a keepsake item, perfect for gifting, decoration, or childhood comfort.
Advertising
For many, working on a Crochet Winnie the Pooh serves as more than just a hobby—it becomes a heartfelt expression of creativity. Crafters often find that stitching this gentle bear helps them reconnect with childhood memories or share the magic of the Hundred Acre Wood with the next generation. Before you begin, it’s helpful to understand the core components of creating this iconic character using basic and intermediate crochet techniques.
When beginning your Crochet Winnie the Pooh, the most important thing is to choose the right materials. Use soft, acrylic or cotton yarns in the traditional colors of yellow for his body and red for his little shirt. You’ll also need black yarn for his nose and eyes, as well as a size-appropriate crochet hook.
Selecting the right pattern is your first big decision. Some prefer amigurumi-style Winnie the Pooh patterns, which are three-dimensional and plush. These versions use basic shapes like spheres and cylinders that come together to form a complete stuffed toy. Patterns often start with the head and body worked in continuous rounds.
Crocheting Pooh’s face can be the most challenging part because it requires precision and symmetry. Many patterns offer detailed instructions on where to place the eyes and how to shape his snout. Embroidering the nose and mouth using black thread gives Pooh his classic, gentle expression.
Advertising
The signature red shirt adds personality and character to your Crochet Winnie the Pooh. It’s usually worked separately and stitched onto the body or worked directly into the design. Small sleeve details and ribbing along the hemline make the shirt look more authentic and snug.
It’s essential to keep your tension even while crocheting to ensure your Pooh comes out with the correct proportions. Inconsistent tension may lead to a lopsided appearance or loose stuffing. Take your time, especially on the head and face, since this is the most recognizable part of the character.
Once you’ve finished crocheting all the parts—head, body, arms, legs, ears, and shirt—it’s time for assembly. Use strong yarn and a tapestry needle to attach each part firmly. Make sure the pieces are symmetrical and securely fastened, especially if the finished item will be handled frequently by children.
2. Tips for Personalizing Your Pooh Creation
One of the most delightful parts of making a Crochet Winnie the Pooh is the ability to personalize him. You can create a classic version or give your bear a modern twist with fun accessories or even different expressions. This opens the door to creativity and adds a unique touch to your project.
Try customizing the shirt with tiny initials or a small heart. This can make your Pooh bear feel even more special, especially if it’s a gift for a baby shower, birthday, or graduation. Embroidered names or symbols give it a personalized charm.
Want to make your Pooh part of a set? Consider crocheting other characters like Piglet, Tigger, or Eeyore in matching styles. These can be used for nursery décor, mobiles, or themed birthday gifts. A full cast of the Hundred Acre Wood in crochet makes for an enchanting display.
Experiment with different yarn textures. While most patterns recommend smooth yarns, fuzzy or boucle yarns can give your Crochet Winnie the Pooh a more plush and cuddly appearance. Just be sure to test your stitches with a swatch first, as textured yarns can be tricky to handle.
For seasonal adaptations, you can dress your bear in various outfits—like a Halloween costume, Christmas hat, or even rain boots and a scarf. This brings fresh creativity and makes Pooh adaptable for different holidays or themes.
Adding sound elements like a rattle insert or squeaker is a wonderful touch for baby-safe Pooh toys. If you’re making your Crochet Winnie the Pooh as a gift for a little one, be sure all materials are baby-friendly, secure, and washable.
Even your bear’s expression can be personalized. A slight tilt of the eyebrows or different eye placement can change his mood from sleepy to surprised. The face defines the soul of the project—so take your time to give Pooh just the right look.
3. Common Crochet Techniques Used in Winnie the Pooh Patterns
If you’re new to crafting a Crochet Winnie the Pooh, it’s helpful to familiarize yourself with the techniques most commonly used in these patterns. These basic stitches and methods form the foundation of nearly every part of the project.
The magic ring (or adjustable loop) is typically used to start round sections like the head and limbs. This technique allows you to pull the center tight, leaving no hole in the middle. It’s ideal for the plush and smooth appearance of Pooh’s body.
Single crochet (sc) is the most used stitch in amigurumi. It’s tight and dense, which keeps the stuffing inside and gives the bear a neat, compact shape. You’ll be doing a lot of single crochets in continuous rounds, especially for the head and body.
Increasing and decreasing stitches shape Pooh’s body and limbs. Increasing adds width, while decreasing tapers parts like the top of the head or tips of arms. Proper stitch counting is crucial here, so a stitch marker can help keep your rounds aligned.
Slip stitches are used to join parts or finish off rows cleanly. They help in creating Pooh’s shirt or attaching ears and limbs. It’s a subtle stitch, but essential for clean transitions and edges.
Stitch markers and row counters are useful tools during this process. They help you track where a new round begins or ends. Since most Crochet Winnie the Pooh projects are made in continuous spirals, it’s easy to lose track without these aids.
Lastly, stuffing is a key element. Use polyester fiberfill or hypoallergenic stuffing to give your bear shape. Distribute the stuffing evenly and avoid overfilling, especially near the seams, to keep the figure balanced and soft.
4. Why Crochet Winnie the Pooh Makes a Perfect Gift
A handcrafted Crochet Winnie the Pooh is more than a cute decoration—it’s a heartfelt gift that speaks volumes. Whether for a newborn, a child’s birthday, or even a nostalgic adult, this classic character evokes warmth, comfort, and joy.
New parents love receiving handmade gifts, especially those with a touch of familiarity like Winnie the Pooh. A crocheted Pooh can be used as a nursery decoration or a snuggly bedtime companion. Its softness and sentimental value often make it a family treasure.
For children, Crochet Winnie the Pooh becomes a character they know from books and films brought to life in tangible form. The tactile nature of crochet makes it ideal for play and cuddles, while still being sturdy enough to last.
Adults who grew up loving Pooh also cherish handmade versions. These make fantastic gifts for anniversaries, Valentine’s Day, or as desk companions to bring a bit of cheer to the workplace. Nostalgia plays a big part in their appeal.
Because it’s handmade, each bear is one of a kind. This exclusivity makes the gift feel special and thoughtful. It shows you invested time and effort into something meaningful, not just picked up a toy from a store shelf.
Craft fairs, charity drives, and online shops also benefit from including Crochet Winnie the Pooh in their offerings. These items tend to sell quickly due to their universal charm and handmade appeal. They resonate with both children and adults.
Ultimately, creating a Crochet Winnie the Pooh allows you to spread joy and comfort. Every stitch holds love, and the final product often becomes a lifelong keepsake, passed down and treasured for years to come.
Frequently Asked Questions About Crochet Winnie the Pooh
What materials do I need to make a Crochet Winnie the Pooh? You’ll need yellow and red yarn (preferably worsted weight), black embroidery thread, safety eyes or black yarn for the eyes, polyester stuffing, a crochet hook (usually 3.5mm to 4mm), a yarn needle, and stitch markers.
Is Crochet Winnie the Pooh beginner-friendly? Yes! Many patterns are designed for beginners and use basic stitches like single crochet, increases, and decreases. Look for simplified amigurumi patterns to start with.
How long does it take to crochet Winnie the Pooh? Depending on your experience level and the pattern complexity, it can take anywhere from 5 to 15 hours to complete a Crochet Winnie the Pooh.
Can I sell my Crochet Winnie the Pooh creations? Yes, as long as the pattern you’re using allows for commercial use. Many independent designers provide such permissions, but always check the usage rights.
How do I make Pooh’s red shirt? The shirt is often crocheted separately in red yarn and then stitched onto the bear’s body. Some patterns integrate the shirt into the body directly by changing yarn color mid-round.
How do I wash a crocheted Winnie the Pooh toy? Handwashing is best. Use mild soap and cold water, gently squeeze out excess moisture, and lay flat to dry. Avoid machine washing unless using durable, machine-safe materials.
In this article, we’ve explored the delightful world of creating your own Crochet Winnie the Pooh, from gathering materials and following techniques to personalizing your finished piece. We’ve highlighted the importance of crafting with care and creativity, and how this classic character continues to bring joy across generations. Whether you’re making one for yourself or gifting it to someone special, the process is both fun and meaningful.
We hope this guide inspires you to start your own Crochet Winnie the Pooh project. If you’ve tried this pattern or have tips of your own, feel free to leave a sincere opinion or suggestion below. We love hearing your thoughts and sharing creative journeys together!


