Ragdoll Bunny Amigurumi - Crochet Pattern
The Halloween Crochet Skeleton Coaster – Crochet Pattern is a fun, creative, and practical way to bring spooky charm into your seasonal décor. Whether you are preparing your home for Halloween festivities or simply want to enjoy a handmade touch for your coffee table, this project is a beginner-friendly and engaging craft idea. Using yarn, a hook, and a bit of imagination, you can create something that is both functional and decorative.
Crochet enthusiasts love seasonal projects because they allow creativity to shine through in new themes and designs. A Halloween Crochet Skeleton Coaster – Crochet Pattern stands out because it captures the spirit of Halloween while also providing a useful item for your household. These coasters can be made in sets, gifted to friends, or even sold at craft fairs, making them versatile and rewarding.
In this article, you will learn how to approach this pattern, explore materials, follow practical tips, and discover ways to personalize your crochet skeleton coasters. By the end, you’ll have all the information you need to confidently make your own Halloween Crochet Skeleton Coaster – Crochet Pattern and enjoy the spooky season with a handmade touch.
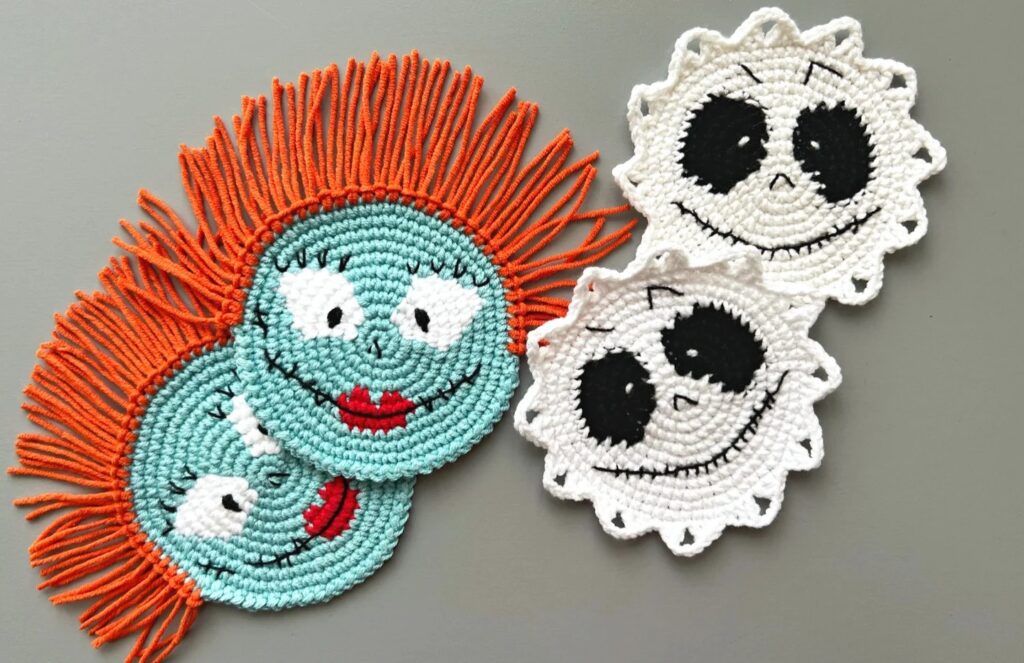
The first step to any crochet project is understanding its structure and purpose. The Halloween Crochet Skeleton Coaster – Crochet Pattern is designed to be small, flat, and sturdy enough to protect surfaces while adding a decorative element. The skeleton design usually involves contrasting yarn colors, such as black and white, to highlight the spooky theme.
A coaster needs to be absorbent and durable, so yarn choice matters. Cotton yarn is highly recommended for the Halloween Crochet Skeleton Coaster – Crochet Pattern because it provides a firm texture, absorbs moisture, and holds shape well. Acrylic yarn is another option, especially if you prefer brighter colors or a budget-friendly material.
One of the most appealing aspects of this pattern is its flexibility. You can follow a detailed Halloween Crochet Skeleton Coaster – Crochet Pattern or adapt it with your own creativity. For example, you might experiment with different skeleton expressions, spooky eyes, or decorative borders to make each coaster unique.
Crochet techniques used in this project typically include chain stitches, single crochet, and slip stitches. These are beginner-friendly, making the pattern accessible even to those who have recently started crocheting. By practicing these stitches, you’ll not only complete a festive coaster but also strengthen your overall crochet skills.
The skeleton motif is simple enough to create without overwhelming details, which is why it works perfectly as a coaster. While some patterns may use color changes or embroidery for facial features, others rely on surface crochet to add definition. Either way, the Halloween Crochet Skeleton Coaster – Crochet Pattern remains easy to follow.
Finally, understanding the purpose behind this coaster is important. It’s not only about crafting; it’s about celebrating a season with creativity. Every time you set a mug of hot cocoa on your skeleton coaster, you’ll feel that festive spirit come alive in your home.
To start the Halloween Crochet Skeleton Coaster – Crochet Pattern, you’ll need basic crochet supplies. The most important tool is your crochet hook. For most coaster projects, a 3.5mm to 4.5mm hook works perfectly, but the size can vary depending on your yarn.
The yarn, as mentioned earlier, plays a big role in the outcome. Cotton yarn in black and white is the most traditional choice for skeleton designs. However, if you want to add a twist, you can incorporate orange or purple for a Halloween vibe while still keeping the skeleton details prominent.
Besides yarn and hook, you’ll also need a yarn needle for weaving in ends and scissors for trimming. If you plan to add embroidered details to your skeleton coaster, an embroidery needle will also be useful. These small details can help bring out the features of the skeleton face.
For beginners, stitch markers are recommended. They help keep track of rounds or specific points in your coaster pattern, ensuring that you don’t lose count or miss a stitch. Since the Halloween Crochet Skeleton Coaster – Crochet Pattern is small, precision is key.
Another optional item is a blocking mat and pins. While coasters are generally small, blocking them ensures they lie flat and have a polished look. This step is especially helpful if you plan to gift or sell your coasters.
Lastly, patience and creativity are essential materials for this project. A handmade Halloween Crochet Skeleton Coaster – Crochet Pattern carries personal charm, so let your imagination guide you as you craft.
To make your Halloween Crochet Skeleton Coaster – Crochet Pattern, begin with a foundation chain or magic ring, depending on the design. Many coasters start with a circle as the base, which makes it easier to shape into the skeleton motif.
Once the base is established, you’ll crochet in rounds, gradually increasing stitches to form a flat circle. Using single crochet stitches ensures a dense and sturdy texture, which is ideal for a coaster. A flat surface prevents cups or glasses from tipping.
After completing the base circle, you’ll add details for the skeleton face. This can be done by changing yarn colors or adding features later with surface crochet or embroidery. For example, black yarn stitches can represent eye sockets and a stitched smile.
Some versions of the Halloween Crochet Skeleton Coaster – Crochet Pattern also include shaped edges, such as scallops or borders, to frame the skeleton face. These extras add personality to your design while keeping it practical.
As you work, remember to keep tension even. Consistency in your stitches will result in a neat finish. If your coaster curls or buckles, adjust your hook size or stitch count until it lies flat. This is a common adjustment when crocheting coasters.
Finally, weave in all loose ends securely. This ensures durability and prevents unraveling when the coaster is washed or used frequently. At this stage, your Halloween Crochet Skeleton Coaster – Crochet Pattern is ready to be admired and enjoyed.
The beauty of the Halloween Crochet Skeleton Coaster – Crochet Pattern lies in its adaptability. While the skeleton design is iconic, you can personalize it in countless ways to suit your taste.
One idea is to experiment with color. Instead of the classic black-and-white look, try glow-in-the-dark yarn for a spooky effect. These yarns are fun during Halloween parties and add a magical glow when the lights are dimmed.
Another creative twist is to add accessories to your skeleton. You could crochet a tiny witch hat, a bow tie, or even a pumpkin to sit alongside the skeleton face. These additions turn each coaster into a miniature piece of art.
Texture can also be a great way to personalize your coasters. Adding raised stitches or appliqué elements, such as 3D eyes or a stitched nose, creates depth and makes the design more playful.
If you’re making a set of coasters, consider giving each skeleton a different expression. One could be smiling, another surprised, and another mischievous. This variation keeps the set lively and adds a conversational element when guests use them.
Finally, think about packaging if you plan to give them as gifts. Tie a bundle of coasters with a ribbon, add a Halloween-themed tag, and you’ll have a thoughtful handmade present that friends and family will treasure.
What type of yarn is best for the Halloween Crochet Skeleton Coaster – Crochet Pattern?
Cotton yarn is best because it is absorbent, sturdy, and maintains its shape. However, acrylic yarn can also be used if preferred.
Is this project suitable for beginners?
Yes, the Halloween Crochet Skeleton Coaster – Crochet Pattern is beginner-friendly, using basic stitches such as chain, single crochet, and slip stitch.
How long does it take to complete one coaster?
On average, one coaster can be completed in about one to two hours, depending on your crochet speed and chosen details.
Can I wash these crochet skeleton coasters?
Yes, if you use cotton yarn, the coasters can be hand washed or machine washed on a gentle cycle. Always air dry them to maintain their shape.
Can I sell coasters made from this pattern?
Absolutely. Handmade coasters are popular at craft fairs and online shops, especially seasonal items like the Halloween Crochet Skeleton Coaster – Crochet Pattern.
How can I make my coasters look more polished?
Blocking the coasters after finishing helps them stay flat and neat. Securely weaving in ends also improves durability and appearance.
The Halloween Crochet Skeleton Coaster – Crochet Pattern is a delightful and festive project that blends creativity, functionality, and seasonal fun. With just a few materials and simple stitches, you can create coasters that protect your furniture while adding a spooky charm to your home décor. Whether you make them for yourself, as gifts, or to sell, they are sure to be a hit during the Halloween season.
Now that you’ve explored the steps, tips, and creative variations, it’s time to bring your skeleton coasters to life. I’d love to hear your honest opinions and suggestions—how would you personalize your own Halloween Crochet Skeleton Coaster – Crochet Pattern? Share your thoughts and inspire others in the crafting community.
