Crochet Amigurumi Fairy - Pattern
If you’re looking for a cute and creative way to express your love for handmade crafts, the Hello Kitty keychain – Crochet Pattern is the perfect project for you. This adorable little accessory combines the charm of crochet with the timeless appeal of Hello Kitty. Whether you’re a beginner or an experienced crocheter, this project will not only help you practice your skills but also give you a delightful piece you can proudly display or gift to someone special.
The Hello Kitty keychain – Crochet Pattern is both fun and functional. It’s small enough to complete in a short time but detailed enough to provide a satisfying challenge. You can easily attach it to your keys, purse, or backpack and bring a touch of handmade sweetness wherever you go. The best part? It’s an excellent way to use up leftover yarn from other crochet projects, making it budget-friendly and sustainable.
In this detailed tutorial, we’ll guide you step by step through creating your own Hello Kitty keychain – Crochet Pattern, from choosing the right materials to assembling your final piece. By the end, you’ll not only have a beautiful handmade charm but also a sense of accomplishment from having crafted something unique and meaningful.
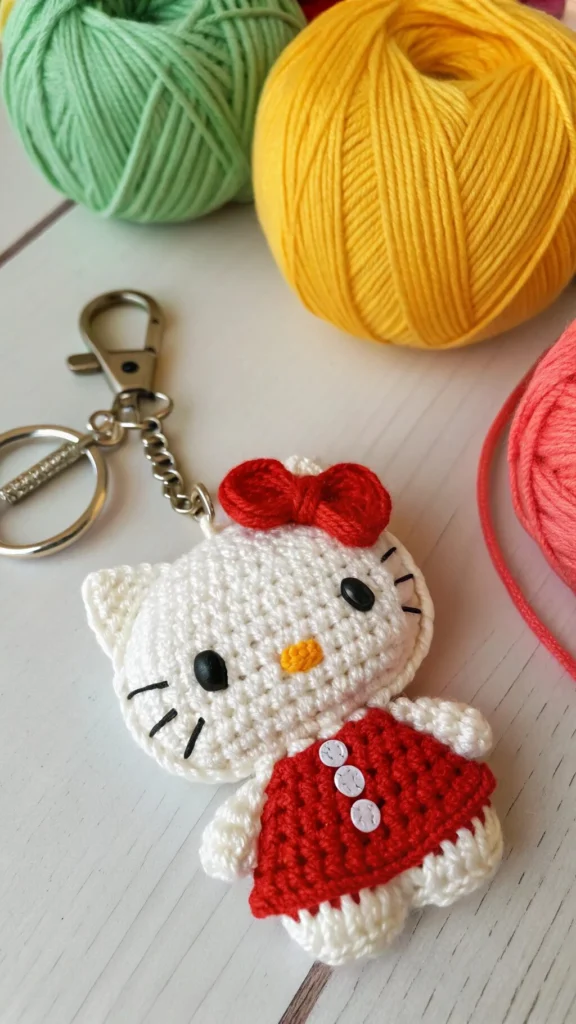
The first step in creating your Hello Kitty keychain – Crochet Pattern is gathering the right materials. You’ll want to select high-quality yarn that matches the color palette of Hello Kitty—typically white for her face, red or pink for her bow, and black for her eyes and whiskers. Using the right yarn ensures that your finished project looks smooth and polished.
For the yarn weight, choose something lightweight such as DK or sport yarn. These yarns create finer stitches, which are perfect for small projects like keychains. A 2.5mm or 3mm crochet hook works well for this type of pattern. Always make sure your hook size complements your yarn so your stitches stay even and tight.
You’ll also need some small details to complete your Hello Kitty keychain – Crochet Pattern, such as safety eyes, a small amount of stuffing for the head, and a metal keychain ring. If you prefer a more traditional handmade look, you can embroider the eyes and whiskers instead of using safety pieces.
Another important material is the thread or yarn for sewing your parts together. Choose a strong thread that matches your yarn color to maintain a neat appearance. Small scissors, a yarn needle, and stitch markers will also come in handy.
Before you begin, make sure all materials are organized in one place. This helps you focus solely on crocheting without interruptions. A well-prepared setup is key to an enjoyable crafting experience.
Lastly, remember that you can personalize your Hello Kitty keychain – Crochet Pattern by using different color combinations. Try pastel shades, sparkly yarn, or even variegated colors to give your keychain a unique touch.
The signature feature of the Hello Kitty keychain – Crochet Pattern is her round, adorable head. To begin, start with a magic ring and work in continuous rounds using single crochet stitches. This technique will help form a smooth circular shape without visible seams.
Use white yarn for the head and maintain consistent tension throughout your rounds. As you increase stitches, your circle will expand. Once you reach the desired diameter—usually around 4 to 5 centimeters—continue crocheting without increases to form the sides of the head.
Stuff the head gently with polyester filling to maintain its shape. Be sure not to overfill, as this may distort your stitches. The goal is to have a soft but firm structure that holds up well when attached to your keychain.
Next, crochet the ears. Each ear is made by working a few rows of single crochets, starting from a magic ring and shaping them into small triangles. Attach them securely to the top of the head, making sure they are symmetrical.
At this point, you can begin adding facial features. Use black yarn to stitch simple eyes and whiskers. A small yellow or pink stitch for the nose will complete her iconic expression. Take your time to place the features evenly for the best results.
Once the head and ears are complete, you’ll already see the essence of Hello Kitty taking shape. This is where the project becomes especially rewarding—seeing the character you love come to life through your own hands.
No Hello Kitty keychain – Crochet Pattern is complete without her signature bow. This tiny yet striking accessory adds the perfect finishing touch to the character’s head. To make it, start by crocheting a small rectangle using red or pink yarn.
Once the rectangle is complete, wrap the center tightly with yarn to create the classic bow shape. Secure it by sewing or knotting the yarn ends firmly so it keeps its form. If you like, you can even add a small bead or decorative accent in the center for a sparkly effect.
Attach the bow carefully to one side of Hello Kitty’s head using a yarn needle. Make sure it’s positioned slightly tilted—just like the original design. This detail gives the keychain its charming, recognizable look.
When sewing on the bow, use small, neat stitches and secure it tightly. Because this keychain will be handled often, the attachment needs to be durable to avoid it coming loose over time.
You can also experiment with different colors or textures for the bow to make your version stand out. Some crocheters like to use satin ribbon or glitter yarn for an extra touch of elegance.
Adding the bow is often the most enjoyable part because it brings the Hello Kitty keychain – Crochet Pattern to life. Once it’s in place, your creation will instantly look like the beloved Sanrio character.
Now that all parts are complete, it’s time to assemble your Hello Kitty keychain – Crochet Pattern. Begin by sewing any remaining parts together securely, checking that all elements are firmly attached and symmetrically placed.
Next, take your metal keychain ring and attach it to the top of the head. Use a small crochet loop or a strong jump ring to ensure it stays in place. The connection should be sturdy enough to handle daily use without stretching or breaking.
Before finalizing, inspect your stitches for loose ends or uneven spots. Trim any excess yarn and weave in all remaining tails to give your keychain a neat and professional appearance.
You can lightly shape the head and bow with your hands to adjust any uneven stuffing or stitching. This helps your finished product maintain its shape and balance.
Optionally, spray a light mist of fabric stiffener or use a crochet blocking technique to help the piece hold its form over time. However, make sure not to overdo it—your keychain should still feel soft and plush.
Finally, admire your completed Hello Kitty keychain – Crochet Pattern! It’s ready to use, gift, or sell at craft fairs. Each stitch represents your creativity and dedication, making this keychain a true labor of love.
1. Is this Hello Kitty keychain project suitable for beginners?
Yes! The Hello Kitty keychain – Crochet Pattern is beginner-friendly, as it uses simple stitches like single crochet and basic increases. With a bit of patience, anyone can complete it successfully.
2. How long does it take to finish the Hello Kitty keychain?
Depending on your skill level, it usually takes between one to two hours. Advanced crocheters may finish it faster, while beginners might take a bit longer as they learn the pattern.
3. Can I use different yarn types for this pattern?
Absolutely! Cotton or acrylic yarn both work great. Just make sure to use a yarn weight that allows for tight stitches so your stuffing doesn’t show through.
4. How do I clean the keychain if it gets dirty?
Gently hand wash it using mild soap and cold water. Avoid soaking the metal ring and let it air dry completely before using it again.
5. Can I sell my finished Hello Kitty keychains?
Yes, you can sell your handmade versions. However, since Hello Kitty is a copyrighted character, it’s best to describe your work as “Hello Kitty inspired” to stay compliant with copyright laws.
6. What are some creative variations I can try?
You can make seasonal versions by changing the bow color or adding accessories like tiny hats, scarves, or flowers. You can even create a set of characters inspired by different Hello Kitty themes.
The Hello Kitty keychain – Crochet Pattern is a delightful project that combines simplicity, creativity, and nostalgia. Through this step-by-step guide, you’ve learned how to crochet the head, ears, and signature bow, and how to assemble everything into a charming, functional keychain.
Whether you’re making it as a gift, a keepsake, or to sell at handmade markets, this cute accessory will always bring smiles and admiration. It’s a small piece that captures the heart of crochet lovers and Hello Kitty fans alike.
Now that you’ve completed your project, I’d love to hear from you! Share your thoughts, suggestions, and experiences in the comments. Did you enjoy making the Hello Kitty keychain – Crochet Pattern? Your feedback helps improve future tutorials and inspires others to join the world of creative crochet.
