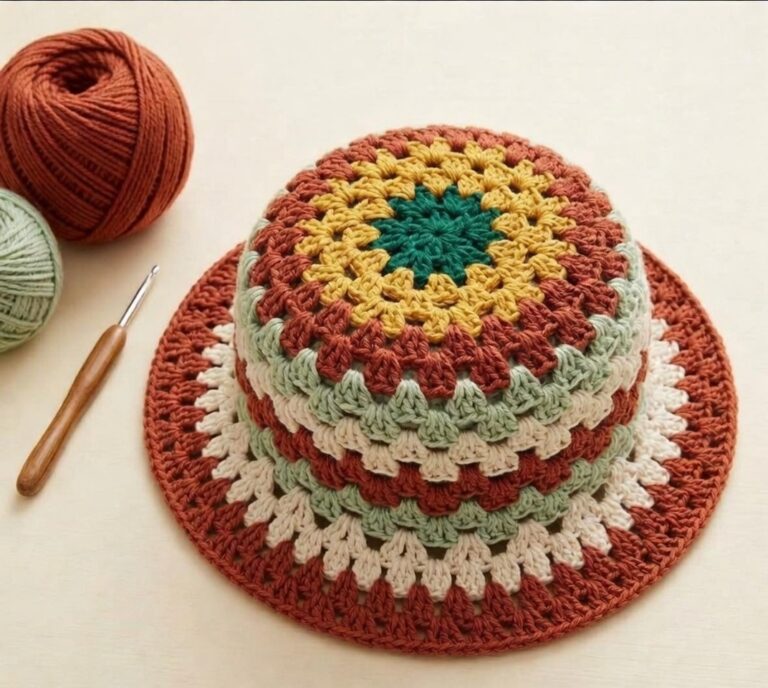
Crocheted Sun Hat Pattern
The Crochet Cowl-Hat Pattern is a creative and cozy accessory that combines two essential winter items into one — a warm cowl and a stylish hat. This design is perfect for crochet enthusiasts who love versatile patterns that are both functional and fashionable. Whether you’re a beginner or an experienced crocheter, learning how to create a cowl-hat can be an enjoyable and rewarding project. The beauty of this pattern is that it adapts easily to different yarn types and sizes, making it an ideal addition to any handmade wardrobe.
This Crochet Cowl-Hat Pattern provides warmth, comfort, and style in one piece. It can be worn as a hat when the weather gets chilly or transformed into a cowl to keep your neck warm. The concept is simple yet elegant — the pattern uses basic stitches and techniques that result in a unique design. You can experiment with different yarn colors, textures, and hook sizes to create a variety of looks. It’s a practical project that also makes a wonderful handmade gift for friends and family during the cold seasons.
One of the reasons why the Crochet Cowl-Hat Pattern has gained popularity is its adaptability. You can personalize it with buttons, pom-poms, or decorative edges to suit your style. Plus, it’s an excellent pattern for using leftover yarn from previous projects. The end result is a snug, flexible accessory that fits perfectly and complements any outfit. Now, let’s explore how to make this pattern step by step, understand the materials needed, and learn some creative variations.
Before starting your Crochet Cowl-Hat Pattern, gathering the right materials is crucial for a successful project. You’ll need a medium-weight yarn, usually categorized as worsted weight or number 4. This yarn thickness provides the ideal balance between warmth and comfort. Acrylic yarn is a popular choice because it’s durable, easy to wash, and soft against the skin. If you prefer a more luxurious finish, you can opt for wool or a wool blend.
Next, you’ll need the right crochet hook. Most Crochet Cowl-Hat Pattern designs recommend a 5 mm to 6 mm hook, depending on your yarn’s thickness. Always check the yarn label for the recommended hook size, and make a small swatch to ensure your stitches are consistent. Gauge is important in crochet, as it affects the final size and fit of your project.
You’ll also need some basic crochet tools such as a yarn needle for weaving in ends, scissors for trimming yarn, and a stitch marker to help you track rounds or pattern repeats. Keeping your materials organized will make your crocheting experience smoother and more enjoyable.
It’s important to select the right color palette before beginning your Crochet Cowl-Hat Pattern. Choose colors that match your wardrobe or reflect your personality. Soft neutrals like beige, gray, or cream create a classic look, while bright tones like red or mustard yellow add a cheerful touch.
Once your materials are ready, set aside a comfortable workspace with good lighting. Having everything within reach — yarn, hook, and tools — will help you stay focused. You may also want to keep a notebook nearby for jotting down measurements or modifications to your pattern.
Finally, take a few moments to warm up your hands and familiarize yourself with the stitches required for your Crochet Cowl-Hat Pattern. A quick practice of basic stitches like chain, single crochet, and double crochet will ensure smoother progress once you begin the actual project.
To start your Crochet Cowl-Hat Pattern, create a foundation chain that fits comfortably around your head or neck, depending on your preferred size. Make sure the chain isn’t too tight — you want flexibility for comfort. Join the ends with a slip stitch to form a ring, ensuring it’s not twisted. This will serve as the base of your project.
Begin with a round of single crochet stitches to create a neat foundation. This round adds stability to your piece and prevents stretching. Then, move on to half double crochet or double crochet stitches for the following rounds. These stitches create a soft texture and build up the fabric quickly.
Continue crocheting in rounds, maintaining a consistent tension. If you want a snugger fit for the hat portion, gradually decrease the number of stitches in the upper rounds. For the cowl section, you can work additional rounds without decreases to keep it loose and comfortable around the neck.
Many Crochet Cowl-Hat Pattern variations include a ribbed or textured section. You can achieve this by alternating front post and back post stitches. This technique adds elasticity and visual interest to your design. It’s especially effective near the brim or top edge of the cowl-hat.
When your project reaches the desired height, finish off neatly by cutting the yarn, pulling it through the last stitch, and weaving in the loose ends using a yarn needle. This final touch ensures your project looks clean and professional.
For extra flair, consider adding embellishments. A pom-pom on top of the hat or a decorative button on the cowl can enhance its charm. You can also crochet a simple border or edge to give your Crochet Cowl-Hat Pattern a polished finish.
One of the best aspects of the Crochet Cowl-Hat Pattern is how customizable it is. You can modify the stitch pattern to create different textures, from sleek and simple to thick and chunky. Try incorporating puff stitches, bobbles, or shell patterns to make your design stand out. Each variation gives your piece a unique character.
Another fun way to personalize your cowl-hat is by playing with colors. Use variegated yarns for a beautiful gradient effect, or alternate two contrasting colors in stripes. Color blocking is a trendy choice that looks modern and stylish. The possibilities are endless when it comes to creativity.
If you enjoy adding details, you can incorporate a drawstring or buttons that allow you to adjust the fit. Some crocheters even add a small hood or ear flaps for extra warmth. These simple modifications turn a basic Crochet Cowl-Hat Pattern into a statement piece.
For those who love eco-friendly projects, consider using recycled or organic yarns. Not only do they feel soft and natural, but they also help reduce waste. Creating sustainable handmade items adds more meaning to your crafting journey.
You can also make matching sets with your cowl-hat, such as gloves or mittens in the same yarn and color scheme. This coordination creates a cohesive winter look that’s both functional and elegant.
Lastly, think about gifting your finished project. A handmade Crochet Cowl-Hat Pattern makes a heartfelt gift that shows care and effort. Add a small tag with washing instructions or a personalized message for a thoughtful touch.
To ensure your Crochet Cowl-Hat Pattern looks great and lasts long, follow a few essential care tips. First, always check the yarn label for washing instructions. Most acrylic yarns can be machine washed on a gentle cycle, while wool may require hand washing in cold water.
When drying, avoid wringing or twisting your crochet piece. Lay it flat on a towel and reshape it gently. Allow it to air dry completely before storing. This helps maintain the shape and texture of your Crochet Cowl-Hat Pattern.
If you plan to wear your cowl-hat often, store it properly between uses. Keep it in a cool, dry place away from direct sunlight. You can fold it neatly or hang it on a hook to prevent stretching.
Another important tip is to block your finished piece if needed. Blocking helps even out stitches and enhances the overall appearance. Simply dampen your crochet item, pin it to shape on a flat surface, and let it dry.
For long-term use, inspect your crochet regularly for loose ends or worn areas. If you find any, repair them promptly with a matching yarn. Taking good care of your handmade work preserves its beauty and functionality.
Finally, remember that patience and practice are key. The more you crochet, the more comfortable you’ll become with patterns and stitches. Enjoy the process, and your Crochet Cowl-Hat Pattern will reflect the love and creativity you put into it.
1. What skill level is required for a Crochet Cowl-Hat Pattern?
Most Crochet Cowl-Hat Pattern projects are beginner-friendly, especially those using basic stitches like single and double crochet. However, intermediate crocheters can explore textured or ribbed versions for a more advanced challenge.
2. How long does it take to make a Crochet Cowl-Hat Pattern?
On average, it takes between 4 to 6 hours to complete, depending on your speed and the complexity of the design. Beginners may take a bit longer.
3. Can I use different yarn weights for this pattern?
Yes, you can. Just remember that lighter yarns create a more delicate fabric, while heavier yarns result in a chunkier, warmer piece. Adjust your hook size accordingly.
4. How can I make the cowl-hat more unique?
You can personalize your Crochet Cowl-Hat Pattern with color changes, embellishments, or stitch variations. Adding buttons, pom-poms, or textured stitches gives it a distinct flair.
5. Is the Crochet Cowl-Hat Pattern suitable for gifts?
Absolutely! It’s a thoughtful and practical handmade gift, especially during the winter months. You can package it beautifully with a custom tag or label.
6. Can I sell my finished Crochet Cowl-Hat Pattern items?
Yes, you can sell handmade items created from this pattern. Just make sure to credit the original pattern designer if applicable. Handmade crochet products are always in demand for their warmth and personal touch.
Creating your own Crochet Cowl-Hat Pattern is a wonderful way to combine creativity, warmth, and functionality in one handmade accessory. With simple stitches and a bit of imagination, you can craft a cozy piece that keeps you stylish all winter long. Whether for yourself or as a heartfelt gift, this project is both practical and enjoyable.
We hope this guide inspired you to pick up your hook and yarn today! If you enjoyed this tutorial, please leave your honest opinion and suggestions below — your feedback helps inspire new and exciting crochet ideas for the future.

