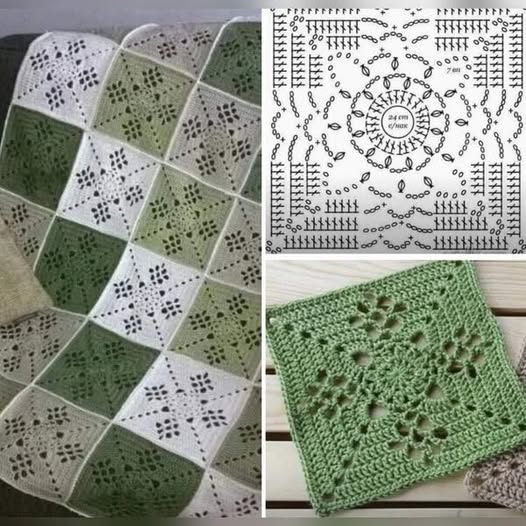
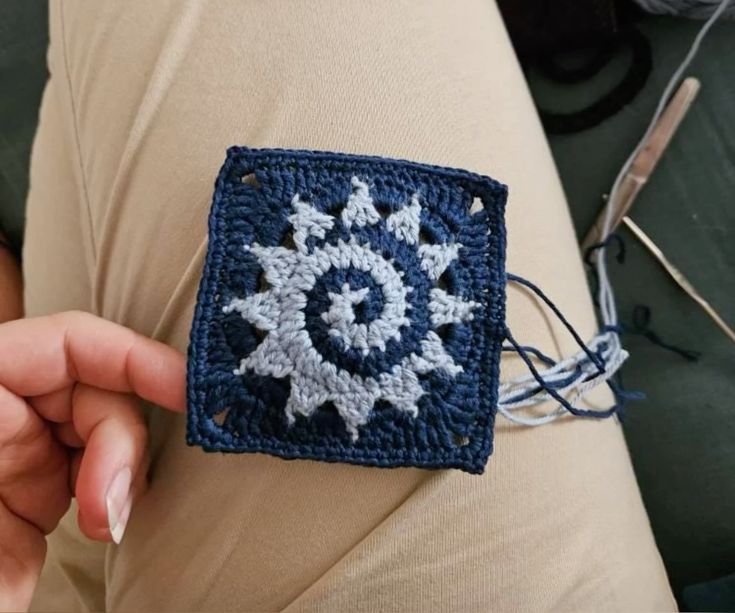
Victorian-Style Lattice Crochet Square - Pattern
Crochet Owl Step by Step with Amigurumi Eyes – Crochet Pattern is a delightful and creative way to bring charm and personality to your handmade projects. Owls have long been symbols of wisdom, and when recreated through the art of crochet, they become adorable companions or thoughtful gifts. With the use of amigurumi eyes, these crochet owls gain an expressive and lifelike touch, making them appealing to children and adults alike. In this guide, you will learn how to approach the project step by step, ensuring clarity and accessibility for all levels of crocheters.
Working on a crochet owl pattern is not only relaxing but also rewarding. It allows you to combine practical crochet skills with creativity and imagination. Many people are drawn to amigurumi because of its ability to transform yarn into characters filled with warmth and personality. Adding the details such as wings, beaks, and amigurumi eyes enhances the result and makes the owl stand out as a finished piece.
This article will take you through the Crochet Owl Step by Step with Amigurumi Eyes – Crochet Pattern in a way that is easy to follow and beginner-friendly. With practice, patience, and a few basic crochet techniques, you can create an owl that reflects your unique style. Whether you are making it for yourself, as a gift, or even as a home décor accent, this project offers endless possibilities.
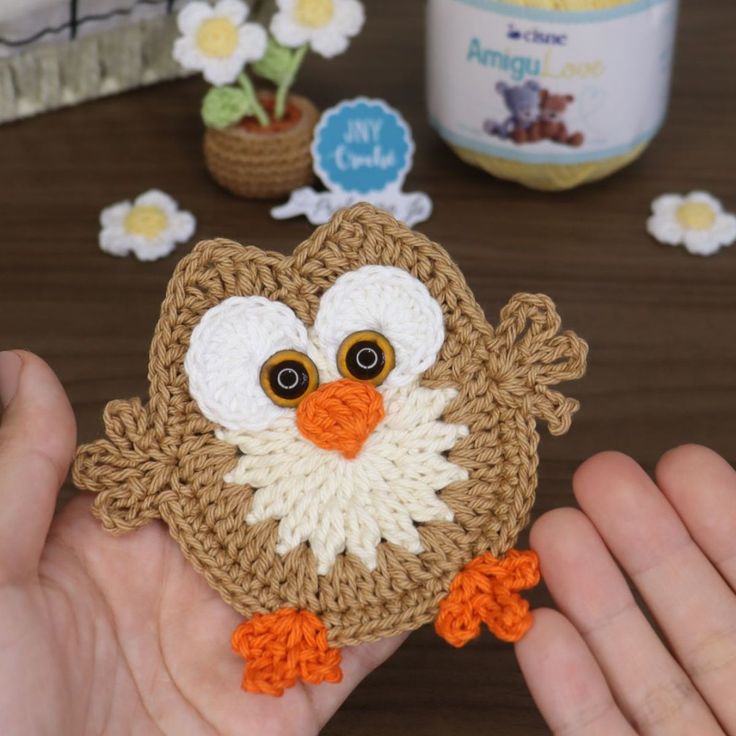
Before diving into the details, it’s important to gather the necessary tools and materials. A successful Crochet Owl Step by Step with Amigurumi Eyes – Crochet Pattern project begins with the right preparation. You will need yarn in various colors, depending on how you want your owl to look, a crochet hook suitable for the yarn weight, stuffing, and safety amigurumi eyes.
Yarn choice plays a major role in how your finished owl will look and feel. A soft acrylic or cotton yarn is often recommended because it holds stitches well and gives the amigurumi a smooth appearance. Bright or pastel colors can give your owl a playful look, while earthy tones will make it appear more realistic.
Crochet hooks should match your yarn’s thickness. Using a slightly smaller hook than recommended can help you achieve tighter stitches, which is crucial for amigurumi projects to prevent stuffing from showing through. For example, if your yarn calls for a 4 mm hook, using a 3.5 mm one is often a good choice.
Safety amigurumi eyes are widely used in these projects because they are durable, secure, and add character to the owl. They come in many sizes and colors, giving you the flexibility to choose the look you prefer. However, if the toy is intended for very young children, embroidered eyes are a safer alternative.
Stuffing material is also essential. Polyester fiberfill is the most common choice, as it is lightweight, washable, and easy to use. Proper stuffing ensures that your owl holds its shape and looks polished.
Finally, having small tools such as stitch markers, scissors, and a yarn needle on hand will make the process easier and more enjoyable. Being well-prepared sets you up for success with your Crochet Owl Step by Step with Amigurumi Eyes – Crochet Pattern.
To begin your Crochet Owl Step by Step with Amigurumi Eyes – Crochet Pattern, start with the body, which serves as the foundation of the project. Most patterns use a magic ring technique to create a tight circle that won’t unravel. From there, you gradually increase stitches to form a round shape.
As you build the body, consistent stitch counts are crucial. Using a stitch marker helps track the start of each round, making it easier to maintain the pattern’s structure. The body is usually worked in continuous rounds, giving it a seamless look.
After creating the base and building up the owl’s body, you can move on to shaping the top portion. This often involves gradual decreases, which bring the round form to a gentle close. The size of the owl can vary depending on how many rounds you complete before decreasing.
Next, you will create the wings, which are typically smaller oval or teardrop-shaped pieces. These are crocheted separately and later sewn onto the body. The wings add dimension and personality to your owl.
The beak is usually a small triangle or diamond-shaped piece, often made with contrasting yarn. Once attached between the amigurumi eyes, it gives the owl its signature look.
Attaching the amigurumi eyes at this stage brings the owl to life. It is best to place them before stuffing the body completely, as securing the safety backs requires access inside the piece. Proper placement of the eyes can dramatically change the owl’s expression.
The charm of Crochet Owl Step by Step with Amigurumi Eyes – Crochet Pattern lies in the details. Small touches can make your project unique and memorable. Start by focusing on color combinations. You can choose traditional owl colors like brown and beige or go bold with bright pinks, blues, or multicolor yarns.
One way to add texture is by experimenting with different stitch techniques. While single crochet is the base for amigurumi, you can incorporate half-double crochets or bobble stitches for added character. This makes the wings or body more visually interesting.
You may also add accessories to your owl. A tiny crocheted scarf, a flower crown, or even a little hat can turn your owl into a themed piece suitable for different occasions. These extras make your creation stand out and showcase your creativity.
Positioning of features matters greatly. Moving the amigurumi eyes slightly closer together or further apart can completely change the owl’s expression—from wise and serious to playful and cute. Take time to experiment before finalizing.
Finishing touches include securely sewing on all parts. Using invisible stitches when attaching wings, beak, and accessories helps keep the design neat. Always double-check that pieces are fastened well, especially if the owl will be handled by children.
Finally, consider personalization. Adding initials, a small tag, or incorporating favorite colors makes the owl special for gift-giving. This personal touch enhances the emotional value of your handmade piece.
One of the most important tips for success with Crochet Owl Step by Step with Amigurumi Eyes – Crochet Pattern is patience. Amigurumi projects often involve repetition, and maintaining consistent tension ensures a polished result.
Practice makes perfect. If you are new to crochet, don’t be discouraged by early mistakes. Each project improves your skills, and over time, you will find it easier to follow complex patterns.
Lighting and comfort are essential. Working in a well-lit environment reduces strain on your eyes, especially when dealing with small stitches. Taking breaks also helps prevent fatigue in your hands and wrists.
Blocking isn’t always necessary for amigurumi, but lightly shaping your finished owl can give it a more professional look. Gently adjusting the stuffing and smoothing the surface ensures the owl looks balanced.
Keep track of your yarn supply before starting. Running out of a particular color mid-project can be frustrating. Planning ahead ensures your owl is consistent in appearance.
Lastly, enjoy the process. Each step, from choosing colors to adding the final details, is an opportunity to express creativity. The joy of making your own crochet owl with amigurumi eyes lies not only in the finished result but also in the journey itself.
Q: Is this project suitable for beginners?
A: Yes, the Crochet Owl Step by Step with Amigurumi Eyes – Crochet Pattern is beginner-friendly. Basic knowledge of single crochet and increasing/decreasing stitches is usually enough to complete the project.
Q: What size should the amigurumi eyes be?
A: The size of amigurumi eyes depends on the overall size of your owl. Smaller owls look good with 6–8 mm eyes, while larger ones may require 10–12 mm for proper balance.
Q: Can I use leftover yarn for this project?
A: Absolutely! This project is ideal for using yarn scraps, especially for small details like wings or beaks. Just make sure the yarn weights are compatible.
Q: How long does it take to finish one owl?
A: On average, it takes a few hours to complete, depending on your speed and familiarity with amigurumi techniques. Beginners may take longer, while experienced crocheters can finish faster.
Q: Is it safe to use amigurumi eyes for children’s toys?
A: Safety amigurumi eyes are secure, but for very young children, it’s safer to embroider the eyes to avoid choking hazards.
Q: Can I customize the owl’s design?
A: Yes, you can easily customize the owl with different colors, accessories, or stitch techniques to make it unique.
The Crochet Owl Step by Step with Amigurumi Eyes – Crochet Pattern is a charming and enjoyable project that combines creativity with technique. By learning how to shape the body, attach the wings, add details, and use expressive amigurumi eyes, you can create a piece that feels personal and unique. Whether you are a beginner or an experienced crocheter, this project offers endless opportunities for fun and creativity.
I hope this article has inspired you to try making your own crochet owl. Please share your honest opinion and suggestions—I would love to hear how your project turns out and what creative touches you decide to add!

