Crocheted Sun Hat Pattern
The Crochet Puppy C2C Blanket with Block Stitch Border is a heartwarming project perfect for beginners and seasoned crocheters alike. Combining the popular corner-to-corner (C2C) crochet technique with the elegant and clean block stitch border, this blanket is not just a cozy creation—it’s a meaningful gift, a cherished keepsake, and a delightful decor item all at once.
This project brings the charm of handmade crafts to life with its playful puppy design. It captures the warmth and comfort that only a handmade blanket can offer. Whether you’re crocheting this for a baby, a pet lover, or simply for your own creative joy, the Crochet Puppy C2C Blanket with Block Stitch Border offers the perfect balance between creativity and technique.
In this article, you’ll learn everything you need to know about creating this adorable piece—from understanding the C2C method and planning your colorwork to mastering the elegant block stitch border. Plus, we’ll include useful tips to help you make your blanket look clean, professional, and polished.
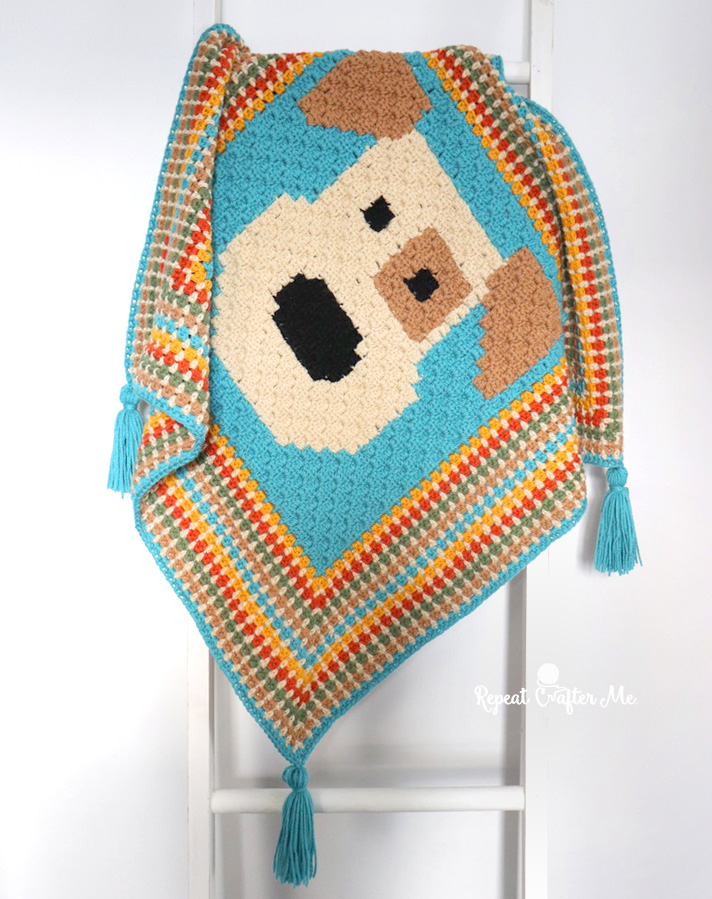
The corner-to-corner (C2C) crochet method is a popular technique that involves working diagonally from one corner of the blanket to the opposite corner. It’s ideal for creating graph-based images, which is why it’s often used in themed projects like the Crochet Puppy C2C Blanket with Block Stitch Border.
The C2C method begins with a small block, and each row builds upon the last by adding blocks diagonally. This allows for the creation of intricate patterns, especially when following a pixel-style graph. C2C is ideal for images like puppies, animals, cartoons, and other personalized shapes.
What makes the C2C technique especially attractive is that it allows for excellent colorwork. You can switch colors block by block to match your design, making it perfect for creating the detailed puppy face that’s the star of this blanket.
Another benefit is the rhythm of the stitch—it becomes almost meditative once you get the hang of it. You’ll find yourself quickly falling into a peaceful pattern of chain stitches and double crochets, watching your design grow organically.
To get started, you’ll need to understand how to increase and decrease in C2C. Increasing builds the shape, while decreasing helps taper it off into a clean rectangle or square. Mastery of this is essential for the overall structure of the Crochet Puppy C2C Blanket with Block Stitch Border.
Practice your tension early. Consistency in your stitches ensures that your graph appears clear, and your blanket remains uniform in size, making the puppy design pop as intended.
Creating a successful Crochet Puppy C2C Blanket with Block Stitch Border starts with good planning. While the puppy design can vary—from cartoonish to realistic—it all begins with choosing or creating a graph.
Your graph should include a color-coded pixel layout that you’ll follow while working from corner to corner. This will serve as your guide throughout the process. Each square on the graph corresponds to one C2C block.
When choosing yarn colors, go for contrasts that make your puppy image stand out. Neutral backgrounds work best when your puppy design includes multiple shades or details like eyes, ears, or a cute nose.
You’ll also want to consider the size of your blanket. A baby blanket might need fewer rows and blocks, while a lap or full-size throw would require a larger chart and more yarn. The beauty of C2C is its scalability—you can make it as small or as large as you’d like.
Color changes are key to making the design look clean and professional. Use bobbins to separate sections of color and avoid long yarn carries, which can cause bunching or gaps in your work.
Mark your progress on your graph with a highlighter or pencil as you go. This simple tip will help you avoid mistakes and keep your blanket symmetrical.
Finally, test your design on a swatch first. Swatching helps you get a feel for how the image translates to yarn and gives you a chance to adjust your hook size or yarn weight if necessary.
The block stitch border is the perfect finish to the Crochet Puppy C2C Blanket with Block Stitch Border. It gives the piece a crisp, colorful frame while allowing you to incorporate additional design elements or colors.
To start the border, begin by single crocheting around the entire edge of the blanket to create a base round. This helps even out the edges, especially if your blanket has some inconsistencies due to color changes.
Once your base round is complete, start the block stitch pattern. This involves alternating chain spaces and double crochets in a repeating format, which creates the boxed, blocky appearance that’s characteristic of this style.
Use a contrasting color for your border to make it pop, or coordinate it with the puppy design for a subtle finish. Either way, the border ties the whole blanket together, making it look neat and professionally done.
The block stitch border also provides added durability. It helps maintain the blanket’s shape over time and prevents fraying at the edges, especially important for pieces that will be frequently used or washed.
Don’t be afraid to add extra rounds if you want a thicker border. Some crocheters like adding a second or third color in separate rounds to build a multi-toned frame that enhances the overall design.
Finally, weave in all your ends securely. This step ensures your blanket remains tidy and intact, giving you a finished product that’s both beautiful and long-lasting.
One of the joys of making a Crochet Puppy C2C Blanket with Block Stitch Border is the opportunity for personalization. From yarn choices to border styles, every element can be adjusted to reflect your personal style or the recipient’s taste.
Choose soft, machine-washable yarns if the blanket is intended for babies or pets. Cotton and acrylic blends are ideal—they’re durable, gentle on the skin, and easy to maintain.
If you’re making this as a gift, consider incorporating the recipient’s favorite colors. Even adding a small tag with the puppy’s name or your initials can turn this into a meaningful keepsake.
Experiment with color gradients in your border. Ombre or rainbow effects add extra flair and can make your design truly one-of-a-kind.
Add embellishments like crochet appliques, tassels, or even safety eyes to your puppy design for a 3D effect. These details make your project unique and fun, especially for children.
Keep track of your yarn inventory and label your bobbins if using multiple colors. Staying organized will save you time and frustration, especially in larger projects.
Lastly, don’t rush. Enjoy the process. Crocheting is about more than just the finished product—it’s about the joy of making something with your own two hands.
Q1: Is the Crochet Puppy C2C Blanket suitable for beginners?
Yes! The C2C technique is beginner-friendly, and the block stitch border is simple to learn. With a bit of patience, even first-time crocheters can create a beautiful blanket.
Q2: How long does it take to make the Crochet Puppy C2C Blanket with Block Stitch Border?
The time depends on the blanket size and your crochet speed. On average, it may take 15–30 hours over several days or weeks.
Q3: What type of yarn works best for this project?
Acrylic or cotton yarns are best. Choose medium-weight yarn for structure and ease of stitching. Baby-soft yarns are great for infant gifts.
Q4: How do I keep my color changes clean and tidy in C2C?
Use bobbins to manage multiple yarns and avoid carrying yarn too far across the back. Secure each color with a tight change and weave in ends properly.
Q5: Can I resize the blanket without losing the puppy design?
Yes, but you’ll need to adjust your graph size. Enlarging or shrinking the pixel pattern while keeping proportions correct is key.
Q6: What is the advantage of the block stitch border?
It adds structure, visual appeal, and durability. It frames the puppy design beautifully and prevents the edges from curling or fraying.
Q7: Do I need a graph pattern for the puppy design?
Absolutely. A graph helps guide each C2C block and ensures your image appears clearly. Many free or paid patterns are available, or you can make your own.
Q8: How do I wash and care for the finished blanket?
Use a gentle machine cycle with cold water. Lay flat to dry or tumble on low. Always check yarn labels for specific care instructions.
Q9: Can I sell blankets made with this design?
Yes, if you’ve created the graph yourself or used a commercial-use-allowed pattern. Just credit any original designers if required.
Q10: Can I use this technique for other animals or themes?
Definitely! The C2C method and block stitch border are versatile. Swap out the puppy for cats, dinosaurs, or any design you like.
The Crochet Puppy C2C Blanket with Block Stitch Border is more than just a cozy craft project—it’s a creative journey full of warmth, personality, and satisfaction. From learning the C2C method to adding a stylish block stitch finish, this project offers something for every crocheter, whether you’re new to the hook
The Crochet Puppy C2C Blanket with Block Stitch Border is more than just a cozy craft project—it’s a creative journey full of warmth, personality, and satisfaction. From learning the C2C method to adding a stylish block stitch finish, this project offers something for every crocheter, whether you’re new to the hook

