
Lucivania Table Runner – Complete Step-by-Step Guide

Creating beautiful and heartfelt gifts by hand is always a joy, and nothing says love and care quite like a handmade bouquet. In this Crochet Tulip Easy DIY Gift Bouquet Tutorial, you’ll discover how to craft lovely crochet tulips that make for the perfect present. Whether you’re celebrating Mother’s Day, a birthday, or simply want to brighten someone’s day, this delightful project is a fantastic option for all skill levels.
This Crochet Tulip Easy DIY Gift Bouquet Tutorial is especially beginner-friendly, allowing crafters with basic crochet knowledge to jump right in and see stunning results. With just a few materials and some patience, you’ll have an elegant and colorful bouquet that lasts forever. Unlike fresh flowers, these crocheted tulips won’t wilt and will serve as a lasting reminder of your thoughtful gift.
Throughout this Crochet Tulip Easy DIY Gift Bouquet Tutorial, you’ll learn step-by-step how to create realistic tulip petals, sturdy stems, and how to assemble them into a bouquet. We’ll cover tips for color selection, yarn types, and even ways to wrap your bouquet for gift-giving. Let’s get started with everything you need to know!

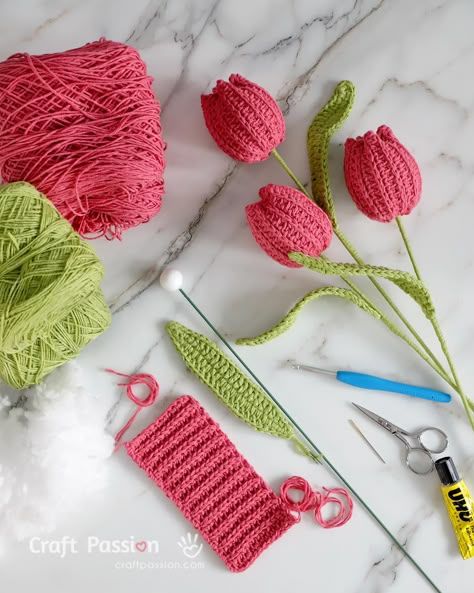
To begin this Crochet Tulip Easy DIY Gift Bouquet Tutorial, gather your supplies. You don’t need anything fancy—just a few basic items commonly found in most crochet kits or available at craft stores. The simplicity of the materials makes this project both affordable and accessible.
Start with cotton or acrylic yarn in tulip-inspired colors like pink, red, yellow, or purple for the petals, and green for the stems and leaves. Cotton yarn is great for structure, while acrylic yarn offers flexibility and is widely available. Make sure the yarn weight is consistent for all colors to keep your bouquet looking balanced.
You’ll need a 3.5 mm or 4 mm crochet hook, depending on the yarn weight you choose. A smaller hook ensures tight stitches, which is ideal for shaping the petals and keeping them firm. You will also need a yarn needle for weaving in ends and floral wire for giving the stems support.
Other helpful tools include scissors, stitch markers, and a hot glue gun if you plan to secure your tulips in a fixed arrangement. A bit of polyfill or scrap yarn can be used to slightly stuff the tulip heads for added shape. Remember, simplicity is key, so don’t worry about perfection—your handmade touch adds charm.
Lastly, have floral tape and ribbon ready for assembling and wrapping your bouquet. This adds a professional finish and allows you to customize the look of your final gift. A few sheets of decorative tissue paper can also elevate your presentation.
Gather all your materials before starting the tutorial. This will ensure a smooth crafting experience from start to finish and help you enjoy the process of creating each beautiful bloom with this Crochet Tulip Easy DIY Gift Bouquet Tutorial.
Now that your materials are ready, let’s dive into the fun part—crocheting the tulips. This Crochet Tulip Easy DIY Gift Bouquet Tutorial is broken down into manageable parts to make it easy to follow, even for beginners.
Begin by making the tulip petals, which are the most prominent part of the flower. You’ll typically crochet 3–5 individual petals using basic stitches such as chain, single crochet, and half double crochet. Start with a magic ring, and build your petal shape by increasing and then decreasing your stitches to create a curved look.
Once you have the desired number of petals, sew or crochet them together to form the tulip cup. Overlapping them slightly gives the flower a more realistic and full appearance. You can experiment with color combinations or variegated yarn to add visual interest.
The stem and leaves come next. Use green yarn to create a sturdy chain for the stem, then work single crochets in rounds around a floral wire to give it structure. For the leaves, crochet elongated ovals using double crochet and slip stitches to shape them.
Attach the leaves to the stem and then carefully sew the stem to the base of the tulip head. At this point, you can slightly stuff the flower head with polyfill if you want more dimension, but this step is optional depending on your style preference.
Repeat these steps to make multiple tulips. For a full bouquet, around 5 to 9 tulips create a generous and appealing arrangement. Each flower can be unique in color and leaf placement, giving your bouquet a naturally varied look.
This part of the Crochet Tulip Easy DIY Gift Bouquet Tutorial is where your creativity shines. Don’t be afraid to personalize the size, style, and color of each bloom to suit the occasion or the recipient’s personality.
With your crochet tulips complete, it’s time to turn them into a stunning gift bouquet. In this section of the Crochet Tulip Easy DIY Gift Bouquet Tutorial, we’ll walk through bouquet assembly, arrangement, and presentation.
Start by deciding on the bouquet shape. A round, dome-like shape is classic, but a cascading or asymmetrical arrangement can also be eye-catching. Lay your tulips out on a flat surface and experiment with placement until you’re happy with the layout.
Use floral tape to bind the stems together, starting near the top and wrapping tightly downward. The floral wire inside the stems helps them hold their shape, making it easier to fan out the flowers without them flopping.
Add extra greenery or filler elements if you like. Crochet leaves or even sprigs of baby’s breath (real or crochet) can give your bouquet a more natural look. These details enhance the bouquet’s volume and give it a professional touch.
Wrap the base of the stems in tissue paper or burlap, then tie it with a ribbon. Choose colors that complement your tulips for an elegant finish. You can also add a handmade gift tag for a personal message.
For added charm, present the bouquet in a small vase or jar. This makes the gift both beautiful and functional, especially if the recipient enjoys displaying handmade crafts. A mason jar with a ribbon around it can look both rustic and stylish.
This final step of the Crochet Tulip Easy DIY Gift Bouquet Tutorial is where you bring all your work together into a thoughtful, lasting gift. The attention to detail will show the love and care you put into each handmade bloom.
One of the best aspects of this Crochet Tulip Easy DIY Gift Bouquet Tutorial is its versatility. There are so many ways to use and gift these lovely handmade tulips beyond the traditional bouquet format.
They make thoughtful Mother’s Day gifts, especially when paired with a handwritten note or card. The tulips symbolize love and elegance, which aligns perfectly with this heartfelt occasion. You can even customize the bouquet in your mom’s favorite colors.
Consider using the tulips as home decor. Place a few in a small vase on a windowsill or shelf to add a handmade touch to your space. Their cheerful appearance brightens up any room and brings a sense of handmade beauty indoors.
You can also turn a single tulip into a gift topper. Attach it to the top of a wrapped present or gift bag for a personalized and reusable embellishment. It’s a small gesture that adds a big impact to any gift.
Wedding favors or bridal party gifts are another excellent use. Craft mini bouquets or single-stem tulips in the wedding color scheme. Guests will love the charm of a handmade keepsake that reminds them of the special day.
If you’re looking for a unique craft fair item, these tulips can be sold as individual stems or pre-arranged bouquets. They’re eye-catching, lightweight, and easy to transport, making them ideal for handmade markets and artisan sales.
Lastly, use your bouquet as part of a DIY therapy project. The repetitive motion of crocheting is relaxing, and gifting your finished tulips can bring joy to others. This makes the entire process fulfilling in both creation and giving.
– Crochet Tulip Easy DIY Gift Bouquet Tutorial
Q: What skill level is needed for this crochet tulip project?
A: This project is suitable for beginners to intermediate crocheters. Basic stitches like chain, single crochet, and slip stitch are mostly used.
Q: What type of yarn works best for crochet tulips?
A: Cotton yarn is ideal for structure and definition, but acrylic yarn works well too. Choose yarn with minimal fuzz for best results.
Q: How many tulips should I make for a bouquet?
A: Between 5 to 9 tulips typically makes a full-looking bouquet, but you can adjust this number based on the desired size.
Q: Can I wash the crochet tulips?
A: Yes, but it’s best to hand wash them gently and air dry. Avoid harsh detergents to maintain color and shape.
Q: Do I need to use wire for the stems?
A: Floral wire is recommended to help the stems hold their shape, especially for arranging the bouquet.
Q: Can I customize the size of the tulips?
A: Absolutely. Use larger hooks or thicker yarn for bigger flowers, or adjust the number of stitches in the pattern.
This Crochet Tulip Easy DIY Gift Bouquet Tutorial has guided you through every step of creating a stunning, handmade floral arrangement. From gathering materials and crafting each tulip to assembling a beautiful bouquet, we’ve explored how accessible and enjoyable this project can be. Whether you’re making a gift, decorating your home, or simply enjoying a relaxing craft, these crochet tulips are sure to bring beauty and joy.
If you followed along, we’d love to hear from you! Share your thoughts, suggestions, or personal tips on how your bouquet turned out. Your feedback helps us grow and inspires more creative crochet tutorials in the future.


