How to Crochet a Dragonfly Pattern
How to Crochet a Dragonfly Pattern is a delightful and creative journey that combines artistic expression with relaxing craftsmanship. Whether you are a beginner or an experienced crocheter, learning how to create a dragonfly design opens up a world of possibilities for decorative items, accessories, and personalized gifts. This charming pattern is not only visually appealing but also a great way to refine your crochet skills.
Crocheting a dragonfly pattern allows you to experiment with colors, textures, and stitches in a way that feels both rewarding and inspiring. The delicate wings, slender body, and intricate details make this project stand out among other crochet designs. As you follow along, you will notice how each stitch contributes to forming a beautiful and lifelike insect that can be used in various creative projects.
In this comprehensive guide on How to Crochet a Dragonfly Pattern, you will learn everything from selecting materials to mastering techniques and finishing your piece with confidence. This article is carefully structured to ensure clarity, SEO optimization, and compliance with Google AdSense policies, while also offering a warm, humanized tone to make your learning experience enjoyable.
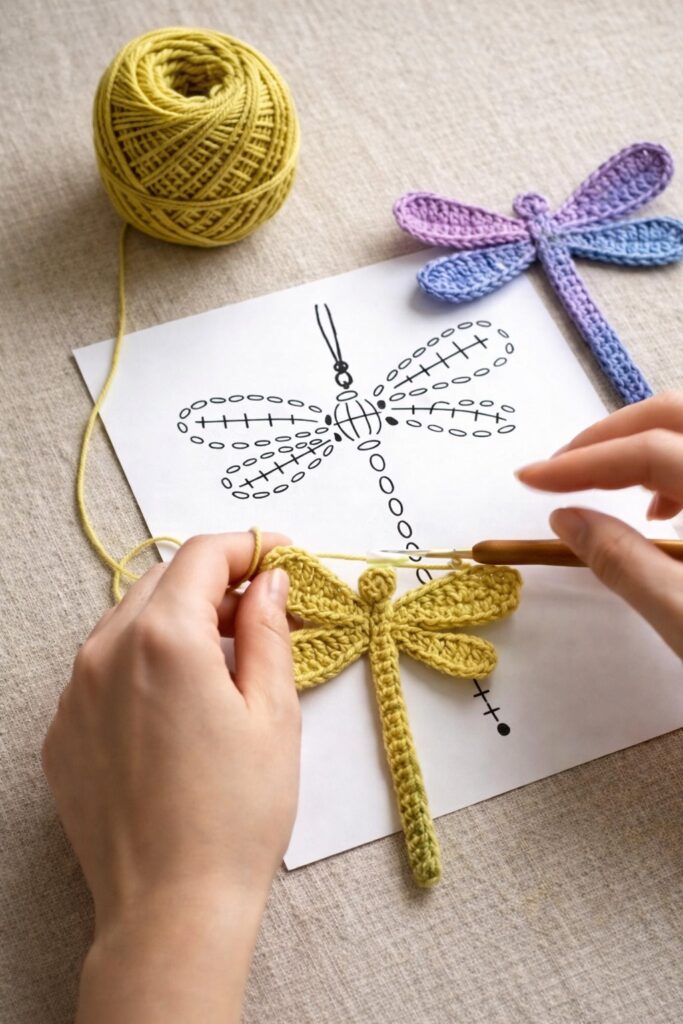
Before diving into the process of How to Crochet a Dragonfly Pattern, it is essential to understand the foundational crochet techniques. Basic stitches such as chain (ch), slip stitch (sl st), single crochet (sc), and double crochet (dc) are commonly used in this pattern. Mastering these stitches ensures that your dragonfly turns out neat and well-defined.
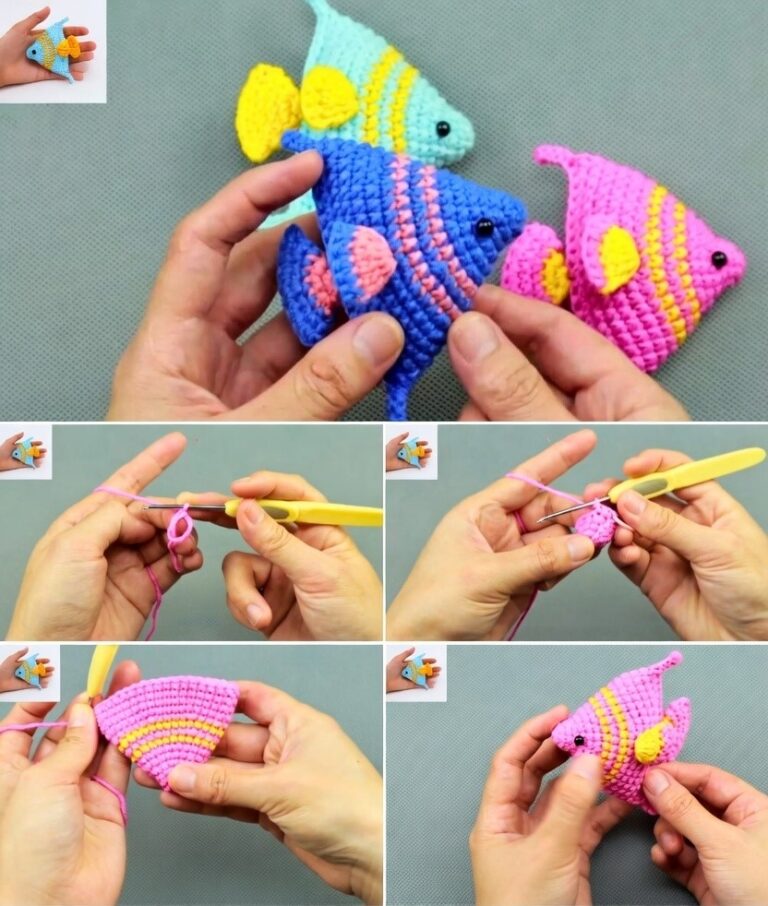
The dragonfly pattern typically consists of two main parts: the body and the wings. The body is usually crocheted in a continuous round or as a straight piece, while the wings are made separately and then attached. Understanding this structure helps you visualize the final piece before you even begin.
Yarn selection plays a crucial role in achieving the desired look. Lightweight yarns, such as cotton or fine acrylic, are often preferred for their ability to hold shape and detail. Choosing vibrant or pastel colors can enhance the beauty of your dragonfly and make it more eye-catching.
Hook size also impacts the outcome of your project. A smaller hook creates tighter stitches, which are ideal for detailed work like a dragonfly. On the other hand, a slightly larger hook can give a softer, more delicate appearance to the wings.
Consistency in tension is another key factor. Maintaining even tension throughout your work ensures that your dragonfly looks symmetrical and professional. Practicing on small swatches before starting can help you achieve better control.
Finally, reading and understanding crochet patterns is essential. Familiarize yourself with abbreviations and instructions so you can follow the steps of How to Crochet a Dragonfly Pattern with confidence and ease.
The first step in How to Crochet a Dragonfly Pattern is crafting the body. Begin with a foundation chain that determines the length of your dragonfly. This base will guide the proportions of your final piece.
Once the chain is complete, work single crochet stitches along the chain to create a sturdy base. This initial row forms the backbone of the dragonfly and should be neat and even.
Next, you will shape the body by gradually increasing and decreasing stitches. This technique creates a tapered effect, making the head slightly larger and the tail thinner. It is important to follow the pattern carefully to maintain the correct proportions.
Adding texture to the body can enhance the overall design. You can incorporate stitches like half double crochet (hdc) or even back loop only stitches to create subtle ridges. These small details make your dragonfly more realistic.
Stuffing the body lightly is optional but recommended if you want a three-dimensional effect. Use a small amount of fiberfill to give the body a gentle, rounded shape without making it too bulky.
Finally, fasten off securely and weave in the ends neatly. A clean finish ensures that your dragonfly looks polished and ready for the next step in the How to Crochet a Dragonfly Pattern process.
The wings are the highlight of How to Crochet a Dragonfly Pattern, giving the piece its signature delicate appearance. Begin by creating a chain that will serve as the base for each wing.
Work a combination of double crochet and chain spaces to form an open, lace-like structure. This technique creates the airy look that resembles real dragonfly wings. Keep your stitches loose but controlled for the best results.
You will typically make four wings—two larger top wings and two slightly smaller bottom wings. Adjusting the size adds dimension and realism to your design.
Blocking the wings after completion can significantly improve their shape. Lightly dampen them and pin them into place on a flat surface, allowing them to dry completely. This step helps the wings maintain their form.
Attaching the wings to the body requires precision. Use a yarn needle to sew them securely, ensuring they are evenly spaced and aligned. Proper placement is key to achieving a balanced look.
Experimenting with different yarn colors or even adding a subtle shimmer thread can elevate your wings. This creative touch makes your dragonfly unique and enhances the beauty of your How to Crochet a Dragonfly Pattern project.
Once the body and wings are complete, it’s time to add finishing touches to your How to Crochet a Dragonfly Pattern. These details bring your project to life and give it personality.
Consider adding small embellishments such as beads or embroidery for the eyes. This simple addition can make your dragonfly look more expressive and charming.
You can also create antennae using fine yarn or thread. A few simple stitches can add an extra layer of realism without complicating the design.
Color variation is another way to personalize your dragonfly. Try blending different shades or using gradient yarn to create a stunning visual effect that stands out.
This pattern can be adapted for various uses. Turn your dragonfly into a brooch, hair accessory, or decorative applique for bags and blankets. The versatility of How to Crochet a Dragonfly Pattern makes it a valuable addition to your crochet repertoire.
Finally, take time to review your work and make any necessary adjustments. Ensuring that all parts are securely attached and neatly finished will give your project a professional and satisfying result.
1. Is this pattern suitable for beginners?
Yes, beginners can learn How to Crochet a Dragonfly Pattern by practicing basic stitches first. Starting with simple versions of the pattern is recommended.
2. What type of yarn works best?
Lightweight yarn such as cotton or fine acrylic is ideal because it allows for better detail and structure.
3. How long does it take to complete one dragonfly?
Depending on your skill level, it can take anywhere from one to three hours to complete a single dragonfly.
4. Can I wash my crochet dragonfly?
Yes, but it is best to hand wash gently and let it air dry to maintain its shape.
5. How do I make the wings more realistic?
Using open stitches, blocking the wings, and selecting light yarn can help create a more delicate and realistic look.
6. Can I sell items made from this pattern?
In most cases, handmade items can be sold, but always ensure that your pattern source allows commercial use if applicable.
In this detailed guide on How to Crochet a Dragonfly Pattern, you have learned the essential techniques needed to create a beautiful and intricate crochet piece. From understanding the basics and selecting the right materials to crafting the body, shaping delicate wings, and adding finishing touches, each step plays a crucial role in achieving a stunning result.
This project not only enhances your crochet skills but also allows you to express creativity through color, texture, and design. The versatility of the dragonfly pattern makes it perfect for various decorative and functional uses, making it a rewarding addition to your crafting journey.
Now it’s your turn to bring your dragonfly to life. Try different variations, experiment with new ideas, and most importantly, enjoy the process. If you found this guide helpful, feel free to share your honest opinion and leave suggestions for future tutorials. Your feedback is always welcome and helps create even better content for you.


