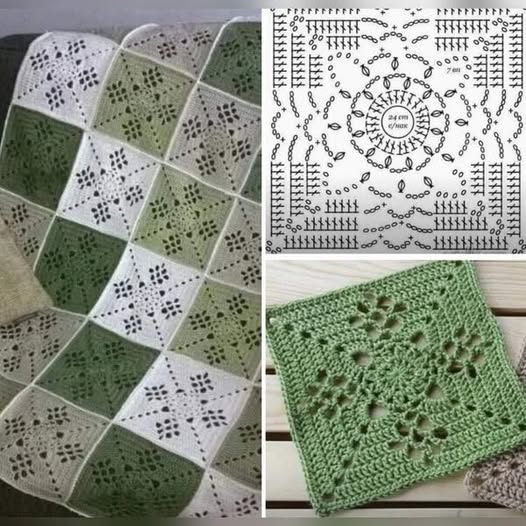
Victorian-Style Lattice Crochet Square - Pattern
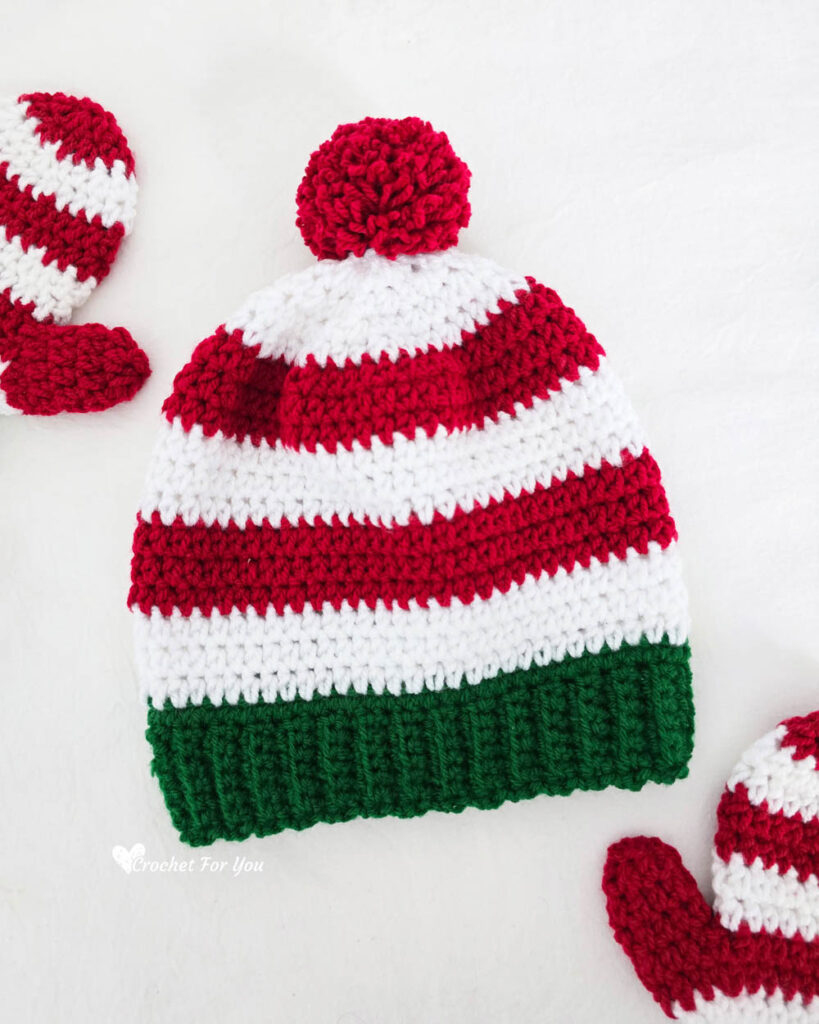
The Santa Helper Hat – Crochet Pattern is one of the most joyful and heartwarming projects you can create for the holiday season. It’s the perfect mix of festive charm and handmade love, making it a must-have for Christmas celebrations. Whether you’re a beginner looking for a simple project or an experienced crocheter who enjoys creating holiday accessories, this pattern will bring a smile to your face and joy to your home.
This cozy hat is inspired by Santa’s cheerful helpers, featuring a long tail, fluffy pom-pom, and soft textures that make it both adorable and comfortable. You can make it in traditional red and white or customize it with your favorite Christmas colors. The Santa Helper Hat – Crochet Pattern is also a wonderful handmade gift idea that will delight friends, family, and even coworkers during the holiday season.
As the holiday spirit fills the air, there’s nothing more rewarding than creating your own festive accessories. With this pattern, you can embrace creativity while spreading Christmas cheer. Let’s dive into the details of how to crochet your very own Santa Helper Hat – Crochet Pattern, from choosing yarn to finishing touches that make it truly special.
Before you begin, selecting the right materials is essential to achieve a soft, warm, and durable hat. The yarn you choose will determine the texture and overall look of your project.
Opt for medium-weight acrylic yarn, as it provides both comfort and durability. Acrylic yarns are easy to care for and come in a wide variety of festive colors. If you prefer something softer, you can also use a blend of acrylic and wool, which adds a bit more warmth for chilly winter days.
For the classic Christmas look, choose red and white yarn—red for the body of the hat and white for the brim and pom-pom. You can also get creative with green, silver, or gold accents for a fun twist.
You’ll need a crochet hook that matches your yarn weight, typically size H/5mm or I/5.5mm. Always check your gauge to ensure your hat fits properly.
Other essential tools include a tapestry needle for sewing in ends, scissors, and a stitch marker to help you keep track of rounds. Preparing everything in advance makes your crocheting experience smoother and more enjoyable.
Once you have your materials ready, you can start working on the magic that brings this Santa Helper Hat – Crochet Pattern to life.
Now that you’ve gathered your supplies, it’s time to begin crocheting. The Santa Helper Hat – Crochet Pattern is worked from the brim up, giving you full control over the size and style.
Start by creating a foundation chain long enough to fit around your head comfortably. This will be the base of your brim. Join the chain ends together and make sure not to twist it.
Work single crochet stitches around the brim for several rounds to make it thick and cozy. This gives the hat a snug fit that will keep your head warm during cold winter nights.
Once the brim is complete, switch to double crochet stitches to build the body of the hat. Gradually decrease the number of stitches as you reach the top to give it a tapered, cone-like shape—just like Santa’s classic hat!
For extra flair, create a long tail by continuing to decrease slowly until it forms a point. Attach a fluffy pom-pom to the tip to finish off the festive design.
This simple yet beautiful pattern is perfect for crocheters of all levels. Even if you’re a beginner, following each step carefully will ensure your Santa Helper Hat – Crochet Pattern turns out perfect every time.
One of the best things about the Santa Helper Hat – Crochet Pattern is how versatile it is. You can easily adapt it to different styles, colors, and sizes to make it uniquely yours.
For a playful twist, experiment with striped designs by alternating red, green, and white yarns. This gives the hat a more whimsical elf-like appearance. You can also add bells or tiny ornaments to the tip for a fun, jingling effect that captures the Christmas spirit.
If you’re making the hat for kids, use softer yarns like baby acrylic or cotton blends. These are gentle on sensitive skin and comfortable to wear for hours of holiday fun.
To personalize your project even more, consider adding embroidered initials or small crochet appliqués, such as stars, snowflakes, or holly leaves. These details turn your hat into a one-of-a-kind handmade treasure.
For those who love matching sets, use the same color scheme to create matching scarves or mittens. Coordinating accessories make for beautiful holiday photos and thoughtful gifts.
The possibilities are endless, and that’s what makes the Santa Helper Hat – Crochet Pattern such a joy to create. It’s more than just a crochet project—it’s a symbol of festive creativity and warmth.
Even though the Santa Helper Hat – Crochet Pattern is beginner-friendly, a few expert tips can help you achieve professional results every time.
First, always check your tension before starting. Crocheting too tightly can make your hat stiff, while crocheting too loosely can make it floppy. Adjust your hook size if necessary to get the perfect fit.
Use a stitch marker to keep track of where each round begins and ends. This ensures even stitching and a clean finish.
When it comes to the pom-pom, use a pom-pom maker for consistent results. Fluff it up after trimming to make it look full and festive.
Block your finished hat lightly by laying it flat and spraying it with water. This step smooths out any uneven stitches and enhances the final appearance.
If you plan to gift your hat, wrap it with a ribbon and handmade tag that says “Made with love.” These small touches make your present extra special.
Finally, don’t forget to take pictures of your creation! Sharing your Santa Helper Hat – Crochet Pattern on social media can inspire others to join in the fun of handmade holiday crafting.
1. What skill level is needed for the Santa Helper Hat – Crochet Pattern?
This pattern is ideal for beginners and intermediate crocheters. The stitches are simple, and the instructions can be followed easily, even if it’s your first holiday crochet project.
2. What type of yarn works best for this hat?
A medium-weight acrylic yarn is recommended. It’s warm, soft, and holds its shape beautifully. You can also use a wool blend for extra warmth.
3. Can I adjust the size of the hat?
Yes! You can make the hat larger or smaller by increasing or decreasing your starting chain. Measure your head circumference for a custom fit.
4. How long does it take to make the Santa Helper Hat – Crochet Pattern?
Depending on your skill level, this project takes about 3 to 5 hours to complete. It’s a quick and rewarding pattern, perfect for holiday gift-making.
5. Can I wash my crochet Santa Helper Hat?
Absolutely. Use a gentle cycle with cold water and lay it flat to dry. Avoid using bleach or harsh detergents to preserve the yarn’s color and softness.
6. Can I make this hat for children?
Yes, simply adjust the number of stitches and use lighter yarn to make it smaller and softer for little ones. It’s a great project for the whole family!
The Santa Helper Hat – Crochet Pattern is a delightful project that combines creativity, craftsmanship, and holiday cheer. From choosing festive colors to adding personalized touches, every stitch tells a story of love and warmth. It’s a beautiful way to celebrate the magic of Christmas while sharing handmade gifts that bring joy to others.
Now that you’ve learned all the steps and tips to make your own Santa Helper Hat – Crochet Pattern, it’s time to grab your yarn and hook and start crocheting. Let your imagination shine, and don’t forget to spread the holiday spirit with every hat you make.
I’d love to hear your thoughts! Share your honest opinion, experiences, or suggestions about this Santa Helper Hat – Crochet Pattern in the comments. Your feedback helps keep the crafting community inspired and connected.


