
Cross Door - Quilt Pattern
The Bird Quilt Pattern Tutorial – Quilt Pattern is a wonderful way to combine creativity, tradition, and storytelling into a single quilt project. Quilting has always been about more than stitching fabric together—it is about expressing emotions, celebrating nature, and passing down heritage. When you bring bird-inspired motifs into your quilting journey, you open the door to a project that feels both peaceful and artistic. Birds symbolize freedom, joy, and connection to nature, making them the perfect inspiration for a quilt design that you can treasure for years.
One of the most rewarding aspects of working with a Bird Quilt Pattern Tutorial – Quilt Pattern is that it offers flexibility. Whether you are new to quilting or an experienced quilter, you can adapt this project to your skill level. Beginners can focus on simpler bird blocks, while advanced quilters can explore detailed appliqué, embroidery, and color layering to bring the birds to life. Every quilt tells a unique story, and with bird patterns, the possibilities are endless.
Throughout this guide, you will learn how to approach this pattern step by step, from choosing fabrics to assembling and finishing the quilt. We will break down each stage in clear and manageable steps, so you can follow along with confidence. This Bird Quilt Pattern Tutorial – Quilt Pattern will not only help you create a beautiful quilt but will also teach techniques you can use in future quilting projects.
The first step in creating a Bird Quilt Pattern Tutorial – Quilt Pattern is selecting the fabrics. Birds are known for their vibrant colors and natural textures, which makes fabric choice especially important. Many quilters choose a mix of solid and patterned fabrics to capture the feathers, beaks, and backgrounds in lively detail.
When deciding on your color palette, think about the birds that inspire you. If you want to replicate a specific bird species, like a cardinal or bluebird, choose fabrics that closely match their plumage. For a more abstract or artistic approach, you can play with bold and contrasting colors to create imaginative interpretations of birds.
Texture also plays a role. Cotton fabrics are the most common for quilting, but you might add batiks or prints with feather-like patterns to enhance the visual effect. The combination of smooth and textured fabrics will make the birds stand out against the quilt background.
Background fabrics matter just as much as the birds themselves. Soft pastels or neutral tones create a natural sky or garden setting. Meanwhile, darker fabrics can provide contrast and make your bird motifs pop, almost as if they are in motion.
Don’t be afraid to use scraps. A Bird Quilt Pattern Tutorial – Quilt Pattern is an excellent opportunity to give new life to leftover fabric pieces. Tiny scraps can be transformed into feathers, wings, or small accents, adding dimension to the quilt without requiring new purchases.
Finally, remember balance. Too many bright fabrics can overwhelm the bird designs, while too many muted tones may hide their beauty. Aim for harmony between the fabrics to create a quilt that feels cohesive and visually stunning.
Once you’ve selected your fabrics, the next stage in the Bird Quilt Pattern Tutorial – Quilt Pattern is cutting and preparing the quilt blocks. Precision in cutting ensures your quilt pieces align correctly, which makes assembly much smoother.
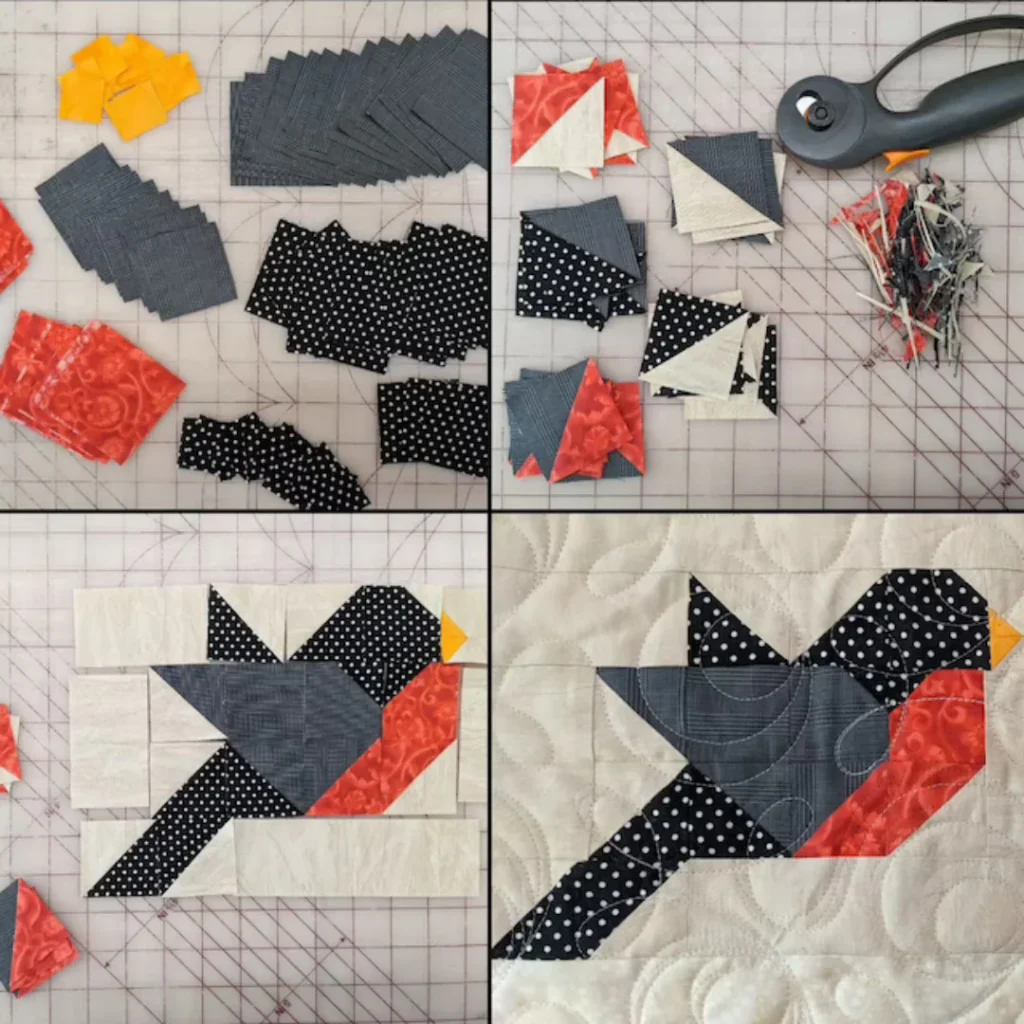
Start by reviewing your pattern templates. These may include bird shapes, wings, beaks, and background pieces. Use sharp rotary cutters and rulers to maintain accuracy when cutting each piece. Tracing onto fabric before cutting can also help keep edges clean.
Organization is key. Label each piece or group them by section so you don’t lose track during the sewing process. A small tray or box can keep the tiny bird details organized, such as tail feathers or small appliqué accents.
Appliqué techniques are commonly used for bird quilts. Prepare your appliqué shapes by fusing lightweight interfacing or heat-bond materials to the fabric. This step helps the fabric keep its shape as you stitch it to the quilt block.
If you prefer piecing instead of appliqué, prepare bird-inspired patchwork blocks by cutting triangles, squares, and rectangles. These can be combined to resemble bird silhouettes or abstract bird shapes. Piecing requires careful attention to seam allowances to maintain the correct block size.
Pressing each piece with an iron before assembly ensures crisp edges and makes sewing easier. Well-pressed pieces create cleaner seams and give the birds a more polished look once added to the quilt.
Take your time during this stage. The success of the Bird Quilt Pattern Tutorial – Quilt Pattern depends heavily on preparation. The more careful you are with cutting and organization, the smoother the later steps will be.
Now that your pieces are ready, it’s time to assemble the quilt top following the Bird Quilt Pattern Tutorial – Quilt Pattern. This stage is where your design begins to truly take shape, as the birds come alive on the fabric canvas.
Start by laying out the quilt blocks on a flat surface or design wall. Arrange the bird motifs so they flow naturally across the quilt. Some quilters like to place birds flying in different directions, while others prefer symmetry for a more orderly design.
Sewing the blocks together requires attention to alignment. Pin blocks carefully before stitching, ensuring the seams match at intersections. Consistent seam allowances will keep your quilt square and neat. If blocks don’t align perfectly, gently adjust them rather than forcing the fabric.
Borders and sashing can enhance the bird patterns. Adding a simple frame between blocks allows each bird design to stand out. For a more cohesive quilt, choose sashing fabrics that complement your bird colors while maintaining balance with the background.
Consider adding accent blocks. These could be small floral or leaf motifs that give the birds a natural environment. Incorporating nature-themed elements enhances the storytelling aspect of the quilt, making it feel like more than just a collection of bird shapes.
Once the quilt top is pieced together, press it thoroughly. Pressing at each step during assembly reduces bulk and creates a polished finish. A smooth quilt top makes the quilting stage much easier and ensures your bird designs shine.
This stage can feel like the most rewarding part of the process. Seeing your birds assembled into a full quilt top brings the Bird Quilt Pattern Tutorial – Quilt Pattern to life and motivates you to continue until the final stitch.
With the quilt top complete, the final stage in the Bird Quilt Pattern Tutorial – Quilt Pattern is quilting and finishing. This step adds depth, durability, and artistic flair to your project.
Layer your quilt sandwich by placing the backing fabric, batting, and quilt top together. Smooth each layer carefully to prevent wrinkles. Pin or baste the layers securely before beginning quilting to keep them aligned.
Choose a quilting design that enhances your bird motifs. Straight-line quilting works well for modern quilts, while free-motion quilting can mimic the movement of wings or create swirls like wind around the birds. Hand quilting is also an option if you want a traditional and personal touch.
Thread color matters. Neutral tones keep the focus on the birds, while contrasting threads can add emphasis to specific areas. Some quilters choose variegated thread to create a natural feather-like effect.
After quilting, trim the edges evenly before adding binding. The binding fabric should complement your overall quilt design. Binding frames the quilt, just as a picture frame highlights artwork.
Don’t forget finishing details. Embroidery, small beads, or hand-stitched accents can add character to the bird designs. These final touches personalize the quilt and make it uniquely yours.
By the end of this stage, your Bird Quilt Pattern Tutorial – Quilt Pattern is complete. What started as fabric pieces is now a meaningful quilt that reflects your creativity, patience, and love for quilting.
1. What is the best fabric to use for a bird quilt pattern?
Cotton fabrics are the most recommended for durability and ease of use. However, batiks and textured prints can bring bird feathers to life beautifully.
2. Can beginners try a Bird Quilt Pattern Tutorial – Quilt Pattern?
Yes, beginners can start with simple appliqué or patchwork bird designs. The tutorial can be adapted to any skill level, making it accessible for everyone.
3. How do I make my bird quilt more realistic?
Choose fabrics that reflect natural bird colors and consider adding embroidery for feather details. Careful placement of shading fabrics also creates depth.
4. What size should a bird quilt be?
It depends on your purpose. Bird quilts can be wall hangings, baby quilts, or full-sized bed quilts. The pattern can be scaled up or down easily.
5. Do I need special tools for a Bird Quilt Pattern Tutorial – Quilt Pattern?
Basic quilting tools like rotary cutters, rulers, and sewing machines are sufficient. If you’re using appliqué, heat-bond fusible materials can be very helpful.
6. How can I make my bird quilt unique?
Personalize it by mixing bird species, adding nature-inspired blocks, or including embroidery and embellishments. Every quilt tells a unique story.
The Bird Quilt Pattern Tutorial – Quilt Pattern is more than just a sewing guide—it is an invitation to create a quilt that celebrates nature and artistry. From selecting fabrics to adding final stitches, each step allows you to bring bird motifs to life in a way that reflects your personality and creativity. Whether you keep it simple or explore advanced techniques, the journey of quilting birds into fabric is deeply rewarding.
Now that you have learned the steps, tips, and inspiration, I’d love to hear from you. Share your sincere opinion about this tutorial and let me know your suggestions for future quilting topics. Your feedback helps make each new project even more meaningful.


