
Cross Door - Quilt Pattern
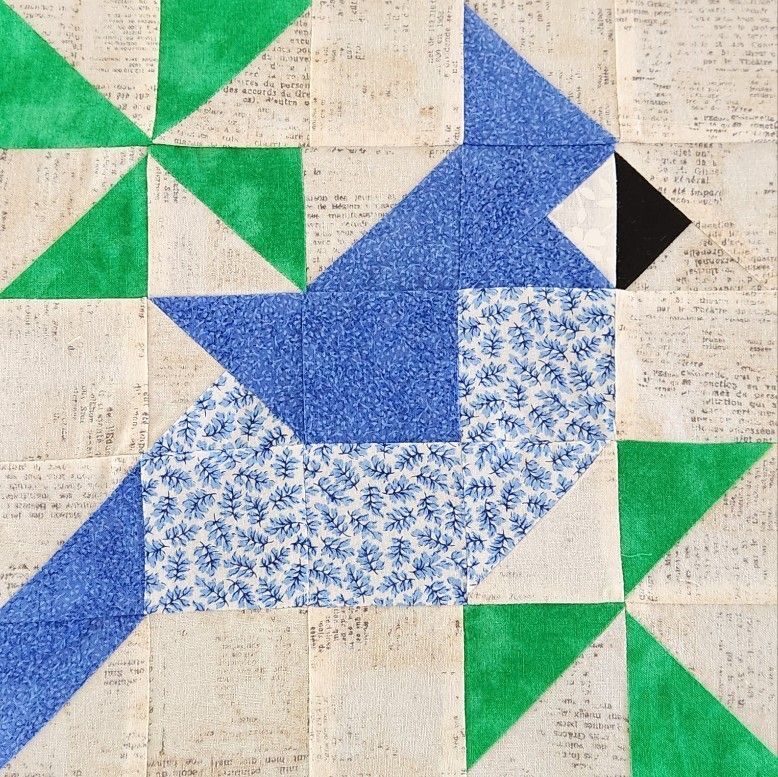
If you are searching for a beginner-friendly quilting project that is both symbolic and beautiful, this Cardinal Quilt Block Tutorial Quilt Pattern is the perfect place to start. Featuring the majestic cardinal bird, this block not only makes a meaningful addition to your quilt collection but also offers a creative and satisfying sewing experience. Whether you’re crafting a seasonal piece or a year-round decorative quilt, incorporating this pattern adds a personal touch rooted in nature and tradition.
The Cardinal Quilt Block Tutorial Quilt Pattern stands out for its versatility. Whether used as a centerpiece block or repeated to form a larger design, this tutorial guides you through each step with clarity and care. Cardinals are often associated with hope, renewal, and remembrance, making this block a heartfelt tribute or gift. This tutorial is written to suit quilters of all levels, especially those seeking a meaningful new project.
With carefully chosen fabric, accurate piecing, and a touch of creativity, you’ll bring your cardinal to life in no time. Let’s dive into how to make the Cardinal Quilt Block Tutorial Quilt Pattern, learn essential construction techniques, and explore ideas for layout and color combinations.
The first step in this Cardinal Quilt Block Tutorial Quilt Pattern is fabric selection. The right fabrics set the tone for your finished block and enhance the details of the cardinal figure.
Choose a bold red fabric to represent the cardinal’s body. Solid colors or subtle textures work best to define the bird’s silhouette and make it pop against the background. Add a small piece of black fabric for the face mask and beak area, and white or light grey for the background to ensure contrast.
You’ll also need neutral tones or soft earth colors for the branch or perch details. Batik fabrics or tone-on-tone prints add an organic feel and visual depth. For added interest, consider a patterned background with small snowflakes or leaves to evoke a seasonal theme.
Ensure all fabrics are pre-washed and pressed. Pre-washing helps prevent shrinking or bleeding later. Ironing the fabrics makes accurate cutting easier and more consistent, which is essential for patchwork.
Gather tools like a rotary cutter, quilting ruler, cutting mat, and fabric scissors. Use high-quality thread that matches or blends with your fabric selections. Fine quilting pins and a seam ripper are handy to correct mistakes and maintain clean lines.
Print or sketch your block layout. Visualizing where each piece fits helps you understand the block’s construction before you begin cutting or sewing. Many quilters also label fabric pieces using sticky notes to keep the assembly process smooth.
Precision is key when it comes to cutting fabric for your Cardinal Quilt Block Tutorial Quilt Pattern. Each piece plays a vital role in shaping the bird’s form and creating the overall design.
Start by cutting squares and rectangles according to your pattern template. These will include the red body parts of the cardinal, wings, tail feathers, and accent pieces. For beginners, marking each piece lightly with a pencil can help track placement.
Use half-square triangles (HSTs) to form angled parts of the cardinal’s body, especially around the wing and tail. HSTs give movement and structure to your block, and they’re easy to create with a little practice. Remember to trim them to the correct size before assembling.
Next, piece together the facial features. A small black triangle or square will represent the cardinal’s mask, with a tiny orange or yellow triangle for the beak. Pay attention to the direction of each piece to ensure the bird’s profile looks natural.
Press seams after each step, preferably to one side or open, depending on your personal style. Consistent pressing prevents bulk and allows blocks to lay flat for quilting. Use steam if needed, but avoid distorting the fabric.
Assemble the body by connecting the upper and lower halves of the bird. Keep checking alignment to maintain the bird’s posture and balance in the block. Make small adjustments before fully stitching larger sections.
Add background pieces around the bird to frame it within the block. This helps stabilize the shape and prepares it for joining with other blocks. Double-check the final block size and square it up using a quilting ruler.
Sewing the components of your Cardinal Quilt Block Tutorial Quilt Pattern brings the block to life. Take your time during this step to ensure every piece is aligned properly and securely sewn.
Begin by stitching smaller units together first, such as the beak and face area. These areas require careful attention to detail, especially when handling small fabric pieces. Use a shorter stitch length for added durability.
Once your facial units are ready, begin assembling the wing and tail sections. Combine red and black fabrics for added definition. Depending on your chosen layout, you may incorporate different wing positions to suggest movement or rest.
With all units prepared, begin joining them into horizontal rows or vertical sections. This step-by-step approach helps manage complexity and makes it easier to maintain seam alignment. Use nesting seams where possible for precision.
Use consistent seam allowances throughout the block, typically ¼ inch. Inaccurate seams can cause distortion or incorrect block sizes, which makes later assembly challenging. Check measurements regularly as you progress.
Press each completed section and pin it to the corresponding section before stitching. Pinning reduces shifting and ensures that the cardinal figure remains symmetrical and centered in the block.
Once fully assembled, your block should measure the intended size (often 12×12 inches). Use your quilting ruler to trim any excess and ensure it’s perfectly square. Now your cardinal block is ready to be added to your quilt layout.
With your Cardinal Quilt Block Tutorial Quilt Pattern completed, it’s time to decide how to use and finish your block. This part opens the door to creativity and personalization.
You can make a full quilt featuring multiple cardinal blocks in different orientations. This creates a dynamic and engaging layout, especially when paired with wintry or woodsy fabrics that enhance the bird’s natural habitat.
Alternatively, showcase a single cardinal block as the focal point of a wall hanging or pillow. Add borders, sashing, or appliqué accents like holly leaves or snowflakes to complete the seasonal theme.
If you enjoy hand quilting, outline the bird with fine stitches to add depth and definition. This works beautifully with solid fabrics, making your stitching the star. You can also use decorative machine quilting to echo the wing or tail shapes.
Consider making a table runner with one cardinal block in the center and coordinating blocks on each end. Choose companion colors like dark green, white, or light blue to balance the strong red tones.
Add embellishments like embroidery or beads for extra texture. Embroider the eye, stitch small snowflakes in the background, or even add a 3D fabric leaf for a mixed-media look that stands out.
Finally, bind your quilt project using a matching or contrasting color. Red, black, or dark brown binding works well with cardinal-themed blocks. Make sure to label your quilt with the date and your name to mark your creative achievement.
What size is the finished Cardinal Quilt Block?
Most Cardinal Quilt Block Tutorial Quilt Pattern designs finish at 12×12 inches, but you can resize it by adjusting your fabric cuts and seam allowances.
Is this pattern suitable for beginners?
Yes! This Cardinal Quilt Block Tutorial Quilt Pattern is beginner-friendly, especially if you follow the instructions carefully. It includes basic shapes and techniques such as half-square triangles.
Can I use scraps for this block?
Absolutely. This block is great for using up red, black, and background-colored fabric scraps. Just be sure each piece is large enough for your pattern templates.
What does the cardinal symbolize in quilts?
Cardinals are often seen as symbols of hope, remembrance, and spiritual messages. Including them in quilts adds emotional value and storytelling.
How can I personalize my cardinal block?
Use different background fabrics to reflect the seasons, add embroidery for extra detail, or position the bird on a pieced branch or snowy landscape.
Do I need a pattern template?
While experienced quilters can draft their own blocks, it’s highly recommended to use a clear pattern template when following the Cardinal Quilt Block Tutorial Quilt Pattern, especially for accurate piecing.
The Cardinal Quilt Block Tutorial Quilt Pattern is a heartfelt and eye-catching addition to any quilt project. With its strong symbolism, vibrant colors, and manageable construction, it offers both creative satisfaction and emotional resonance. Whether you’re creating a seasonal piece or a memorial gift, this block speaks volumes through fabric and stitches.
We hope this tutorial has helped you understand every step involved in bringing a cardinal to life in your quilting journey. If you try this pattern, we’d love to hear from you—please leave your honest feedback, share your thoughts, and let us know if you have suggestions or personal touches that made your project unique!


