
Summer-Country-Star-Flower - Quilt Pattern
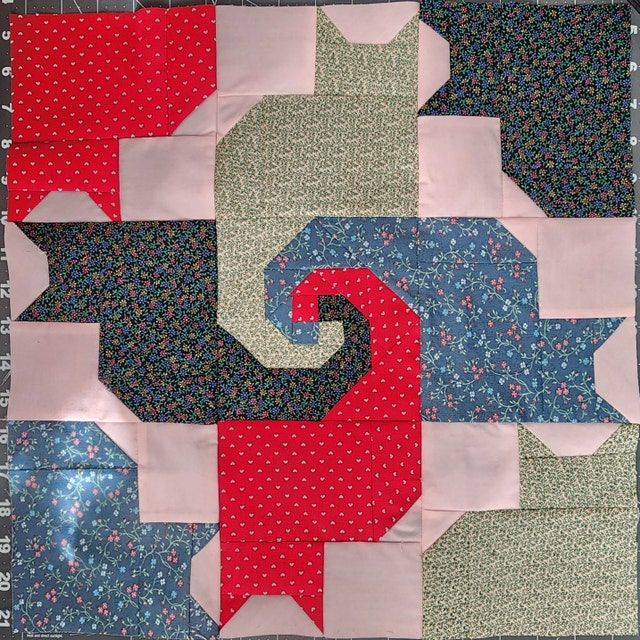
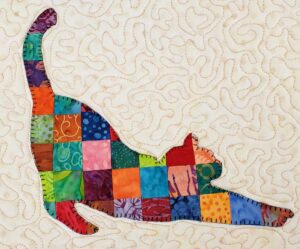
The Cat Quilt Pattern is a delightful project that brings together creativity, warmth, and love for our feline friends. For cat lovers and quilting enthusiasts alike, making a quilt that showcases the charm of cats is both enjoyable and rewarding. Whether you are a beginner looking for an easy project or an experienced quilter aiming to add something playful to your collection, a Cat Quilt Pattern can be customized to suit your personal style and home décor.
Quilting has always been a form of storytelling through fabric. When combined with the adorable imagery of cats, it becomes a celebration of affection and artistry. The versatility of the Cat Quilt Pattern allows crafters to experiment with colors, textures, and techniques, resulting in a truly personal and heartwarming piece. From realistic cat silhouettes to abstract feline motifs, there are endless ways to make your design unique.
Before diving into cutting and stitching, it’s essential to understand the elements that make a Cat Quilt Pattern successful. Choosing the right fabrics, maintaining accurate seams, and selecting the perfect layout are all vital components. This article will guide you through every step of creating your quilt, ensuring it’s not only visually appealing but also durable and comfortable.
When starting your Cat Quilt Pattern, selecting the right fabric is the foundation of success. The fabric choice determines the overall feel, comfort, and look of your quilt. Consider high-quality cotton, which is durable and easy to work with. Cotton fabrics hold up well through washing and daily use, making them ideal for quilts.
Color selection is another exciting part of quilting. For cat-themed quilts, many crafters opt for earthy tones like browns, blacks, grays, and whites to mimic natural feline shades. However, if you want a more whimsical or artistic effect, you can use vibrant prints or pastel backgrounds that make your cat shapes stand out beautifully.
Patterns and prints also play an essential role in your design. You can use fabrics with tiny paw prints, fish bones, or whiskers to complement the Cat Quilt Pattern theme. These details add character and charm to your finished quilt.
Before cutting your fabric, it’s wise to pre-wash and iron it. This prevents shrinkage and ensures your quilt retains its shape. Pre-washing also helps remove any chemical residues from the manufacturing process, giving you a smoother sewing experience.
Another important factor to consider is fabric contrast. Using light and dark fabrics strategically can highlight the details of your cat shapes and make them more visually striking. This balance enhances depth and texture throughout your quilt.
Finally, consider using fabric scraps or leftover materials from previous projects. Quilts are traditionally resourceful creations, and incorporating different textures can make your Cat Quilt Pattern more dynamic and eco-friendly.
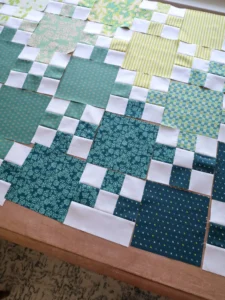
Once your fabrics are ready, the next step is to design and cut your Cat Quilt Pattern pieces. Start by sketching your layout on paper. This helps you visualize how each block will come together. Whether you prefer a repeating cat silhouette, a central feline motif, or multiple cats in various poses, your design will set the tone of your quilt.
Templates are extremely helpful for precision. You can create or download cat shapes and transfer them onto your fabric. Make sure each shape is consistent by using a rotary cutter and ruler for clean edges. Accuracy in cutting is crucial because even a small misalignment can affect your quilt’s final look.
If you want your quilt to have dimension, you can use appliqué techniques. This involves sewing fabric cat shapes onto background squares, creating layers and visual interest. Appliqué allows for flexibility in design since you can arrange your cats however you like before stitching them permanently.
For beginners, using large, simple cat shapes is recommended. As you gain experience, you can experiment with more detailed designs, such as patchwork cats or even embroidered details like eyes and whiskers.
Labeling your fabric pieces as you cut them helps keep your project organized. Since quilts can involve many small parts, this simple step can save time and reduce mistakes during assembly.
When designing your Cat Quilt Pattern, don’t forget about borders and sashing. These elements frame your quilt beautifully and help tie the overall theme together. Adding a paw-print border or using a contrasting color can make your quilt truly stand out.
Now comes the exciting part — bringing your Cat Quilt Pattern to life through assembly and stitching. Begin by arranging your quilt blocks according to your design plan. Lay them out on a large, flat surface or use a design wall to get a clear view of the layout before sewing.
When you’re happy with the arrangement, start stitching the blocks together. Sew in rows first, making sure your seams are straight and consistent. Press each seam as you go to keep the quilt flat and professional-looking. Ironing may seem like a small detail, but it makes a big difference in the final presentation.
Once the rows are complete, join them to create the full quilt top. Pay close attention to how your cat shapes align; precision here ensures your quilt looks polished and cohesive.
Adding batting and backing is the next step. Choose a soft batting material that complements your quilt’s weight. Cotton or polyester batting are both excellent choices. For the backing, you can use a single fabric or piece together multiple sections if you want a reversible design.
After layering the quilt top, batting, and backing, it’s time to quilt the layers together. You can choose from hand quilting, machine quilting, or even free-motion quilting, depending on your preference and skill level. For a Cat Quilt Pattern, a playful touch like paw-shaped stitching or curved lines around the cat shapes can add personality.
Finish the edges with a neat binding that complements the rest of your design. Hand-stitching the binding can give your quilt a classic look, while machine stitching offers durability. Whichever method you choose, the finishing touch should highlight the love and care you’ve poured into your Cat Quilt Pattern.
Every quilt tells a story, and your Cat Quilt Pattern can reflect your personality and creativity. One way to make it special is to include embroidery. You can stitch your cat’s name, a favorite quote, or small details like whiskers and paws to personalize it.
Labeling your quilt is another meaningful addition. Add your name, the date, and perhaps a short message on a small fabric tag. This turns your quilt into a keepsake, especially if you’re gifting it to someone.
If you’re making your Cat Quilt Pattern as a gift, consider the recipient’s favorite colors or the type of cats they adore. Customizing the quilt in this way makes it even more cherished.
Proper care will ensure your quilt lasts for years. Wash it gently using mild detergent and cold water, and air-dry it to maintain the quality of the fabrics and stitching. Avoid harsh machine cycles that could damage the seams.
Store your quilt in a cool, dry place, away from direct sunlight. Folding it loosely and rotating it occasionally prevents permanent creases. If displayed on a wall, keep it out of areas with heavy moisture or heat exposure.
Finally, remember that quilting is a journey, not just a finished product. Each Cat Quilt Pattern you create will teach you something new about technique, color, and creativity. Enjoy the process and let your love for cats inspire every stitch.
1. What is a Cat Quilt Pattern?
A Cat Quilt Pattern is a sewing design that features cat-themed shapes or motifs, often used to create quilts for home décor, gifts, or personal keepsakes.
2. Can beginners make a Cat Quilt Pattern?
Yes! Beginners can start with simple designs using basic cat silhouettes and gradually move on to more detailed patterns as they gain confidence.
3. What fabric is best for a Cat Quilt Pattern?
High-quality cotton fabric is the best choice because it’s durable, easy to sew, and comfortable. You can also use scraps to create interesting color combinations.
4. Can I use a sewing machine for quilting?
Absolutely. Many quilters use sewing machines for piecing and quilting. A walking foot or free-motion foot can help achieve professional results.
5. How can I make my Cat Quilt Pattern unique?
You can personalize your quilt with embroidery, special fabrics, or even your pet’s image. Adding labels or using creative color palettes also makes your quilt one-of-a-kind.
6. How do I wash and store my quilt?
Gently wash your quilt in cold water with mild detergent, and air dry it. Store it in a cool, dry place, away from direct sunlight to preserve the colors and fabric.
Creating a Cat Quilt Pattern is more than just a sewing project — it’s an expression of love, creativity, and craftsmanship. From choosing fabrics to adding personal touches, every step contributes to a meaningful and beautiful quilt. Whether it’s for your home, a loved one, or even your favorite cat, this pattern offers endless possibilities for personalization.
We hope this guide has inspired you to start your own Cat Quilt Pattern today. What do you think of this tutorial? Share your thoughts, experiences, or suggestions in the comments — your feedback helps make our quilting community even better!


