
Cross Door - Quilt Pattern
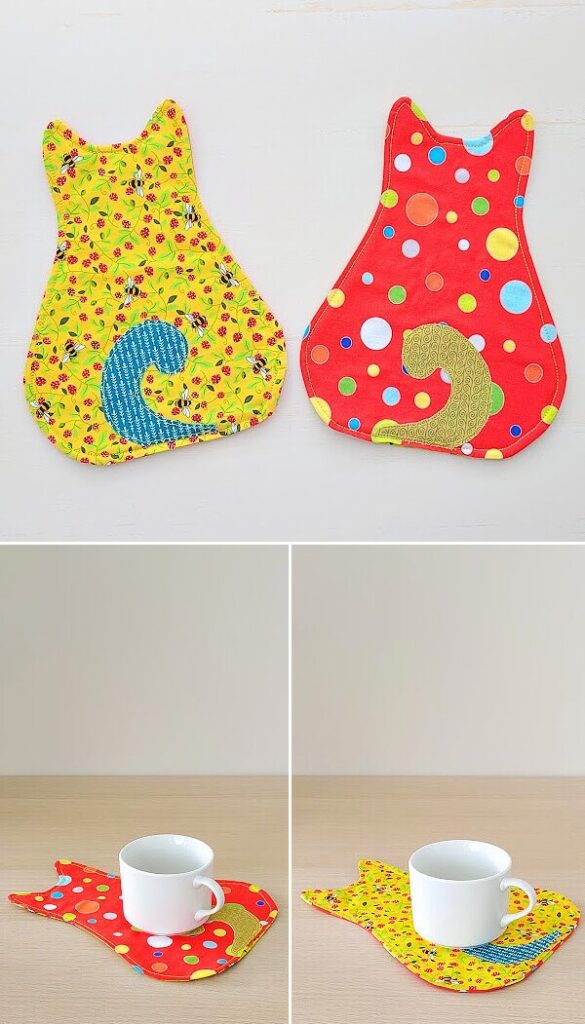
The Cat Shaped Coaster Mug Rug Tutorial – Quilt Pattern is a delightful project for quilters and crafters who want to combine functionality with charm. This project is not just about creating a simple coaster; it’s about making a playful and cozy addition to your home that reflects your love for quilting and cats. With a thoughtful step-by-step process, you can create a piece that is both decorative and useful, perfect for protecting your table while adding personality to your space.
Whether you are an experienced quilter or a beginner eager to try a small project, this tutorial will guide you through everything you need to know. Because it’s compact, the Cat Shaped Coaster Mug Rug Tutorial – Quilt Pattern is an excellent choice for practicing quilting techniques, using fabric scraps, and experimenting with design. It’s a satisfying project that you can finish quickly, making it perfect for gifting or personal use.
In this article, we will explore how to make this quilt pattern step by step, focusing on important details such as fabric selection, cutting, sewing, and finishing touches. By the end, you will have all the information needed to confidently create your own unique cat shaped mug rug that looks adorable on any table.
When starting the Cat Shaped Coaster Mug Rug Tutorial – Quilt Pattern, the first step is gathering the right materials. Since the project is small, you won’t need large pieces of fabric, making it a great opportunity to use up scraps from your stash. Select fabrics that represent your style, whether they are bright and cheerful or neutral and elegant.
Cotton fabric is the most common choice for quilting because it is easy to work with, durable, and available in endless patterns. You can mix solid fabrics with fun prints like polka dots, stripes, or even paw prints to give your mug rug a playful cat-like charm. Make sure to pick coordinating colors for the front, back, and binding.
For the batting, choose a lightweight option that gives the mug rug structure without being too thick. Batting helps the coaster absorb condensation and provides extra protection for your surfaces. Thin cotton batting or fusible fleece works perfectly for this project.
In addition to fabric and batting, you will also need basic quilting tools such as a rotary cutter, cutting mat, quilting ruler, pins, and sewing machine. These tools will help you cut accurate shapes and sew with precision.
Thread is another important detail often overlooked. Choose a high-quality thread in a color that blends with your fabric or contrasts for a decorative look. A strong polyester or cotton thread is ideal for quilting.
Finally, don’t forget the template. A simple cat-shaped template can be drawn by hand or printed from a design. This will guide your cutting and ensure all coasters have the same shape. Having the right template is essential to the Cat Shaped Coaster Mug Rug Tutorial – Quilt Pattern.
The next stage of the Cat Shaped Coaster Mug Rug Tutorial – Quilt Pattern is preparing your template and cutting fabric pieces. Start by transferring your cat design onto sturdy cardstock or template plastic. This will make it easier to trace the shape multiple times without the edges wearing down.
Lay your fabric flat on the cutting mat and trace around the cat-shaped template. You will need two fabric pieces: one for the front and one for the back. Remember to cut slightly larger than the template if you are including seam allowances.
After cutting the fabric, cut the batting layer using the same template. Keep in mind that the batting should be slightly smaller than the fabric pieces to reduce bulk along the edges. Accuracy in cutting ensures that the finished mug rug will have a neat and professional look.
If you are using scraps, you may piece together smaller fabric sections before cutting the final cat shape. This adds extra charm and makes your coaster look more like a tiny quilt block. Scrappy designs work beautifully in the Cat Shaped Coaster Mug Rug Tutorial – Quilt Pattern, as they highlight different textures and colors.
Once your fabric and batting pieces are ready, give them a quick press with an iron. Pressing eliminates wrinkles and helps layers align better when sewing. This small step makes a big difference in the overall finish.
Finally, keep your template safe for future projects. Many quilters find themselves making several cat coasters as gifts, so having a reusable template is handy.
Now it’s time to bring the Cat Shaped Coaster Mug Rug Tutorial – Quilt Pattern to life with sewing and quilting. Place your fabric pieces right sides together with the batting on top or bottom, depending on your preferred method. Pin around the edges to keep everything aligned.
Start sewing along the traced shape, leaving a small opening for turning the coaster inside out. Use a short stitch length to ensure strong seams, especially around curves like the ears and tail. Carefully pivot at corners to maintain the cat’s shape.
After sewing, trim away excess fabric and clip the curves. This helps reduce bulk and allows the coaster to turn smoothly. Take your time with this step to ensure the outline looks neat.
Turn the coaster right side out through the opening. Use a blunt tool like a chopstick or knitting needle to gently push out the corners and curves. Press the coaster flat with an iron to set the shape before quilting.
For quilting, you can keep it simple with straight-line stitching or add fun details like whiskers or paw prints. Quilting adds texture, secures the layers, and gives your coaster a polished look. Choose thread colors that complement your design.
Once quilting is complete, close the opening with a hidden hand stitch or topstitch around the edge. Both methods work well, but topstitching also adds durability to the coaster.
The last part of the Cat Shaped Coaster Mug Rug Tutorial – Quilt Pattern is adding finishing touches. This is where your creativity shines and your coaster becomes truly unique.
Consider adding embroidered details like eyes, nose, or whiskers to give the cat more personality. You can also sew on small appliqué shapes like hearts, bows, or fish for extra charm. These little accents transform a simple coaster into a delightful keepsake.
Another variation is experimenting with different fabrics. Felt or flannel can add softness, while denim gives a sturdy, rustic look. Using novelty fabrics with cat prints makes the project even more fun for animal lovers.
If you prefer a more polished finish, bind the edges of the coaster instead of turning it inside out. Binding gives a professional quilted appearance and allows you to add contrasting fabric as a frame around the cat shape.
You can also adjust the size of the template to create matching sets. Larger versions work as placemats, while smaller ones can be used as mini coasters. Coordinated sets make wonderful handmade gifts for birthdays, holidays, or housewarmings.
Personalization is another way to make your project stand out. Add initials, names, or short embroidered messages to make the coaster meaningful for its recipient. Handmade gifts like these are always appreciated.
Finally, don’t be afraid to make multiple coasters in different fabric themes. Seasonal designs—like Halloween cats, Christmas cats, or spring floral cats—keep your table décor fresh and festive throughout the year.
1. What size should the cat shaped coaster be?
Most coasters measure between 4 and 6 inches across, but you can resize the template to fit your needs.
2. Can I make this project without a sewing machine?
Yes, it is possible to hand sew the coaster, though it will take longer. Small stitches and patience will give good results.
3. What type of batting works best for mug rugs?
Thin cotton batting or fusible fleece works well. Avoid very thick batting to keep the coaster flat and practical.
4. How can I wash the cat shaped coaster?
Since it is quilted, it can be machine washed on a gentle cycle. Use mild detergent and air dry for best results.
5. Is this a beginner-friendly project?
Absolutely. The Cat Shaped Coaster Mug Rug Tutorial – Quilt Pattern is small and manageable, making it perfect for beginners who want to practice quilting skills.
6. Can I sell the coasters I make from this pattern?
Yes, handmade coasters are popular at craft fairs and online shops. Just remember to add your own unique touches to make them stand out.
The Cat Shaped Coaster Mug Rug Tutorial – Quilt Pattern is a wonderful way to combine quilting skills with creativity and fun. From choosing fabrics and cutting the template to sewing, quilting, and finishing, every step gives you the opportunity to create something special. This project is practical, beginner-friendly, and endlessly customizable.
If you’ve followed along, you now have the knowledge to make your own cat-shaped coasters that bring warmth and personality to your home. I would love to hear your opinion about this tutorial—please share your honest feedback and any suggestions you may have for future quilting guides. Your ideas help make these tutorials even better!


