
Cross Door - Quilt Pattern
Starting a new sewing project can be both exciting and rewarding, especially when it combines practicality with creativity. Cone Potholder Sewing – quilt pattern is one of those delightful projects that bring together functionality and style. This pattern allows you to create a unique potholder that not only protects your hands but also adds a touch of charm to your kitchen decor. Whether you are an experienced quilter or a beginner eager to learn, this project is an excellent opportunity to practice piecing, sewing, and finishing skills while making something truly useful.
The popularity of the Cone Potholder Sewing – quilt pattern lies in its versatility. You can use fabric scraps, experiment with vibrant colors, or keep it minimal and neutral for a classic look. Its cone shape is practical, allowing easy handling of hot dishes, while the quilted structure adds durability and strength. This is a project that can be completed in a short amount of time, making it perfect for gifting, selling, or simply enhancing your own collection of kitchen accessories.
In this article, we will explore the steps, techniques, and creative possibilities of making your very own Cone Potholder Sewing – quilt pattern. You will find helpful tips on fabric choices, quilting methods, and sewing tricks that can make the process smooth and enjoyable. Let’s dive into the details and learn how to create a functional quilted cone potholder that stands out with style.
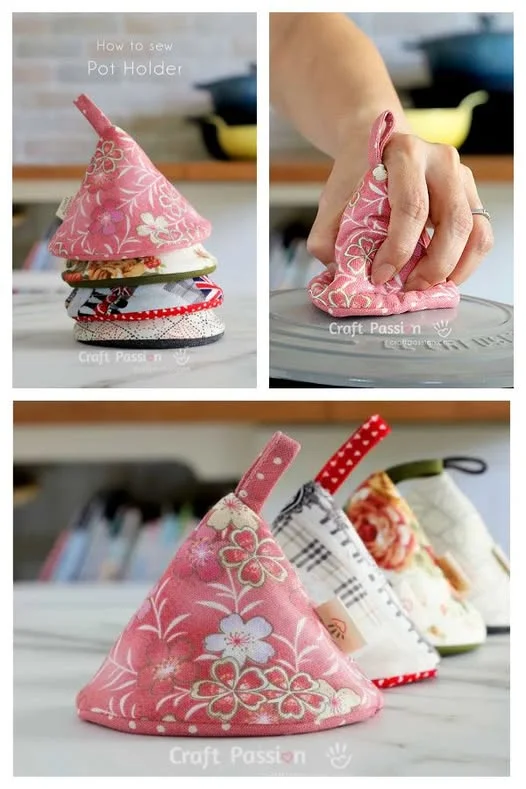
The first step in creating a beautiful and functional potholder is understanding the design. The Cone Potholder Sewing – quilt pattern is built with a triangular base that is folded into a cone shape. This clever construction gives it a snug fit for your hand while providing enough fabric layers to protect against heat. It is more than just a kitchen tool—it’s a little piece of quilted art.
One of the best features of this pattern is its accessibility. Even if you are just learning to quilt, the Cone Potholder Sewing – quilt pattern is simple enough to try. The basic shape involves cutting precise fabric pieces, layering batting, and quilting lines before sewing everything into a cone. Each step reinforces important sewing techniques that can be used in larger quilting projects later on.
The cone shape also adds ergonomic comfort. Unlike flat potholders that can sometimes slip, the cone design grips dishes better, making it safer and more practical. This makes it not only a fun project but also a very functional one for everyday kitchen use.
Another key benefit is flexibility in design. You can personalize your Cone Potholder Sewing – quilt pattern by choosing fabrics that match your kitchen decor. Floral prints, modern geometrics, or holiday-themed fabrics all work beautifully, turning a simple potholder into a statement piece.
The quilting aspect strengthens the potholder, preventing fabric from shifting and giving it a professional look. With straight-line quilting or free-motion quilting, you can add texture and artistic detail. This means every piece you make can be unique.
Finally, understanding the structure helps you plan ahead. Once you grasp the folding and sewing steps, you will find this pattern is highly adaptable. You can adjust sizes, use different batting thicknesses, or experiment with binding methods to create variations that suit your needs.
The success of your Cone Potholder Sewing – quilt pattern starts with thoughtful material selection. Since this item will handle heat, choosing the right fabrics and batting is crucial. Cotton fabric is the most recommended because it is heat-resistant, breathable, and durable. Synthetic fabrics should be avoided, as they may melt when exposed to high temperatures.
For the outer layer, consider using quilting cotton. This fabric comes in endless prints and colors, allowing you to match your potholder with your kitchen theme. A fun option is to use fabric scraps from other quilting projects, creating a patchwork effect that looks both eco-friendly and stylish.
Batting plays a major role in the heat protection of your Cone Potholder Sewing – quilt pattern. A cotton or insulated batting is recommended. Some specialized battings are made specifically for potholders and oven mitts, designed to resist heat more effectively. Adding two layers of batting can enhance safety and durability.
The inner lining should also be cotton for comfort and heat resistance. Solid colors or light patterns work well inside since they will not distract from the decorative outer fabric. It is also wise to pre-wash fabrics to prevent shrinking after sewing.
Thread selection is another key detail. A high-quality cotton or polyester thread ensures strong seams that hold up under repeated use. Choose a color that blends well or contrasts for decorative stitching. The right thread enhances both durability and visual appeal.
Finally, gather basic tools such as rotary cutters, quilting rulers, sewing machine, and binding tape. Having the right tools on hand makes the process smoother and ensures neat, professional-looking results.
Now that you have your materials ready, it’s time to begin sewing your Cone Potholder Sewing – quilt pattern. Start by cutting your fabric pieces into precise shapes. Triangles or wedge-shaped pieces form the base of the cone. Accuracy in cutting ensures that the final cone comes together neatly.
Next, layer your fabrics with batting in between. This quilt sandwich is essential for heat protection. Pin the layers together and prepare for quilting. Straight-line quilting is the simplest method, but you can also try diagonal or decorative stitches. This step not only strengthens the fabric but also adds a personal artistic touch.
Once the quilting is complete, trim the edges neatly. Fold the quilted piece into a cone shape and sew along the side to create the base. This step transforms the flat quilted piece into the signature cone design. Backstitch at the ends for reinforcement.
After forming the cone, focus on finishing edges. Bias binding is an excellent option to cover raw edges and give the potholder a polished look. Use coordinating or contrasting fabric for the binding to enhance the design. Sewing the binding carefully ensures durability.
At this stage, you can add a hanging loop if desired. A small fabric strip sewn at the tip of the cone allows easy storage on kitchen hooks. This practical addition makes the Cone Potholder Sewing – quilt pattern even more functional.
Finally, give your finished potholder a quick press with an iron to smooth out seams and showcase the quilting details. Admire your work—you now have a handmade kitchen accessory that is as beautiful as it is useful.
The beauty of the Cone Potholder Sewing – quilt pattern lies in its adaptability. You can experiment with countless variations to create personalized and unique pieces. For example, using holiday-themed fabrics allows you to make seasonal potholders that double as festive decorations.
Patchwork styles are another wonderful option. By piecing together small fabric scraps, you can create a colorful, eco-friendly cone potholder that celebrates sustainability. This approach also reduces fabric waste while adding charm and personality.
Consider experimenting with quilting designs. Straight lines provide simplicity, but free-motion quilting can turn your potholder into a miniature art canvas. Swirls, flowers, or geometric patterns stitched onto the fabric add sophistication and texture.
These potholders also make excellent handmade gifts. Whether for housewarmings, birthdays, or holidays, a Cone Potholder Sewing – quilt pattern project is thoughtful and practical. Wrap it in simple paper or add a ribbon for a personal, heartfelt touch.
If you enjoy selling handmade items, this project is perfect for craft fairs or online shops. The quick sewing process and appealing design make it a popular choice among buyers who appreciate functional handmade goods.
Finally, think about pairing your cone potholders with other quilted kitchen items, such as table runners, placemats, or coasters. Together, they form a coordinated kitchen set that looks beautiful and professional.
Q1: Can beginners try the Cone Potholder Sewing – quilt pattern?
Yes, this pattern is beginner-friendly. With basic sewing and quilting skills, anyone can complete it successfully.
Q2: What fabrics are best for this project?
100% cotton is the best choice for safety and durability. Avoid synthetic fabrics since they are not heat-resistant.
Q3: How do I make the potholder more heat-resistant?
Use two layers of cotton batting or a specialized heat-resistant batting to increase protection.
Q4: Can I wash my cone potholder in the machine?
Yes, cone potholders made from cotton fabrics can be machine washed. Use a gentle cycle and air-dry for best results.
Q5: Is quilting necessary for this pattern?
Quilting is important because it secures the fabric layers and adds strength, but you can choose simple quilting lines if you prefer.
Q6: Can I resize the Cone Potholder Sewing – quilt pattern?
Absolutely. You can enlarge or reduce the triangle pieces to create larger or smaller cone potholders depending on your needs.
The Cone Potholder Sewing – quilt pattern is a perfect example of a project that combines creativity, functionality, and quilting skills. From choosing fabrics to quilting designs, every step offers a chance to personalize and enjoy the sewing process. Whether you make it for yourself, as a gift, or for selling, this cone-shaped potholder is practical, charming, and rewarding to create.
Now it’s your turn! Try making your own Cone Potholder Sewing – quilt pattern and see how much fun it can be. I would love to hear your opinions and suggestions—share your experience and let’s keep the creativity flowing.


