
Summer-Country-Star-Flower - Quilt Pattern
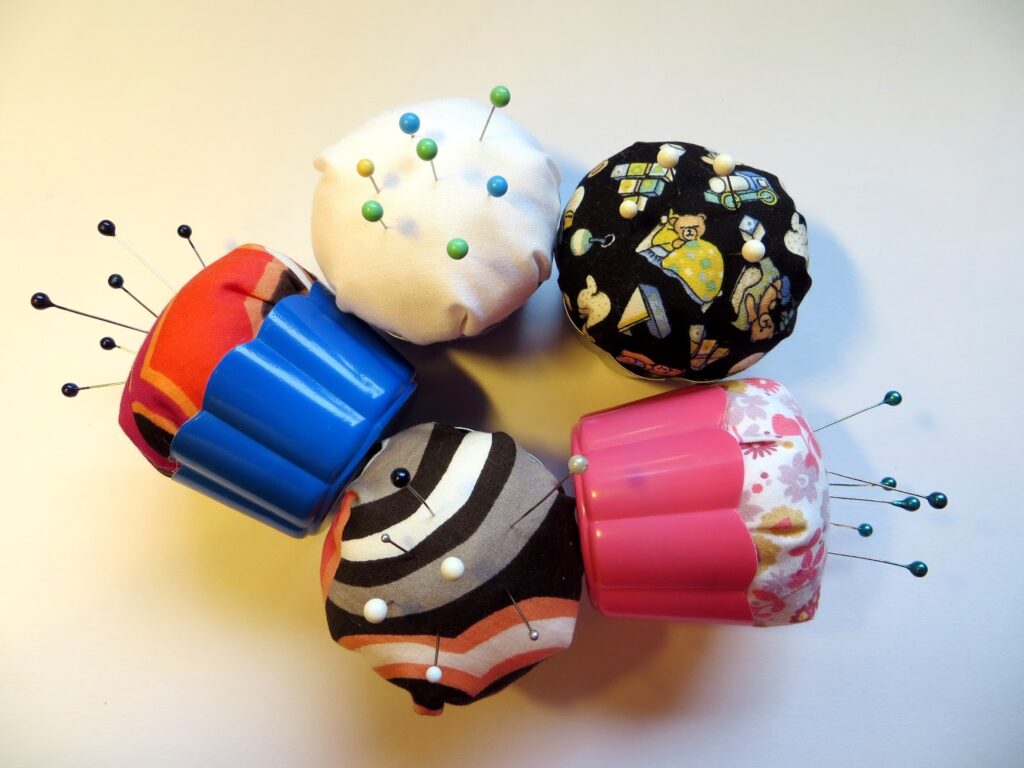
If you love sewing and quilting, then a Cupcake Pincushion DIY | Neulatyyny – Quilt Pattern is the perfect little project to brighten up your sewing room. Not only is it fun to make, but it is also practical, keeping your pins organized in a creative and delightful way. The best part about this project is that it is beginner-friendly, quick to finish, and a great way to use up fabric scraps from other quilting adventures.
The Cupcake Pincushion DIY | Neulatyyny – Quilt Pattern can be customized with endless fabric combinations, embellishments, and quilting details. Whether you prefer bold modern colors or soft pastel tones, this pincushion can be adapted to reflect your style. Handmade pincushions are not only useful tools, but they also make charming gifts for friends and family who share a love for sewing.
In this tutorial-style article, we will walk through the basics of making your own cupcake-shaped pincushion, explore fabric choices, discuss quilting techniques, and add personal touches that turn a simple sewing project into a decorative treasure. By following this guide, you’ll soon be able to create your very own Cupcake Pincushion DIY | Neulatyyny – Quilt Pattern with confidence.
To begin this creative journey, you will need just a few simple materials. The beauty of this project is that it makes excellent use of small scraps you may already have at home. Cotton fabric works beautifully for the base, while felt or textured fabric can add a nice touch to the “frosting” part of your cupcake pincushion.
A sturdy thread is important because pincushions are handled often. Using quilting cotton in fun prints is ideal for the base, while soft fabrics like fleece or felt work well for the top portion. You can also experiment with lace, buttons, and ribbons for decoration. The key is to mix textures that resemble a real cupcake while still providing durability for everyday use.
Before starting, cut your fabrics into small pieces that resemble a rounded cupcake base and a dome-shaped top. Precision is not critical since this is a whimsical project, but it helps to mark cutting lines with a washable fabric pen to ensure neatness.
For stuffing, polyester fiberfill works best because it keeps the shape light and fluffy. Some crafters also add a small pouch of ground walnut shells inside the pincushion for extra weight and to keep pins sharp. Decide which option suits your needs before you begin.
Organizing your materials beforehand will make sewing much smoother. Keep scissors, a rotary cutter, pins, and a sewing machine or needle close at hand. This way, you can enjoy the process without interruptions.
Finally, consider whether you want to hand-stitch or machine-stitch the pincushion. Hand-sewing can give a charming homemade look, while machine-stitching ensures sturdiness. Either choice works wonderfully for the Cupcake Pincushion DIY | Neulatyyny – Quilt Pattern.
Start with the cupcake base. Take your fabric rectangle and fold it into a cylinder shape, sewing the side seam together. This creates the classic cupcake liner effect. If you wish, you can quilt small vertical lines along the base to mimic the ridges of a cupcake wrapper.
Once the base is complete, move to the frosting section. Cut a circular or dome-shaped piece of fabric, slightly larger than the opening of your base. Use a running stitch around the edge, pull gently, and stuff with fiberfill until the dome is plump and fluffy.
Attach the frosting dome to the base by hand-stitching or machine-stitching carefully. Make sure the stitches are strong, as this area holds the stuffing securely inside. At this point, your pincushion will start looking like a real cupcake.
If you would like to quilt details onto the frosting, this is the perfect stage. Decorative stitching in swirls or zigzags can mimic icing designs. Embellish with beads or buttons to represent sprinkles or cherries on top.
Keep your stitches even and neat. This ensures not only durability but also a polished look. Taking your time at this stage transforms the pincushion from a simple project into a charming quilted keepsake.
When the top and bottom are securely joined, add finishing touches such as a ribbon bow around the base or a small felt circle at the bottom to cover seams. Congratulations—you now have your own Cupcake Pincushion DIY | Neulatyyny – Quilt Pattern creation!
One of the joys of this project is how customizable it is. You can make dozens of pincushions, each one unique and fun. By mixing fabrics, embellishments, and quilting designs, no two pincushions ever look the same.
Experiment with bold color contrasts. For instance, a dark chocolate brown base with pink frosting fabric creates a deliciously realistic look. Alternatively, pastel bases with white or cream tops resemble soft whipped icing.
Add small details that make your pincushion special. Lace trims can mimic frosting drips, while embroidered stitches can create a swirl effect on the top. You could even add a fabric strawberry or felt flower as a decorative topper.
Think about matching your pincushion to the décor of your sewing space. If your quilting corner has a theme, coordinate fabrics to fit in. This makes the pincushion both useful and visually pleasing.
Personalized pincushions also make excellent handmade gifts. Imagine gifting a sewing friend a small set of quilted cupcake pincushions, each one designed with their favorite colors and patterns. These thoughtful items are practical yet heartfelt.
Lastly, don’t be afraid to experiment. The Cupcake Pincushion DIY | Neulatyyny – Quilt Pattern allows endless creative freedom. Use every version to try something new and grow your sewing skills.
For beginners, this project is simple enough to complete in one sitting. It introduces important sewing skills such as cutting, stitching, and stuffing without overwhelming detail. The small size keeps it approachable, yet the finished result feels rewarding.
Quilters will especially love this project because it offers the opportunity to use up fabric scraps. Instead of letting leftover pieces go to waste, they can be transformed into adorable pincushions. It is a sustainable and eco-friendly way to reduce fabric waste.
Another benefit is that it requires very few tools. Unlike large quilt projects, this pincushion can be made with basic supplies, making it budget-friendly. You can also complete it with hand-sewing alone if you do not have access to a sewing machine.
The project also encourages creativity and play. Since it resembles a cupcake, the design possibilities are as wide as your imagination. Quilters can treat it like a mini art quilt, experimenting with stitches, colors, and textures.
Additionally, these pincushions are practical in everyday sewing. A sturdy and soft cushion keeps pins organized and prevents them from getting lost. Having multiple pincushions around your sewing area ensures pins are always within reach.
Most importantly, making a Cupcake Pincushion DIY | Neulatyyny – Quilt Pattern provides joy. The whimsical design and quick construction bring a sense of accomplishment, inspiring you to continue exploring new quilting and sewing projects.
What fabrics work best for a cupcake pincushion?
Cotton quilting fabric is perfect for the base, while felt or fleece is ideal for the top. Mixing textures gives the pincushion a realistic cupcake look.
Can I make this pincushion without a sewing machine?
Yes, absolutely. Hand-stitching works just as well and can even add extra charm to the finished piece.
How do I keep the pincushion stable and weighted?
You can add a small pouch of crushed walnut shells or rice inside before stuffing. This adds weight and helps the pincushion stay in place.
Are these pincushions good for gifting?
Yes, they make excellent handmade gifts for sewing enthusiasts. You can personalize them with colors, trims, or small embellishments.
How long does it take to make one pincushion?
Depending on your sewing speed, it can be completed in less than an hour, making it a quick and satisfying project.
Can I quilt designs onto the frosting part?
Definitely. Swirls, zigzags, or decorative stitches look beautiful and add a unique touch to each pincushion.
The Cupcake Pincushion DIY | Neulatyyny – Quilt Pattern is more than just a sewing accessory—it’s a creative expression of quilting and crafting. With a few scraps of fabric, some stuffing, and a little imagination, you can create a functional and decorative item that brightens up your sewing space.
This project is perfect for beginners and seasoned quilters alike, offering an opportunity to practice skills while producing something fun and practical. Whether you make one for yourself or as a thoughtful handmade gift, each pincushion will carry its own charm and personality.
I hope this article has inspired you to try making your own Cupcake Pincushion DIY | Neulatyyny – Quilt Pattern. If you do, I would love to hear your thoughts, suggestions, and experiences. Please share your opinion and let me know how your cupcake pincushion turned out!


