
Cross Door - Quilt Pattern
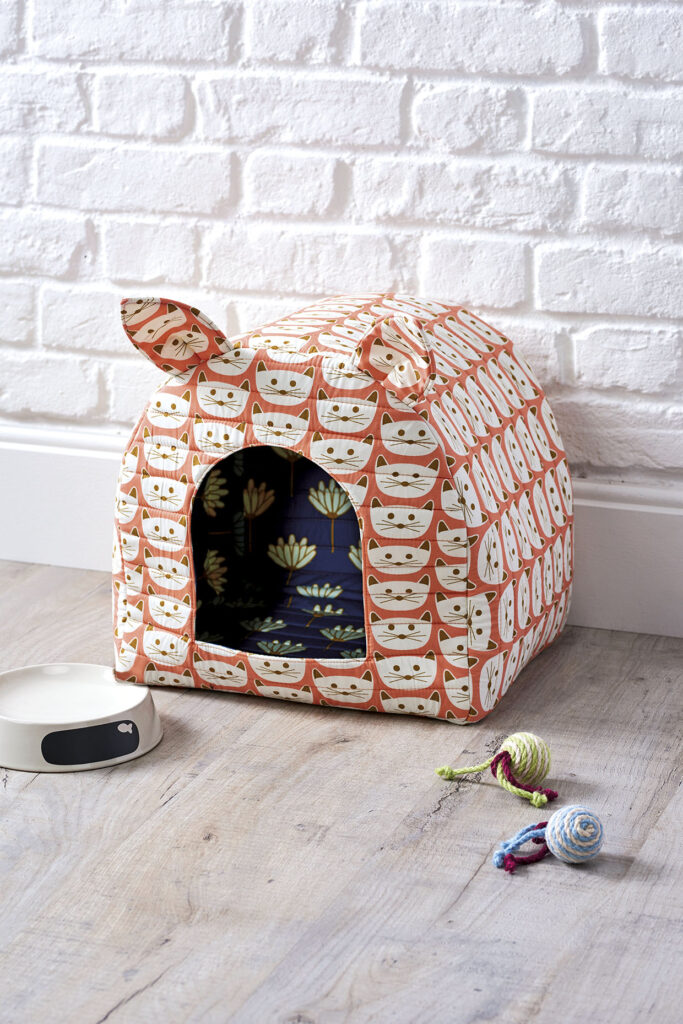
If you love quilting and also want to spoil your furry friend, this guide is perfect for you. DIY cat bed: how to make a cat bed step by step – Quilt Pattern is not only a fun project but also a rewarding one because it combines your creativity with your pet’s comfort. Cats adore cozy, padded spaces, and when you design one yourself, you ensure that it is not only stylish but also safe and comfortable. From fabric selection to quilting details, this tutorial gives you everything you need to make your own handmade cat bed.
The wonderful thing about crafting a DIY cat bed: how to make a cat bed step by step – Quilt Pattern is that it doesn’t require expensive materials. In fact, you can use leftover fabrics, batting scraps, or even repurpose old quilts. This project allows you to recycle while also making something practical for your cat. Plus, by choosing your fabrics, you can match the bed to your home décor, making it both useful and visually appealing.
In the following sections, we’ll cover materials, measurements, quilting techniques, and sewing instructions. With these steps, even a beginner quilter can confidently create a cat bed. By the end, your cat will have a handmade nest stitched with love. Let’s dive into this guide on DIY cat bed: how to make a cat bed step by step – Quilt Pattern and see how easily you can make one.
The very first step in creating your DIY cat bed: how to make a cat bed step by step – Quilt Pattern is selecting the right fabrics. Cats love soft, cozy, and durable materials. Cotton fabric works well because it is breathable and easy to wash. Fleece is another excellent choice since it provides warmth and softness.
When choosing batting, go for something that adds comfort but is still machine washable. Polyester batting is common and works well, but cotton batting adds a natural touch that some pet owners prefer. Since cats often knead their beds before lying down, durability is essential.
You’ll also need thread, a rotary cutter, scissors, sewing pins, and a sewing machine. Hand-sewing is possible, but using a machine makes the process quicker and more secure. Opt for high-quality thread so the seams stay strong over time.
Another key material to consider is the filling for the bed’s edges. You can use polyester fiberfill, memory foam pieces, or even fabric scraps. This provides structure and comfort. The sides should be padded enough so your cat feels secure.
Remember, safety comes first. Avoid beads, buttons, or anything that can detach easily. Cats may chew or swallow loose parts, so keeping the bed simple is best. Stick to fabrics and fillings only.
Finally, prepare all materials before starting. Having everything at hand makes sewing your DIY cat bed: how to make a cat bed step by step – Quilt Pattern smoother and more enjoyable.
Now that you have the right materials, it’s time to prepare the quilt pattern. A DIY cat bed: how to make a cat bed step by step – Quilt Pattern usually consists of a round or oval base with padded sides. The base should be wide enough for your cat to stretch but small enough to feel cozy.
Start by measuring your cat. A standard size is around 18–20 inches in diameter for the base. Larger cats may need more space. Once you decide on the size, cut two identical fabric circles for the top and bottom layers.
Next, cut batting to match the fabric base. This batting layer goes between the fabric layers, creating a quilted cushion effect. Pin the fabric and batting together securely before sewing. This prevents shifting during stitching.
For the sides, cut long strips of fabric. The height can be around 6–8 inches, depending on how snug you want the bed. You will also need batting strips for the sides. Quilting these strips before attaching them adds strength and style.
At this point, you can choose a quilting design. Simple straight-line quilting works well and keeps the batting in place. You can also experiment with decorative stitches for a unique touch.
Once everything is cut and layered, you’re ready to move on to assembling your DIY cat bed: how to make a cat bed step by step – Quilt Pattern.
With your fabric and batting prepared, it’s time to sew the base of your DIY cat bed: how to make a cat bed step by step – Quilt Pattern. Place the top fabric circle and bottom fabric circle right sides together, with the batting layered beneath. Sew around the edges, leaving a small opening to turn the piece inside out.
After turning it right side out, topstitch around the edge to close the opening and secure the batting. This creates a neat quilted cushion base. At this stage, you can add more quilting lines across the circle for extra durability.
Next, prepare the side strips. Sew the short ends of the fabric strip together to form a loop. Do the same for the batting strip. Place the batting inside the fabric strip and stitch them together so they act as one piece.
Now attach the side loop to the base. Pin carefully, aligning the edges. Sew slowly around the circle, making sure the side is securely attached to the base. This step requires patience, but it is essential for a sturdy finish.
Before closing the seam completely, insert the chosen filling (fiberfill or fabric scraps) into the side strip. Distribute it evenly so the bed has a cushioned wall. Then, finish sewing the side to the base.
Once done, you have the basic structure of your DIY cat bed: how to make a cat bed step by step – Quilt Pattern ready.
The fun part of making a DIY cat bed: how to make a cat bed step by step – Quilt Pattern is adding your personal touches. You can bind the edges with bias tape for a polished look. This also reinforces the seams and prevents fraying.
If you want a removable cushion, sew a separate quilted pillow to fit inside the base. This allows for easier cleaning since you can wash the cushion separately. Zippers or Velcro can be added to make the pillow cover removable.
You might also want to add handles for portability. Simple fabric loops sewn into the sides make it easy to move the bed around the house. Just ensure they are securely stitched so they don’t loosen.
Another option is to embroider your cat’s name onto the bed. This adds a personal and charming detail. Choose thread colors that contrast with your fabric so the name stands out.
Consider seasonal themes for your DIY cat bed: how to make a cat bed step by step – Quilt Pattern. For winter, use warm fabrics like fleece. For summer, lighter cotton fabrics keep your cat cool. This way, you can even make more than one bed for different seasons.
Finally, give the bed a test. Place it in your cat’s favorite spot and see how they react. Most cats will curl up immediately, enjoying the comfort of something handmade just for them.
1. What size should I make a quilted cat bed?
A standard size is around 18–20 inches in diameter, but measure your cat to ensure comfort. Larger cats may need a 22–24 inch base.
2. Can I wash a quilted DIY cat bed?
Yes, if you use machine-washable fabrics and batting. A removable cushion or cover makes cleaning much easier.
3. Do I need a sewing machine to make a cat bed?
A sewing machine is recommended for durability, but you can hand-sew if you are patient and use strong stitches.
4. What is the best filling for the sides of a cat bed?
Polyester fiberfill works well because it is lightweight and washable. Fabric scraps or foam pieces can also be used.
5. Can beginners make a quilted cat bed?
Yes! A DIY cat bed: how to make a cat bed step by step – Quilt Pattern is beginner-friendly. The steps are simple, and even those new to quilting can complete it successfully.
6. How can I make the cat bed more stylish?
Use colorful fabrics, add embroidery, or quilt in decorative patterns. You can also match the fabrics to your home décor for a cohesive look.
Creating a DIY cat bed: how to make a cat bed step by step – Quilt Pattern is a rewarding project that blends quilting skills with pet care. You’ve learned how to choose materials, cut and prepare the pattern, sew the base and sides, and finish with personalized touches. The result is a soft, durable, and stylish cat bed that your furry friend will love.
Now that you have the steps, it’s time to start your project and see your cat enjoy the comfort of a handmade quilted bed. I’d love to hear your thoughts—please share your opinion and suggestions about this tutorial. Your feedback helps improve future guides and inspires new creative projects.


