
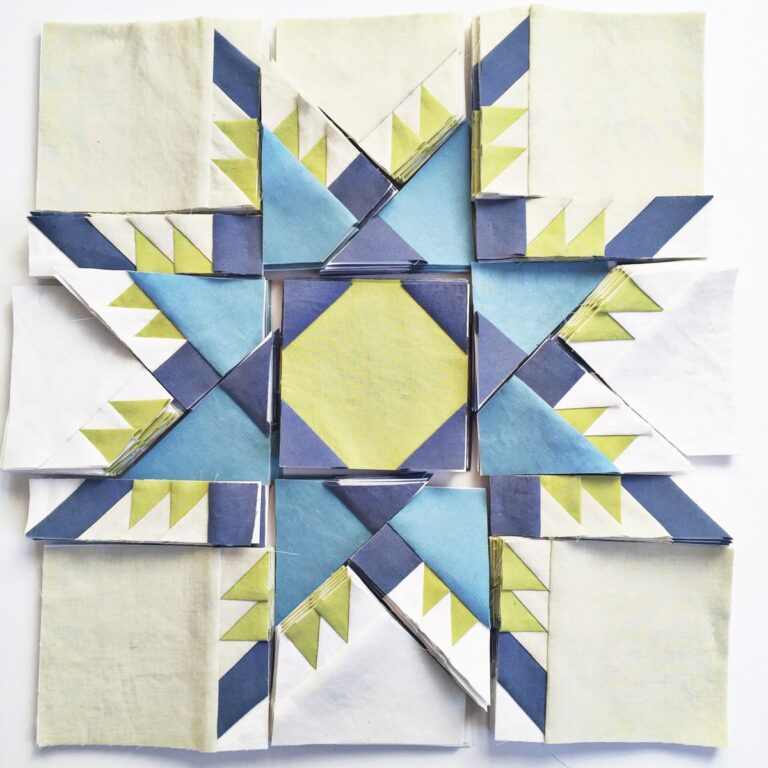
Summer-Country-Star-Flower - Quilt Pattern
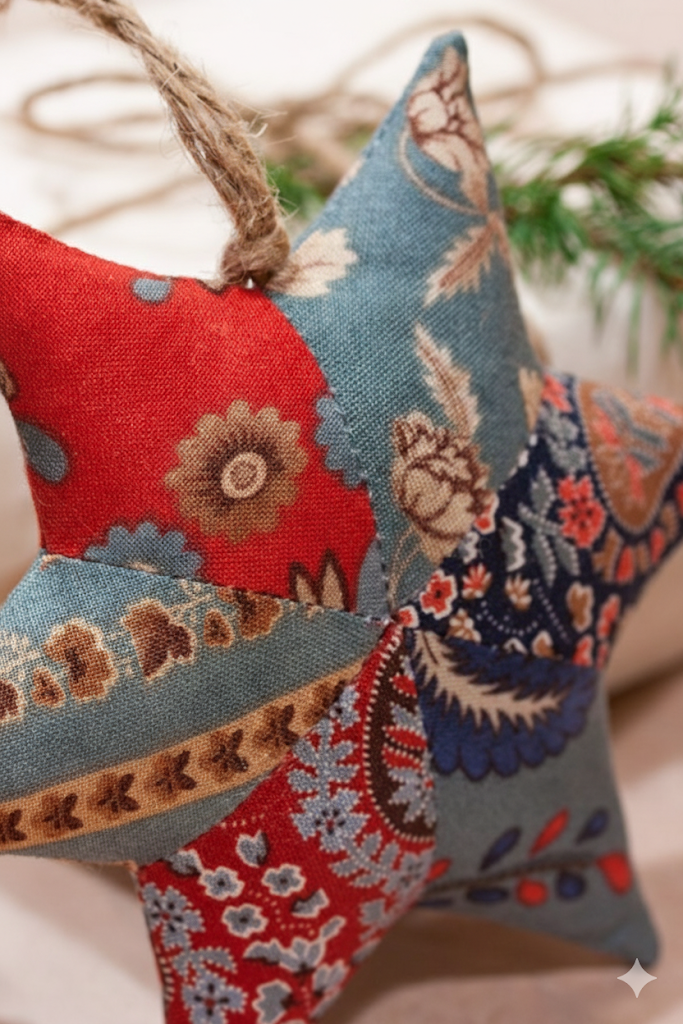
If you are looking for a charming holiday project, the DIY Christmas Patchwork Star Ornament Free Sewing Patterns – Quilt Pattern is the perfect idea. This festive craft combines the warmth of quilting with the magic of Christmas decorations, making it a delightful addition to your seasonal décor. Handmade ornaments not only add a personal touch to your tree but also carry sentimental value, reminding you of the joy of creating with your own hands.
The beauty of the DIY Christmas Patchwork Star Ornament Free Sewing Patterns – Quilt Pattern lies in its versatility. Whether you are an experienced quilter or just beginning your sewing journey, this project is simple enough to follow yet impressive enough to showcase your skills. With a variety of fabrics, you can personalize each star ornament to reflect your style, your family’s traditions, or even match the colors of your holiday theme.
In addition to being a festive decoration, these ornaments also make thoughtful handmade gifts. Imagine gifting a set of patchwork stars to friends, family, or colleagues—something they can cherish year after year. With free sewing patterns available, creating these stars is affordable and fun, giving you endless opportunities to experiment with fabrics, textures, and colors while enjoying the art of quilting.
When beginning your DIY Christmas Patchwork Star Ornament Free Sewing Patterns – Quilt Pattern, it is important to gather all the essential supplies. You will need small fabric scraps, basic sewing tools, thread, a sewing machine (or hand-stitching skills), batting for structure, and ribbon for hanging. Using what you already have at home makes this an eco-friendly and budget-friendly project.
One of the most enjoyable aspects of this project is selecting fabrics. You can mix holiday-themed prints such as snowflakes, holly leaves, and plaids, or opt for metallic fabrics that shimmer under Christmas lights. Patchwork allows you to combine different textures and patterns, making each star ornament unique.
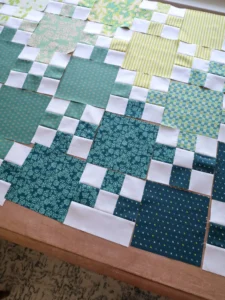
Before cutting your fabric, always press it with an iron. Smooth fabric pieces are easier to measure and cut, which ensures your quilted star comes together neatly. Accuracy in cutting is important in quilting because even slight differences can affect the final shape of the ornament.
The cutting process typically involves squares and triangles that will be pieced together to form the star shape. Free sewing patterns often provide templates to guide you through this stage. If you are new to patchwork, start with simple shapes before moving on to more intricate designs.
Once your fabric pieces are prepared, you can begin sewing them together. Always start with small sections and gradually build the star by connecting rows or clusters of shapes. Press the seams as you go, as this helps the pieces lay flat and improves the finished look.
At this stage, you should already see the shape of your star forming. The satisfaction of watching the ornament take shape is one of the highlights of working with a quilt pattern. It transforms small scraps of fabric into something festive, functional, and full of character.
The sewing stage is where your DIY Christmas Patchwork Star Ornament Free Sewing Patterns – Quilt Pattern comes to life. Consistency in your stitches will ensure the ornament is durable and long-lasting. You can use a sewing machine for quick assembly or stitch by hand if you prefer a more traditional and mindful approach.
When piecing the fabric sections together, use a quarter-inch seam allowance. This is the standard in quilting and helps keep your ornament aligned correctly. If seams are too wide or too narrow, the star shape may lose its symmetry.
Pressing is equally important after sewing each seam. Instead of ironing back and forth, press firmly and lift the iron to prevent distortion. This small habit makes a big difference in the final appearance of the ornament.
For additional stability, you can add a thin layer of batting or interfacing between fabric layers. This gives the ornament more body and ensures it holds its shape when hanging on the Christmas tree. Batting also adds a soft, quilted texture that enhances the overall handmade charm.
Topstitching is a decorative yet practical step. By stitching around the edges of your star, you not only secure the layers but also highlight the design. Using metallic or contrasting thread can give the ornament a festive touch.
Finally, don’t forget the finishing touches. Sew a small loop of ribbon at the top of the star so it can be hung easily. Some crafters like to embellish their stars with beads, sequins, or embroidery for extra sparkle. These personal touches make each ornament unique and memorable.
One of the joys of the DIY Christmas Patchwork Star Ornament Free Sewing Patterns – Quilt Pattern is that it allows for endless creativity. While the basic structure remains the same, you can explore different variations to suit your style.
For a rustic look, consider using earthy tones like browns, creams, and muted reds. Pairing these fabrics with twine instead of ribbon gives the ornament a farmhouse-inspired charm.
If you love bright and cheerful decorations, choose vibrant fabrics with whimsical Christmas motifs. Pair these with glittery ribbons or playful trims to create ornaments that pop on your tree.
Another variation is to make reversible ornaments. By selecting two different fabric designs for each side, you can enjoy a double-sided decoration. Simply flip them around whenever you want a new look.
You can also scale the patterns to create stars of different sizes. Large stars make striking tree toppers or wall hangings, while mini stars can be used as gift toppers or added to garlands.
Experiment with non-traditional fabrics such as felt, velvet, or silk for a luxurious effect. These textures can elevate your patchwork stars into elegant statement pieces.
Lastly, consider making themed sets. For example, create a collection of stars in classic red and green for a traditional Christmas, or try a modern palette of silver, gold, and white for a more contemporary holiday feel.
If you are new to quilting or sewing, the DIY Christmas Patchwork Star Ornament Free Sewing Patterns – Quilt Pattern is an excellent starting project. Here are some practical tips to make the process enjoyable and stress-free.
First, start small. Instead of making a dozen ornaments at once, focus on one star. This allows you to practice your cutting, stitching, and finishing techniques without feeling overwhelmed.
Second, take advantage of pre-cut fabric bundles available in craft stores. These are often color-coordinated and save time on cutting, making it easier to jump straight into sewing.
Third, chain piecing can be a time-saver. This involves sewing multiple pieces in a continuous chain without cutting the thread in between. It speeds up the process and keeps your work organized.
Fourth, if precision cutting feels challenging, use rotary cutters with a clear quilting ruler. These tools make it easier to achieve straight, accurate cuts that align perfectly when sewn together.
Fifth, always keep your sewing space tidy. A clutter-free area helps you stay focused and reduces mistakes caused by misplaced fabric pieces or tangled threads.
Finally, don’t stress over imperfections. Handmade ornaments carry character, and small quirks often make them more charming. The goal is to enjoy the creative journey while making something meaningful for the holiday season.
Q1: Can I make the patchwork star ornament without a sewing machine?
Yes, absolutely. You can hand-stitch the fabric pieces together using small, even stitches. While it takes more time, the result will still be beautiful and durable.
Q2: What type of fabric works best for these ornaments?
Cotton is the most commonly used fabric because it is easy to cut, sew, and press. However, you can also experiment with felt, velvet, or silk for different textures.
Q3: How do I ensure my star ornament keeps its shape?
Adding a thin layer of batting or interfacing between the fabric layers provides stability and helps the ornament hold its shape.
Q4: Can I wash the patchwork star ornaments?
It is not recommended to machine wash them, especially if they have embellishments. Instead, spot-clean gently with a damp cloth.
Q5: How long does it take to complete one ornament?
For beginners, it might take around one to two hours to complete one ornament. With practice, you can finish them much faster.
Q6: Are these ornaments suitable for gifting?
Yes, handmade patchwork stars make thoughtful, personal gifts. You can even package them in small gift boxes or tie them onto wrapped presents for an extra special touch.
The DIY Christmas Patchwork Star Ornament Free Sewing Patterns – Quilt Pattern is a joyful project that blends creativity, tradition, and holiday spirit. By using fabric scraps and simple sewing techniques, you can create ornaments that bring warmth and personality to your Christmas décor. Whether you make them for yourself, your family, or as gifts, these patchwork stars carry the magic of handmade love.
I hope this tutorial has inspired you to try making your own festive ornaments. If you do, I would love to hear your feedback and suggestions. Share your thoughts honestly—your input helps me create even more helpful and creative guides for sewing and quilting enthusiasts like you.


