
Summer-Country-Star-Flower - Quilt Pattern
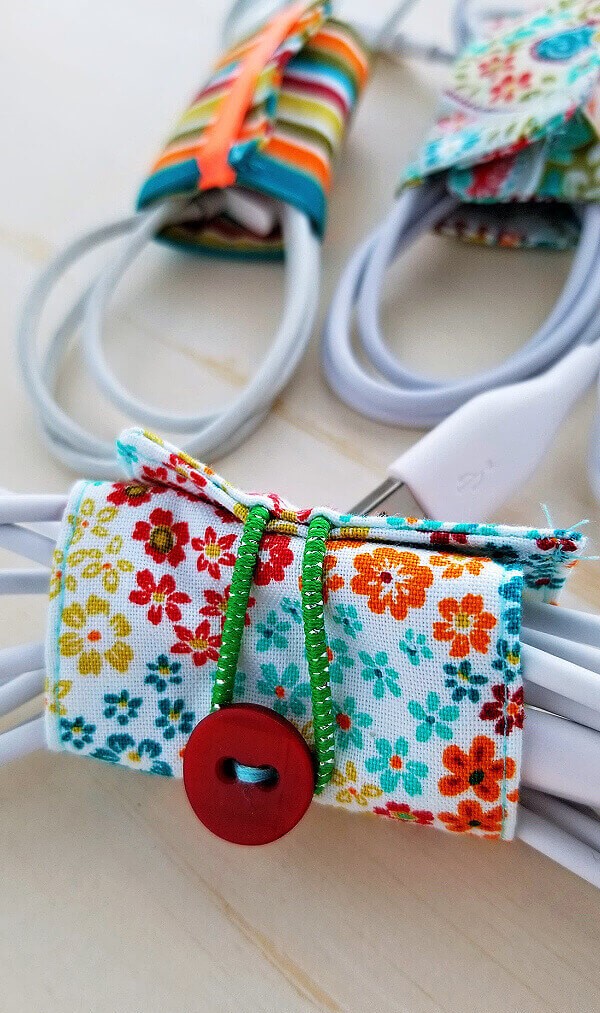
If you have ever wished for a simple and creative way to organize your cables, then this DIY Fabric Cord Holder Tutorial – Quilt Pattern will be the perfect solution. Not only does this project help keep your home or office tidy, but it also allows you to add a personal handmade touch to everyday items. With just a few scraps of fabric and basic sewing skills, you can make a practical and stylish cord holder that fits your needs.
The beauty of this tutorial is that it combines functionality with quilting, making it enjoyable for both beginners and experienced sewists. Quilting scraps are often left over from larger projects, and this is an ideal way to use them up while crafting something useful. The DIY Fabric Cord Holder Tutorial – Quilt Pattern is a beginner-friendly project that you can finish quickly and customize endlessly.
In addition to being functional, these little organizers also make excellent handmade gifts. Whether you need to store phone chargers, earphones, or even larger cords, you can adjust the size and fabric design to suit your preferences. By following this step-by-step DIY Fabric Cord Holder Tutorial – Quilt Pattern, you will not only learn how to create a simple item but also enjoy the relaxing process of quilting on a small scale.
To begin your DIY Fabric Cord Holder Tutorial – Quilt Pattern, it’s important to gather the right materials. You do not need anything fancy or expensive, and many of the supplies may already be in your sewing room. Using fabric scraps and small pieces of batting makes this project eco-friendly and budget-friendly.
Choose cotton quilting fabric for best results. This material is easy to sew and available in a wide range of colors and prints. Using coordinating fabrics allows you to create a professional look, while mixing patterns can result in a playful and fun accessory. Keep in mind that these holders are small, so bold prints and bright colors will stand out beautifully.
For the batting, any lightweight quilt batting works perfectly. It provides structure without making the cord holder bulky. If you want a sturdier finish, consider adding fusible interfacing instead. Both options will help your project maintain its shape while still being flexible enough to wrap around cords.
Other materials you will need include Velcro or snap fasteners to close the holder, matching thread, and basic sewing tools like scissors, pins, and a sewing machine. Velcro is an excellent choice because it is adjustable and easy to open and close. Snaps, on the other hand, give a cleaner look and are more secure for heavier cords.
Preparation is also important before you start sewing. Iron your fabric pieces to ensure smooth and crisp seams. Pre-cut your batting to match the fabric dimensions, and organize your sewing area so the process runs smoothly. By investing a little time in preparation, the sewing will feel more enjoyable and efficient.
Once everything is ready, you can begin cutting the fabric pieces. A good size for a cord holder is around 4 x 8 inches, but you can adjust the dimensions depending on the type of cords you want to organize. This is one of the best aspects of the DIY Fabric Cord Holder Tutorial – Quilt Pattern: it’s adaptable to your needs.
Now that you have prepared your fabric and supplies, it’s time to start sewing. The DIY Fabric Cord Holder Tutorial – Quilt Pattern follows straightforward steps that are beginner-friendly and do not require advanced techniques.
Begin by layering your fabric pieces and batting. Place the two fabric rectangles right sides together, with the batting on the bottom. Pin the layers securely to prevent shifting during sewing. This sandwich method is common in quilting and helps create a neat, professional finish.
Sew around the edges using a ¼-inch seam allowance, leaving a small gap for turning the piece right side out. Backstitch at the beginning and end to secure the stitches. Trim the corners diagonally to reduce bulk and help the holder turn neatly.
Carefully turn the piece right side out through the gap, and use a blunt tool like a chopstick to push out the corners. Press the holder flat with an iron for crisp edges. Then, topstitch around the entire rectangle, closing the gap in the process and adding a decorative touch.
Next, attach your closure. If using Velcro, cut two small pieces and stitch them securely to opposite ends of the holder. If you prefer snaps, follow the instructions that come with your snap tool to install them. Make sure the closure is aligned correctly so the holder wraps around cords easily.
At this point, your cord holder is nearly complete. Test it by wrapping it around a charger or earphones to see how it fits. If needed, you can adjust the size or placement of the closure. This flexibility is what makes the DIY Fabric Cord Holder Tutorial – Quilt Pattern so practical for everyday use.
To finish, add decorative stitching if desired. You can quilt diagonal lines, stitch-in-the-ditch, or even free-motion quilting to personalize your holder further. These extra touches not only add beauty but also strengthen the structure.
One of the most exciting parts of the DIY Fabric Cord Holder Tutorial – Quilt Pattern is the endless customization. You are not limited to a single style, which means each holder you create can look completely different.
Try using themed fabrics for special occasions. For example, holiday prints for Christmas, floral designs for spring, or geometric patterns for modern décor. Personalized fabric choices make your cord holders more unique and fun to gift.
You can also experiment with closure types. Instead of Velcro or snaps, consider adding a button with an elastic loop, which gives a charming handmade look. Magnetic snaps are another stylish option that makes the holder easy to open and close quickly.
Embellishments are another way to make your project stand out. Add embroidery, appliqué, or decorative ribbon to your fabric before sewing the holder together. These small details can transform a simple organizer into a piece of art.
If you want your cord holder to be multifunctional, adjust its size and shape. Larger versions can be used for laptop chargers, while smaller ones are perfect for earbuds. You can even sew a set of different sizes to keep all your cords neatly arranged.
Another creative idea is to add a label or pocket. A small fabric tag with a name or purpose (like “Phone” or “Tablet”) helps you identify cords quickly. A mini pocket can even store small accessories like USB adapters or memory cards.
By applying these creative touches, you can elevate a simple tutorial into a personalized project. The DIY Fabric Cord Holder Tutorial – Quilt Pattern not only solves an organizational problem but also allows for true artistic expression.
The practical benefits of making your own cord holders are numerous. With this DIY Fabric Cord Holder Tutorial – Quilt Pattern, you will gain a functional and beautiful tool that simplifies your daily routine.
First, it eliminates clutter. Loose cords can easily tangle and make your space look messy. A simple fabric holder keeps them neatly coiled and easy to find when you need them.
Second, it extends the life of your cords. Constant tangling and pulling can damage chargers and earphones over time. By keeping them properly wrapped, you reduce wear and tear.
Third, the portability is a major advantage. If you travel often or commute with electronic devices, having organized cords in your bag saves time and frustration. A small quilted cord holder ensures your essentials stay in place.
Fourth, it’s eco-friendly. By reusing fabric scraps and reducing the need for plastic or store-bought organizers, you are making a more sustainable choice. This makes the DIY Fabric Cord Holder Tutorial – Quilt Pattern not only practical but also environmentally conscious.
Fifth, it is cost-effective. Buying cord organizers can be surprisingly expensive, but with this tutorial, you can make as many as you need at little to no cost.
Finally, the project is fun. Sewing small items like this provides instant gratification and is a wonderful way to practice quilting techniques on a manageable scale.
Q: Do I need advanced sewing skills for this project?
A: No, this tutorial is beginner-friendly. Basic sewing skills are enough to complete the DIY Fabric Cord Holder Tutorial – Quilt Pattern successfully.
Q: Can I make the holder without batting?
A: Yes, you can. Batting adds structure, but if you want a lighter holder, you can skip it or use fusible interfacing instead.
Q: How do I choose the best closure for my cord holder?
A: Velcro is adjustable and easy to use, while snaps and buttons offer a cleaner look. Choose based on your preference and the type of cords you want to store.
Q: What size should I cut the fabric for the holder?
A: A common size is around 4 x 8 inches, but you can adjust dimensions to fit different cords, such as earbuds, chargers, or laptop cables.
Q: Can I wash my fabric cord holder?
A: Yes, since it’s made of quilting fabric, you can machine wash it. However, use gentle settings and avoid harsh detergents to preserve its shape and color.
Q: Are these holders good gift ideas?
A: Absolutely! Handmade cord holders are thoughtful, practical gifts that can be customized with personal fabric choices for friends and family.
The DIY Fabric Cord Holder Tutorial – Quilt Pattern is more than just a sewing project; it’s a creative solution for everyday organization. With simple materials and easy-to-follow steps, you can transform fabric scraps into practical items that add charm and function to your life. From preventing tangled cords to creating personalized gifts, this tutorial shows just how versatile quilting can be.
Now that you’ve learned how to make your own, I would love to hear your thoughts. Have you tried this project? Do you have unique ideas for customizing it? Please share your honest opinion and suggestions so that more creative sewists can be inspired.


