
Cross Door - Quilt Pattern
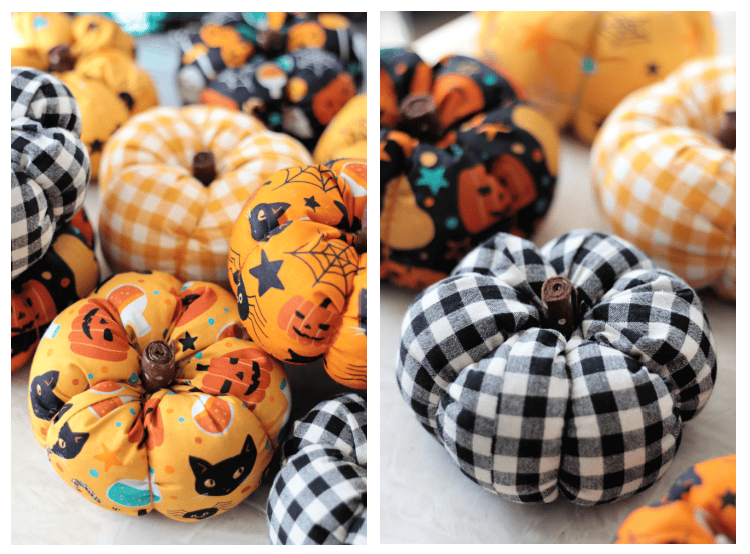
The Easy Fabric Pumpkins – Quilt Pattern is a delightful sewing and quilting project that brings charm and seasonal beauty into any home. Perfect for fall, Thanksgiving, or even Halloween décor, these fabric pumpkins are quick to make and endlessly customizable. Whether you are new to quilting or have years of experience, this project provides a fun way to use up fabric scraps while creating something festive and unique. Not only are these pumpkins adorable, but they also add a cozy, handmade touch to your seasonal decorations.
One of the greatest aspects of the Easy Fabric Pumpkins – Quilt Pattern is how simple the process can be. With just a few fabric pieces, some stuffing, and a bit of sewing, you can create pumpkins of various sizes, colors, and textures. From elegant neutral tones for a farmhouse-style table to bright oranges for a more traditional autumn look, the possibilities are endless. Because this project is so forgiving, it’s an excellent choice for beginners while still being enjoyable for experienced quilters who want a quick and creative project.
In addition to being fun and decorative, the Easy Fabric Pumpkins – Quilt Pattern is also practical in terms of skill-building. Making these pumpkins helps quilters practice piecing, quilting small sections, and sewing curved shapes. Each pumpkin becomes a unique piece of art that reflects your personality and fabric choices. They also make wonderful handmade gifts, offering a thoughtful alternative to store-bought seasonal décor. Now, let’s explore step-by-step how to create your very own fabric pumpkins.
When starting your Easy Fabric Pumpkins – Quilt Pattern, fabric selection sets the tone for your project. Quilting cotton is the most common choice since it’s versatile, comes in endless patterns, and is easy to work with. However, you can also use flannel for a cozy look, velvet for a more luxurious style, or linen for a rustic farmhouse vibe.
The color palette you choose will greatly influence the overall effect of your pumpkins. Traditional orange is always a safe and festive option, but don’t hesitate to explore neutrals like cream, beige, or gray for a modern look. Plaid fabrics also work wonderfully for fall-inspired designs, bringing warmth and texture into your home décor.
Stuffing is another important component of the project. Polyester fiberfill is lightweight and easy to shape, making it ideal for creating plump, round pumpkins. If you prefer a more natural filler, you could experiment with fabric scraps, cotton stuffing, or even dried beans for added weight.
You’ll also need a few basic sewing supplies such as thread that matches or contrasts your fabric, sharp scissors or a rotary cutter, a cutting mat, and sewing needles or a machine. For quilting, small amounts of batting can be used if you want a quilted effect on the pumpkin panels.
Finally, consider the stems and embellishments. Cinnamon sticks, twigs, or felt-covered stems are popular choices to finish off the pumpkins. You can also add ribbons, buttons, or hand-stitched details for extra personality.
Choosing the right fabrics and supplies not only enhances the look of your Easy Fabric Pumpkins – Quilt Pattern, but it also ensures that the project is enjoyable and easy to complete.
Once your materials are ready, the next step in the Easy Fabric Pumpkins – Quilt Pattern is cutting and sewing the pumpkin panels. This process forms the foundation of the project, so taking your time here will make assembly easier later on.
Begin by cutting fabric circles. The size of the circle determines the size of the pumpkin. Larger circles will result in bigger pumpkins, while smaller ones create adorable mini versions perfect for table decorations or tiered trays. Use a plate, bowl, or compass to trace your circles before cutting for accuracy.
Next, you’ll fold each circle in half, then into quarters, and cut wedge-shaped sections if you want a pieced quilt look. These wedges can be sewn back together using different fabrics for a patchwork pumpkin. If you prefer a solid fabric pumpkin, simply use the full circle without cutting wedges.
Once your pieces are cut, sew them together using a ¼-inch seam allowance. If making a patchwork pumpkin, alternate colors and prints to create variety. Press the seams flat to keep the fabric smooth and to reduce bulk.
After the circle is pieced, sew a running stitch around the outer edge of the fabric. This step will allow you to gather the fabric into a pumpkin shape later. Be sure to leave long thread tails so you can pull and secure the stitches.
At this point, you may add quilting if desired. Simple straight-line stitching or free-motion quilting on each panel adds texture and stability to the pumpkin, making it look more polished.
With your pumpkin panels complete, you are ready to move on to stuffing and shaping, which is where the pumpkin truly comes to life.
The most exciting part of the Easy Fabric Pumpkins – Quilt Pattern is stuffing and shaping your pumpkin to give it that charming, plump appearance. This stage transforms flat fabric circles into a three-dimensional seasonal decoration.
Begin by pulling the running stitch around the edge of your fabric circle to form a pouch. Once the circle gathers into a bowl shape, you can start filling it with stuffing. Add small amounts at a time, gently pressing down to ensure even distribution and a smooth, rounded look.
As you stuff, be mindful not to overfill, which can make it difficult to close the top. On the other hand, under-stuffing can leave the pumpkin limp and less defined. Aim for a balance that creates a firm yet soft pumpkin shape.
When the pumpkin is sufficiently filled, pull the thread tightly to close the top opening. Secure the thread with a few strong knots to keep the stuffing inside. You may need to stitch across the opening a few times for added security.
To create the iconic pumpkin ridges, thread a long needle with strong thread or embroidery floss and stitch from the top center to the bottom center, pulling tightly to form sections. Repeat this process several times around the pumpkin to create 5–8 ridges, depending on your preference.
This step adds character and makes the pumpkin look more realistic. It’s also an opportunity to play with contrasting thread colors for decorative stitching or keep it subtle with matching tones.
By the end of this step, your fabric pumpkin will have the perfect plump shape, complete with ridges that mimic the natural curves of real pumpkins.
The final step of the Easy Fabric Pumpkins – Quilt Pattern is adding stems and finishing touches, which elevate the project from simple fabric décor to a truly eye-catching centerpiece. Stems not only complete the pumpkin’s look but also provide a charming detail that enhances its handmade appeal.
For a rustic touch, natural twigs or small branches work perfectly as stems. Simply hot glue them to the center top of your pumpkin. If you want a more fragrant option, cinnamon sticks are a popular choice, giving the pumpkins a cozy fall scent in addition to their decorative charm.
Another creative option is to craft stems out of felt or fabric. Roll small strips of green or brown felt into tubes, stitch or glue them in place, and attach them securely to the pumpkin. This method allows for more consistency if you’re making multiple pumpkins of the same style.
You can also add leaves to your pumpkins for extra detail. Cut leaf shapes from green felt, fabric scraps, or even quilted pieces, then stitch or glue them next to the stem. Ribbon bows, lace, or raffia ties wrapped around the stem base are additional ways to enhance the design.
For those who enjoy embroidery, small stitched details like vines, swirls, or initials can personalize the pumpkin and make it extra special. This customization is particularly thoughtful if you plan to give the pumpkins as gifts.
By adding stems and embellishments, you bring personality and charm to the Easy Fabric Pumpkins – Quilt Pattern, ensuring each one is unique and ready to brighten your seasonal décor.
1. Are Easy Fabric Pumpkins suitable for beginner quilters?
Yes, the Easy Fabric Pumpkins – Quilt Pattern is beginner-friendly and requires only basic sewing skills. It’s a great project for learning new techniques without being overwhelming.
2. What fabric works best for making fabric pumpkins?
Quilting cotton is most commonly used, but flannel, velvet, and linen can also be used to create different textures and styles.
3. How can I make my pumpkins look fuller and more realistic?
Use quality stuffing, distribute it evenly, and stitch ridges around the pumpkin to create defined sections that mimic real pumpkins.
4. Do I need a sewing machine for this project?
A sewing machine makes the process faster, but these pumpkins can also be sewn by hand with patience and strong thread.
5. Can I make fabric pumpkins in different sizes?
Yes, simply adjust the size of the fabric circles to create pumpkins ranging from tiny minis to large statement pieces.
6. How long does it take to complete one pumpkin?
On average, each pumpkin can be completed in under an hour, making it a quick and satisfying quilting project.
The Easy Fabric Pumpkins – Quilt Pattern is a wonderful way to combine quilting and seasonal décor into a single project. From selecting fabrics and sewing panels to stuffing, shaping, and adding charming stems, each step allows for creativity and personalization. These fabric pumpkins are not only easy to make but also versatile, serving as table centerpieces, mantle décor, or thoughtful handmade gifts.
I hope this guide has inspired you to create your own pumpkins and enjoy the process of quilting something festive and fun. Please share your honest opinions and suggestions—I’d love to hear how your projects turn out and what creative touches you added.


