
Cross Door - Quilt Pattern
The EASY Grandmother’s Garden Quilt Tutorial is a beautiful and timeless project that has charmed quilters for generations. This classic design, featuring clusters of colorful hexagons sewn together in a floral pattern, is both nostalgic and elegant. Whether you’re an experienced quilter or a beginner eager to try something new, this guide will help you understand every step of the process, from fabric selection to final assembly. The beauty of the Grandmother’s Garden Quilt lies in its versatility — you can use vibrant modern fabrics or delicate vintage prints to create a piece that reflects your personal style.
One of the most appealing aspects of this pattern is that it can be made entirely by hand or with the help of a sewing machine. Many quilters love using the English Paper Piecing (EPP) method to create perfect hexagons that fit together beautifully. It’s a slow but relaxing process that allows you to enjoy every stitch. This EASY Grandmother’s Garden Quilt Tutorial will guide you through each stage with simple, step-by-step explanations, making it accessible even for beginners.
Before we begin, it’s worth appreciating the sentimental value of this quilt. The Grandmother’s Garden Quilt has a rich history in traditional quilting, often made from fabric scraps and cherished as family heirlooms. Each hexagon represents a piece of the maker’s life and creativity, making it a quilt full of heart and meaning. Now, let’s explore how to create your own version of this timeless beauty.
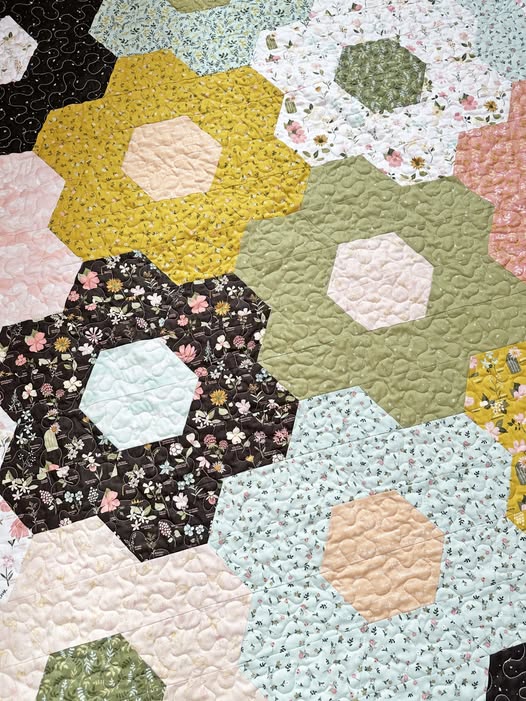
When starting your EASY Grandmother’s Garden Quilt Tutorial, selecting the right fabrics and materials sets the tone for your entire project. The quilt typically features a mix of vibrant floral prints, solids, and soft pastels. Choose cotton fabrics that are easy to sew and have a pleasant texture to work with. Many quilters prefer using fabric scraps to achieve a vintage charm and reduce waste, giving each hexagon its own story.
Next, you’ll need hexagon templates. These can be purchased pre-cut or made at home from cardstock or thin plastic. The most common size for beginners is a 1-inch side hexagon, but you can adjust this depending on the size of your desired quilt. Having consistent and accurate templates is essential to achieving neat results.
You’ll also need basic quilting tools such as sharp fabric scissors, a rotary cutter, cutting mat, sewing pins, a needle, and strong thread. If you plan to use the English Paper Piecing method, you’ll also need paper pieces to temporarily support your fabric while stitching. These can be removed once the quilt top is assembled.
When choosing your color palette, think about contrast and harmony. For a traditional look, select a mix of floral and pastel tones, while for a modern twist, opt for bold, bright fabrics with geometric designs. Arranging your hexagons before sewing helps you visualize how the final quilt will look and prevents color imbalance.
Batting and backing are the next steps to consider. Choose a lightweight cotton batting for a soft, drapable finish. For the backing fabric, pick something that complements your front design—many quilters choose a solid color or subtle print that enhances the main pattern.
Finally, ensure your fabrics are pre-washed and pressed before cutting. This prevents shrinking or color bleeding later on. Proper preparation makes your EASY Grandmother’s Garden Quilt Tutorial project smoother and ensures a professional finish that will last for years.
Now that your materials are ready, it’s time to start piecing together your Grandmother’s Garden Quilt. Begin by cutting fabric hexagons slightly larger than your paper templates—about ¼ inch bigger on all sides for seam allowance. Center the paper on the wrong side of the fabric and fold the edges over neatly, securing them with basting stitches or fabric glue.
Once you have a selection of basted hexagons, you can start assembling your flower motifs. Each flower typically has a center hexagon surrounded by six petals. Choose coordinating colors to make your design cohesive and visually appealing. Sew the hexagons together using a whipstitch or ladder stitch, carefully aligning edges for clean joins.
After completing several flowers, start joining them to form the garden pattern. Traditionally, quilters use a “path” color—often white, cream, or green—to separate the flowers. This gives the quilt a soft, cohesive appearance and highlights the floral design. Continue piecing until you reach your desired quilt size.
For beginners, this part of the EASY Grandmother’s Garden Quilt Tutorial can be time-consuming, but it’s incredibly rewarding. Take your time and enjoy the process. Each hexagon adds to the beauty and story of your quilt.
Once your quilt top is complete, remove the paper pieces carefully. Press the top lightly with an iron, making sure all seams lie flat. At this stage, you’ll begin to see your hard work come to life—a vibrant patchwork garden blooming right in front of you.
This method is wonderfully portable, too. You can take your hexagon pieces anywhere—on trips, to quilting circles, or while relaxing at home. The Grandmother’s Garden Quilt is as much about the journey as it is about the finished result.
With your quilt top complete, it’s time to layer and quilt. Lay your backing fabric right side down, followed by the batting and then your quilt top, right side up. Smooth out any wrinkles, then baste the layers together using safety pins or basting spray. This step keeps everything in place as you quilt.
Quilting can be done by hand or machine. Hand quilting gives a traditional and soft look, while machine quilting offers a faster and more precise finish. For this EASY Grandmother’s Garden Quilt Tutorial, a simple outline quilting method works beautifully—stitch around each flower or along the seams to enhance the floral shapes.
After quilting, it’s time to trim the edges neatly. Since the edges are typically hexagonal, you can either leave them as is for a charming vintage feel or trim them into straight lines for easier binding. If you prefer the traditional look, bind each edge carefully with bias binding that follows the hexagon shape.
When choosing binding fabric, consider using one of the colors from your flowers for a cohesive look. A hand-sewn binding gives a clean finish and adds to the handcrafted feel of your quilt. Take your time with this step—it’s the final touch that pulls everything together.
Once the binding is complete, give your quilt a gentle press with an iron. Admire the harmony of colors and textures. The Grandmother’s Garden Quilt is a piece of art and history combined, a tangible reflection of your creativity and patience.
Now your EASY Grandmother’s Garden Quilt Tutorial has brought you full circle—from choosing fabrics to finishing your masterpiece. It’s time to display it proudly or gift it to someone special.
While the Grandmother’s Garden Quilt is a timeless pattern, it also offers endless possibilities for customization. Modern quilters love to experiment with different fabric choices, color schemes, and layouts to make the design their own.
Try using solids instead of florals for a contemporary feel, or create a gradient effect using shades of one color. You can even alternate between light and dark petals for a striking contrast. The key is to let your creativity shine while maintaining the essence of the original pattern.
Some quilters modify the design by increasing the size of the hexagons, making the assembly quicker and the design more minimalist. Others choose to combine hexagons with other shapes, such as diamonds or triangles, to add complexity and depth.
You can also play with fabric textures. Mixing cotton with linen or adding embroidered details can make your EASY Grandmother’s Garden Quilt Tutorial truly unique. Hand-stitching decorative lines around each flower adds character and highlights your craftsmanship.
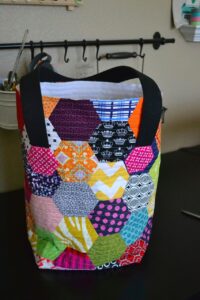
Another modern adaptation is using the quilt as wall art or a table topper instead of a bed quilt. Mini versions of the Grandmother’s Garden pattern make wonderful gifts or decorations, especially when framed or bordered with lace.
Ultimately, there are no strict rules—just inspiration. Whether you follow traditional methods or create a bold new variation, your quilt will be a reflection of your imagination and love for the craft.
1. What is the best fabric for a Grandmother’s Garden Quilt?
Cotton is the most popular choice because it’s durable, easy to sew, and soft. You can also use cotton blends or small-print fabrics to enhance the design.
2. How many hexagons do I need for a full-size quilt?
The number depends on your hexagon size and desired quilt dimensions. Typically, a full-size quilt requires several hundred hexagons, so plan accordingly.
3. Can beginners make this quilt?
Absolutely! This EASY Grandmother’s Garden Quilt Tutorial is perfect for beginners. Start small with a pillow cover or wall hanging to build your confidence.
4. What is English Paper Piecing (EPP)?
EPP is a hand-sewing technique where fabric is basted around paper templates to create precise shapes. It’s ideal for making the hexagons used in this quilt.
5. How long does it take to make a Grandmother’s Garden Quilt?
It depends on your pace and the quilt’s size. Some finish small projects in weeks, while larger quilts can take months.
6. Can I machine-sew the hexagons instead of hand stitching?
Yes, you can use a sewing machine, but hand stitching offers better control and maintains the traditional charm of the quilt.
The EASY Grandmother’s Garden Quilt Tutorial is more than just a sewing project—it’s a connection to history, creativity, and craftsmanship. Through careful selection of fabrics, patient stitching, and a touch of imagination, you can create a quilt that tells a story of beauty and tradition. Whether you’re making it for yourself or as a heartfelt gift, this pattern offers endless possibilities and timeless appeal.
Have you ever made a Grandmother’s Garden Quilt before? Share your experiences, tips, or color inspirations—I’d love to hear how your quilting journey unfolds!


