
Cross Door - Quilt Pattern
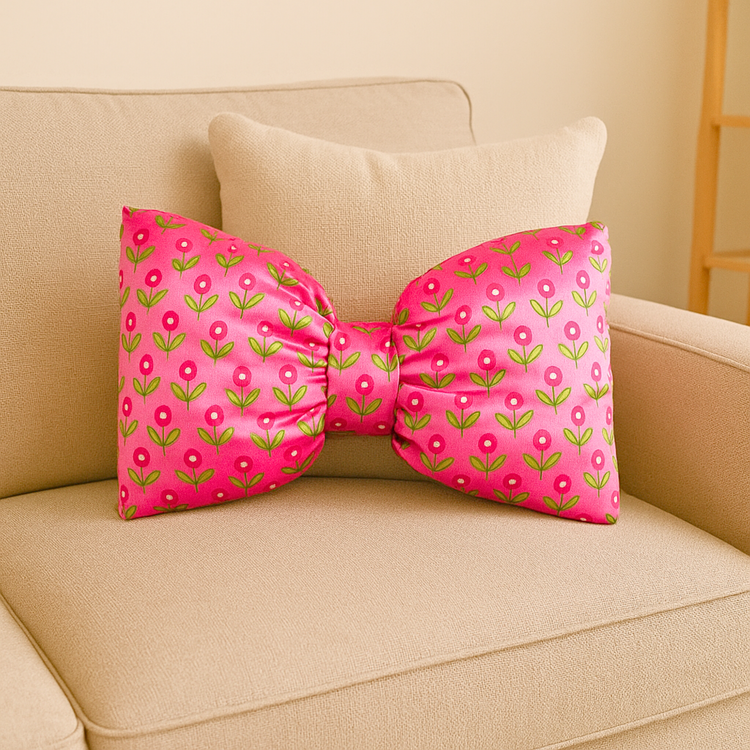
The Free Pillow Pattern: Bow Pillow – Quilt Pattern is a charming and creative sewing project that blends the artistry of quilting with the fun of crafting decorative pillows. Whether you are new to quilting or a seasoned maker, this project offers a delightful opportunity to add a playful yet elegant accent to your home décor. The bow pillow design stands out for its decorative knot-like centerpiece, making it both visually appealing and cozy to use. Plus, the fact that it’s based on a free pattern means you can start without investing in expensive instructions—just your fabric, basic sewing supplies, and a bit of time.
One of the most attractive qualities of the Free Pillow Pattern: Bow Pillow – Quilt Pattern is its versatility. It can be adapted to any color scheme or fabric style, from soft pastels for a nursery to bold, modern prints for a statement piece in your living room. The quilting element adds texture and durability, making the pillow more than just a pretty decoration—it’s built to last. You can make it as a single decorative piece or create a matching set to tie a room together, making it a great weekend project for both personal enjoyment and gift-giving.
In this guide, we’ll walk through everything you need to know to create your own Free Pillow Pattern: Bow Pillow – Quilt Pattern, from fabric selection and cutting to quilting, assembling, and finishing. Along the way, we’ll cover helpful tips to make your project look polished and professional, even if you’re just starting out. By the end, you’ll have the confidence to create a bow pillow that reflects your personal style and adds a handmade charm to your space.
The first step in making a Free Pillow Pattern: Bow Pillow – Quilt Pattern is selecting the perfect fabrics. Because this pillow has both a quilted base and a bow detail, you’ll want to choose materials that complement each other while also serving their practical purposes.
Quilting cotton is a popular choice for the main pillow body. It’s durable, easy to work with, and comes in countless colors and prints. For the bow, you might want a slightly different texture—something like cotton sateen for a bit of sheen, linen for a rustic feel, or even velvet for a luxurious touch.
It’s important to select fabrics that not only look beautiful but also feel comfortable to the touch. After all, this pillow might be used for lounging as well as decoration. Wash and press your fabrics before cutting to ensure they don’t shrink or warp after the pillow is assembled.
You can use solid colors for a clean, modern look or mix prints for a more whimsical design. Just make sure the fabrics have enough contrast so that the bow stands out against the pillow body.
Choosing the right batting for the quilting is also crucial. A lightweight cotton batting is ideal for this project—it adds just enough softness without making the pillow bulky.
Finally, make sure your thread matches your fabric or contrasts intentionally for a decorative effect. The right materials set the stage for a project that’s both visually appealing and built to last.
Once your fabrics are chosen, it’s time to prepare them for the Free Pillow Pattern: Bow Pillow – Quilt Pattern. Accurate cutting is essential for a clean and professional-looking result, so take your time with this step.
Cut the front and back pillow panels according to the size you want. For a standard throw pillow, a size of 16 inches by 16 inches works well, but you can adjust it to your preference. Don’t forget to cut extra fabric for the bow piece, as it will be wrapped and secured around the pillow later.
Layer the front panel with batting and a backing fabric for quilting. Baste the layers together with pins or temporary spray adhesive to prevent shifting during quilting. This step will make the process smoother and more precise.
When it comes to quilting, you can choose from a variety of patterns—straight-line quilting for a simple, modern look or free-motion quilting for more decorative designs. The quilting not only adds texture but also reinforces the fabric layers, making the pillow more durable.
After quilting, trim the edges of the panel to square it up. This ensures that the pieces will fit together evenly during assembly.
With both panels cut and prepared, you’re now ready to move on to constructing the bow and attaching it to the quilted pillow body.
The bow is the defining feature of the Free Pillow Pattern: Bow Pillow – Quilt Pattern, giving it its signature charm. Making the bow is surprisingly simple, yet it has a big visual impact.
Start by cutting a strip of fabric for the bow that’s long enough to wrap around the pillow and wide enough to gather in the center. Fold it in half lengthwise, right sides together, and sew along the long edge to form a tube. Turn it right side out and press it flat.
To create the bow’s center knot, cut a smaller strip of fabric, fold it lengthwise, and sew along the edge to create another tube. Turn this piece right side out and press it as well.
Wrap the larger fabric tube around the quilted pillow front, positioning it so the seam is hidden on the back. Place the smaller tube over the center of the bow to cinch it, adjusting the gathers for a balanced, full look.
Pin the bow securely in place before stitching it along the edges of the pillow panel. This ensures that the bow won’t shift or loosen over time.
Once the bow is attached, the front panel is ready for assembly with the back panel, creating the final pillow shape.
With the bow in place, the final stage of the Free Pillow Pattern: Bow Pillow – Quilt Pattern is assembling the pillow. This step brings all your hard work together into a finished, functional piece.
Place the quilted front panel and back panel right sides together, pinning around the edges. If you want a removable cover, insert a zipper along one edge or use an envelope-style back. For a permanent pillow, leave a small opening to insert the pillow form before closing.
Sew around the edges with a ¼-inch seam allowance, reinforcing the corners for durability. Clip the corners to reduce bulk, then turn the pillow cover right side out.
Insert the pillow form or stuffing, making sure it’s evenly distributed. If you’ve left an opening, hand-stitch it closed with an invisible ladder stitch.
Give the finished pillow a final press, taking care not to flatten the bow too much. This helps set the seams and ensures the pillow holds its shape.
Your bow pillow is now complete—a beautiful blend of quilting craftsmanship and decorative design that’s ready to brighten up any room.
1. Is the bow pillow difficult for beginners?
No, the Free Pillow Pattern: Bow Pillow – Quilt Pattern is suitable for beginners, especially with clear step-by-step guidance.
2. What size should the pillow be?
A standard 16″ x 16″ size works well, but you can adjust the dimensions to fit your needs.
3. Can I use different fabrics for the bow and pillow body?
Yes, mixing fabrics adds contrast and makes the bow stand out.
4. Do I have to quilt the pillow panels?
Quilting adds durability and texture, but you can skip it for a simpler version.
5. How do I wash the pillow?
If the pillow is removable, machine wash the cover in cold water. For non-removable pillows, spot cleaning is best.
6. Can I make a set of bow pillows?
Absolutely—making matching or coordinating pillows is a great way to style a room.
The Free Pillow Pattern: Bow Pillow – Quilt Pattern is a delightful sewing project that combines functionality with decorative flair. From selecting fabrics and quilting panels to crafting the bow and finishing the pillow, each step allows you to express your creativity while making something practical and beautiful. Whether you keep it for yourself or gift it to someone special, this handmade pillow will always stand out for its charm and craftsmanship.
I hope this guide has inspired you to try your own version—please share your honest opinions and suggestions so we can continue to inspire each other in our creative journeys.


