
Cross Door - Quilt Pattern
The Friendship Star Quilt Block Tutorial – Quilt Pattern is one of the most loved designs in the quilting world. Its charm comes from its simplicity and the deeper symbolism it carries. For centuries, quilters have used this pattern to celebrate companionship, kindness, and the joy of shared creativity. With its gentle star design, the block not only adds beauty to quilts but also tells a story of unity and warmth.
This Friendship Star Quilt Block Tutorial – Quilt Pattern will guide you through the steps of creating this timeless block. Whether you are a beginner just stepping into the world of quilting or an experienced maker seeking a refreshing project, the Friendship Star block is an excellent choice. It is versatile enough to be used in large quilts, table runners, or even as a single decorative piece.
In this article, we will break down the process into manageable steps, provide helpful tips, and highlight how you can adapt this block to suit your personal style. By the end of this Friendship Star Quilt Block Tutorial – Quilt Pattern, you will feel confident in creating your own version of this classic design and inspired to bring it into your quilting projects.
The Friendship Star Quilt Block Tutorial – Quilt Pattern is built on a simple nine-patch layout, making it approachable for quilters at all levels. The star effect is created by carefully arranging half-square triangles around a central square, producing the iconic spinning motion that represents friendship and connection.
This block became popular during the 19th century when quilting bees were a common way for women to gather, work together, and form strong community bonds. The design came to symbolize unity, companionship, and support, which is why many quilters still cherish it today.
One of the reasons the Friendship Star Quilt Block Tutorial – Quilt Pattern is so widely used is its adaptability. By changing fabric choices, colors, or the block’s scale, quilters can achieve dramatically different looks while maintaining the star’s essence.
Beginners love this block because it teaches fundamental skills like piecing half-square triangles, aligning seams, and achieving sharp points. These techniques are essential for progressing in quilting, so practicing with this block is both fun and educational.
Another strength of this block lies in its ability to shine on its own or become part of a larger quilt design. Multiple blocks arranged together create a mesmerizing quilt top, while a single star can serve as a striking motif in smaller projects.
Above all, the Friendship Star Quilt Block Tutorial – Quilt Pattern carries meaning beyond stitches and fabric. When you gift a quilt with this block, you are sharing a message of warmth and connection with the recipient.
To follow the Friendship Star Quilt Block Tutorial – Quilt Pattern, you only need a handful of essential quilting tools and fabrics. These materials are often already in the supply stash of most quilters, which makes this project even more approachable.
Start with fabric in at least two contrasting colors. Traditionally, quilters use a light background with a darker star fabric, but you can experiment with modern prints, solids, or even scrappy pieces. The contrast is what helps the star stand out beautifully.
You will also need a cutting tool, preferably a rotary cutter, along with a self-healing cutting mat and quilting ruler. These tools allow for precise cutting, which is crucial when working with half-square triangles to ensure accuracy in your block.
A sewing machine is recommended for piecing, though you could sew by hand if you prefer traditional methods. Make sure your machine is threaded with high-quality cotton thread that matches or blends well with your fabric colors.
Don’t forget about pressing tools. An iron and ironing board are essential to press seams flat, helping the block look sharp and professional. Finger pressing works for some steps, but a proper iron will give you the best finish.
Finally, gather pins or clips to hold your fabric pieces in place as you sew. This extra step ensures accuracy and keeps seams aligned neatly throughout the process. With these tools, you’re ready to dive into the Friendship Star Quilt Block Tutorial – Quilt Pattern.
The Friendship Star Quilt Block Tutorial – Quilt Pattern follows a clear sequence of steps that makes it beginner-friendly. Once you understand the structure, the block comes together smoothly and quickly.
Begin by cutting your fabrics into squares. You’ll need one center square, four half-square triangles, and four background squares. Keeping your measurements precise at this stage will make assembly easier later on.
Next, create the half-square triangles (HSTs). Pair your star fabric with your background fabric squares, draw a diagonal line, sew on either side of the line, and cut along it. Press the seams, and you will have the triangles needed for your star design.
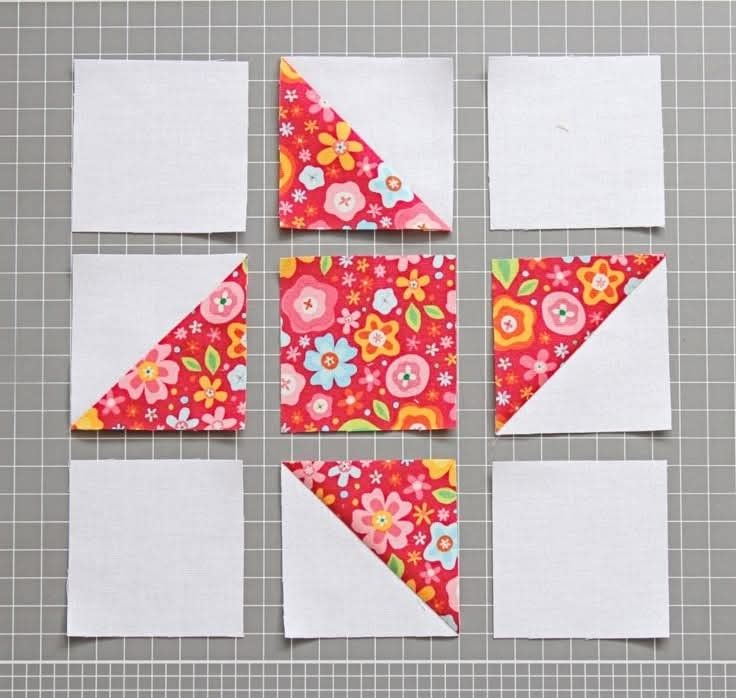
Now it’s time to lay out the block. Place the center square in the middle, surround it with the background squares at the corners, and position the half-square triangles so they form the points of the star. This layout step is important for visualizing the final design.
With the pieces arranged, begin sewing the rows together. Sew each row horizontally first, then press the seams. After that, join the rows vertically, making sure seams align where the triangles meet for sharp, crisp points.
Once the block is fully pieced, press everything flat one final time. At this point, you will see the iconic star shape clearly formed. You can trim the block to ensure it matches your desired size for quilting projects.
This Friendship Star Quilt Block Tutorial – Quilt Pattern shows that even a simple nine-patch design can transform into something meaningful and beautiful with the right technique and attention to detail.
The Friendship Star Quilt Block Tutorial – Quilt Pattern opens up endless creative possibilities. While it looks stunning in a traditional quilt, there are many ways you can incorporate this design into your projects.
One popular option is to create an entire quilt top using only Friendship Star blocks. When arranged together, the stars seem to dance across the fabric, creating a dynamic and engaging pattern.
Another idea is to use the block in table runners or wall hangings. A row of stars can brighten up a dining area or add warmth to a hallway wall. This makes the pattern versatile for both large and small projects.
Scrappy versions are also very appealing. By using leftover fabric pieces from other projects, you can create a colorful, patchwork-style star quilt that carries memories of past creations. This is a great way to personalize the design.
For those who love modern quilting, consider enlarging the block and placing it in the center of a quilt. Surrounded by negative space, the star becomes a bold focal point that combines traditional and modern styles beautifully.
Lastly, the Friendship Star Quilt Block Tutorial – Quilt Pattern can be adapted into gifts. From pillows to tote bags, incorporating this block into handmade items allows you to share its symbolism of friendship with loved ones.
What size is the Friendship Star quilt block?
The size can vary, but common versions are 6-inch, 9-inch, or 12-inch finished blocks. You can adjust the square measurements to achieve your desired block size.
Is the Friendship Star block good for beginners?
Yes. This block is one of the most beginner-friendly designs. It introduces quilters to essential skills like half-square triangles and seam alignment.
What fabric works best for the Friendship Star?
High-contrast fabrics work best. Choose a lighter background and a darker star fabric, or experiment with prints and solids for more creativity.
Can I make a scrappy Friendship Star quilt?
Absolutely. Scrappy versions are popular and add charm. Using fabric remnants creates a unique quilt with lots of personality.
How do I keep the star points sharp?
Accuracy in cutting and sewing is key. Pressing seams carefully and aligning points when joining rows ensures crisp star points.
What projects can I make with this block besides quilts?
You can use the Friendship Star block in table runners, pillows, tote bags, or wall hangings. It adapts well to both small and large creations.
The Friendship Star Quilt Block Tutorial – Quilt Pattern is more than just a sewing project; it’s a symbol of unity, warmth, and creativity. With its simple structure and timeless appeal, this block remains a favorite for quilters of all levels. From learning basic skills to designing meaningful gifts, the Friendship Star offers endless opportunities to explore your creativity.
Now that you’ve learned the steps and discovered creative ways to use this block, it’s your turn to try it out. I’d love to hear your thoughts—share your opinion about this tutorial and suggest new quilting ideas you’d like to see in the future. Your feedback helps keep this quilting journey full of inspiration and creativity.


